• Cart
  • Checkout
  • My Account

Infrared Conversions, IR Modifications & Photography Tutorials | Life Pixel IR

The world leader in infrared conversions, modifications & DIY IR conversion tutorials. Scratched sensor replacement, UV & Full spectrum conversions.

The world leader in infrared camera conversions

866.610.1710
  • Home
  • → Start Here ←
    • 1 – Introduction
    • 2 – Filter Choices
    • 3 – Focus Calibration
    • 4 – Lens Considerations
    • 5 – Camera Considerations
    • 6 – Start Shopping
  • Galleries
    • Infrared Photography
    • Infrared Time Lapse
    • Infrared Cinematography
    • Infrared Stop Motion
    • Ultraviolet Photography
    • Forensic Photography
  • Education
    • Training Sessions
    • How To Shoot Infrared
    • AR Coated Infrared Filters
    • Lens Hot Spot Database
    • Photoshop Video Tutorials
    • Infrared Issues & Solutions
    • IR Basics in Photoshop
    • Camera Quick Start Guide
    • DIY Conversion Tutorials
    • IR Photography Primer
    • Secondhand Cameras
    • Wall Of Shame
  • Workshops
  • FAQ
  • Blog
    • Tutorials
    • Inspiration
    • Locations
    • Gear
    • News
    • Other
  • Why Choose LifePixel?
    • Submit Your Review
  • Contact
  • Shop

Mastering the Graduated Filter in Adobe Lightroom

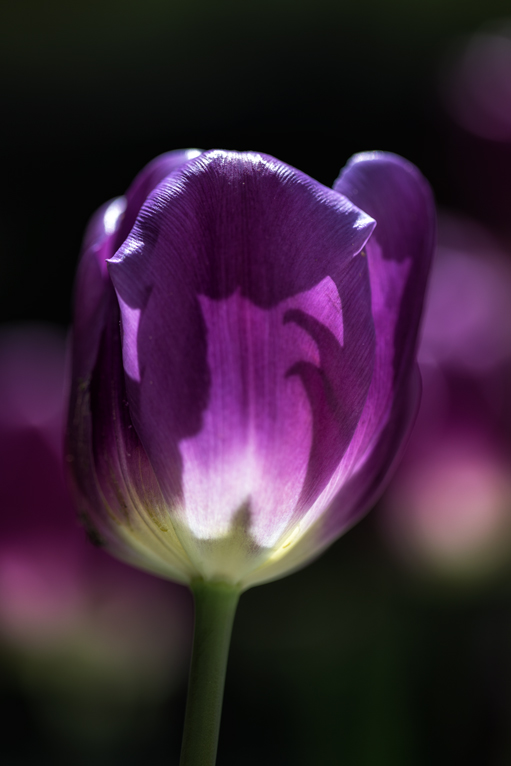
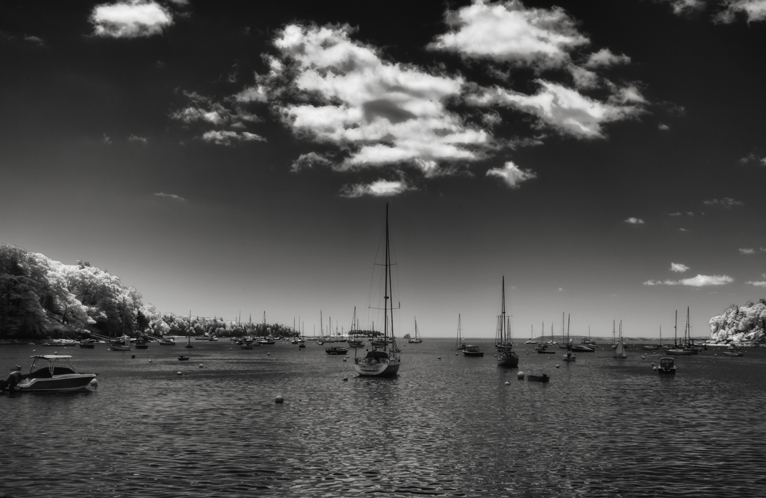
Graduated neutral density filters, or GND’s, have been a mainstay in the gear bags of landscape and nature photographers for years. The filter consists a piece of glass which is stained to darken only one half. The purpose of this is to give the photographer a tool to control extreme differences in exposure latitudes. Frequently, this these types of photographic conundrums generally occur when foreground and background elements require significantly different exposures while shooting landscapes where bright skies contrast with shadowed foregrounds. With the advent of digital imaging, post processing software has advanced so to the point where we can now replicate the effects(or at least come close)of many of the tools and techniques found in conventional photography techniques. And while the general concept of GND’s bleeds over from non-digital manipulation we have a great substitute available in Adobe Lightroom.

Understanding the Graduated Filter In Adobe Lightroom

The Graduated Filter(GF) in Lightroom is a digital amalgamation of the tried and true GND filter. Sure, it allows us to correct exposure selectively but it also goes much, much further than that. We can now add virtually any edit available in Lightroom more surgically with the GF. This includes not only exposure but also, contrast, temperature, and clarity…just to name a few of the big ones. In this tutorial, you will learn just how easy it is to put the power of the GF filter to work for your images in Adobe Lightroom.

Let’s get started with a RAW file displaying a basic happening encountered by most landscape shooters when a physical GND is not available.

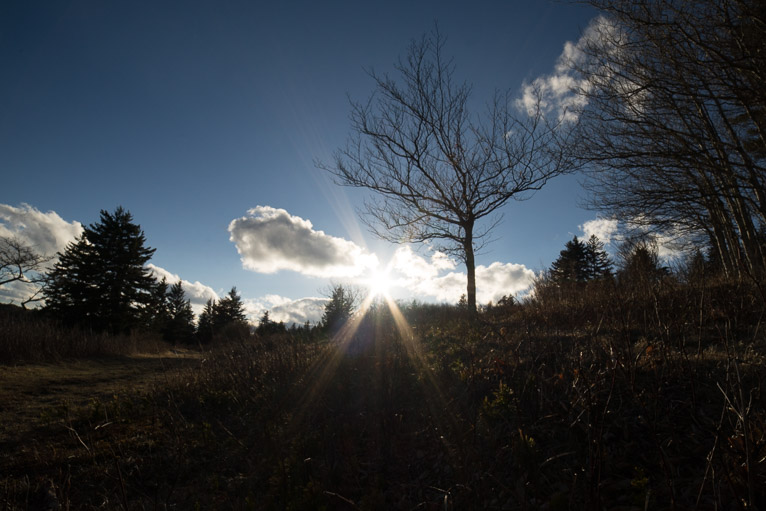
Note the nearly complete lack of detail in the foreground.

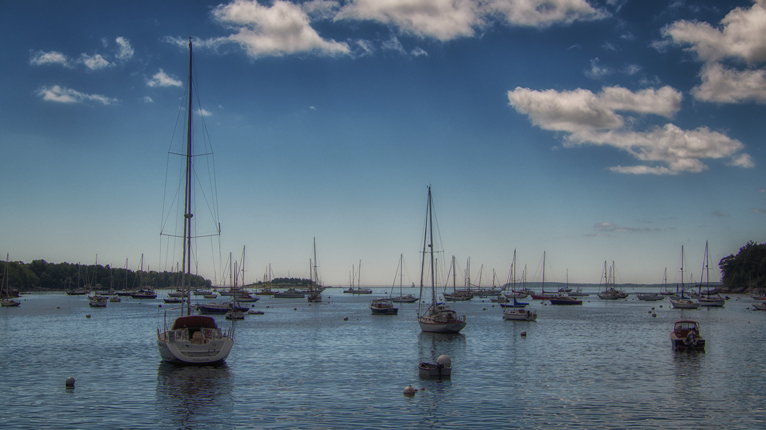
In order to keep the clouds and sky from being blown out and overexposed the foreground has therefore been unavoidably underexposed. To solve the problem we will use the GF in Lightroom. When using this tool, we will be able to correct or at the very least improve the exposure range between the bright sky and the underexposed foreground. Along the way we will also add in a few more useful edits that we would not have been able to utilize if we were using the traditional GND. We will venture further. Go beyond. And all that….

Applying the Graduated Filter

Not only is the GF a great tool to help you gain control of your image but it will also allow you to make use of the other editing tools in Lightroom. To start, we begin in the Develop panel and click the GF icon. You can also use the keyboard shortcut “M” for both Windows and Mac.


Right now, all we want to do is to adjust the foreground only. To do this, beginning at the bottom of the image left click and drag the cursor upward to apply the GF filter. Don’t worry, the position of the filter is completely adjustable after the fact. To see exactly where the filter will be applying the edits, either hover over the filter pin(the dot in the center of the filter) or check the box at the bottom of the window labeled “show selected mask overlay”. The color of the mask is adjustable by using the shortcut key “shift+o”.

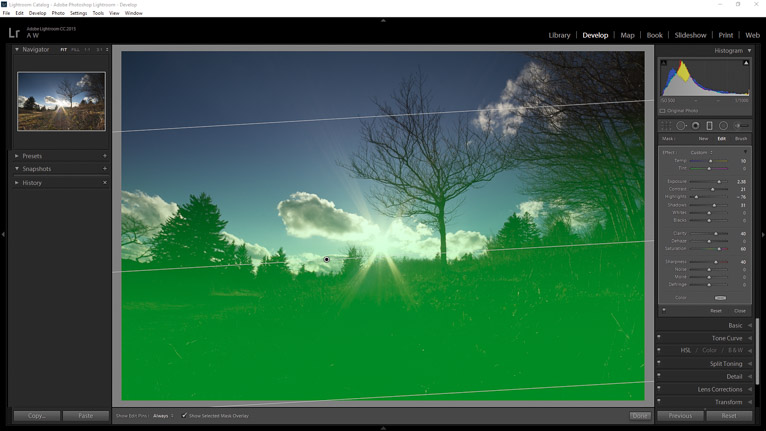
Once the filter was applied and positioned all my edits can be applied to only the areas covered with green. Note the adjustments include changes to clarity, saturation, contrast, sharpness, as well as a host of other slider changes which demonstrate just how versatile the capabilities of the GF truly are.

Let’s switch our focus next to the sky. To do this, we apply another GF by clicking “new” in the GF panel.

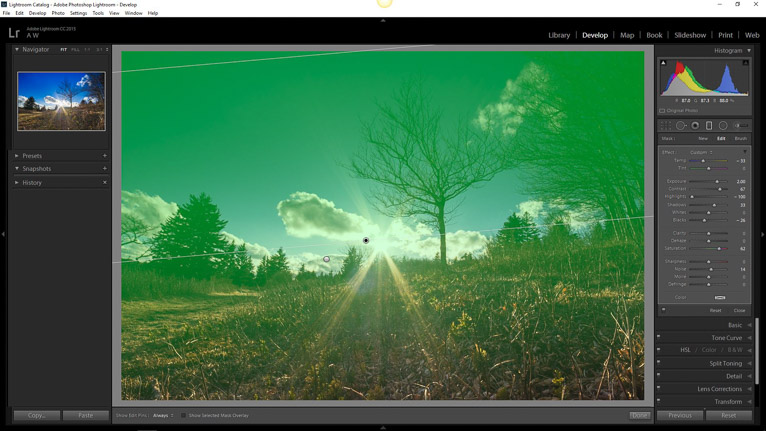
Drag the cursor from top to bottom.

Adjustments are made to the sky including exposure, highlights, and color temperature. Then click the “done” button.

And that’s it!

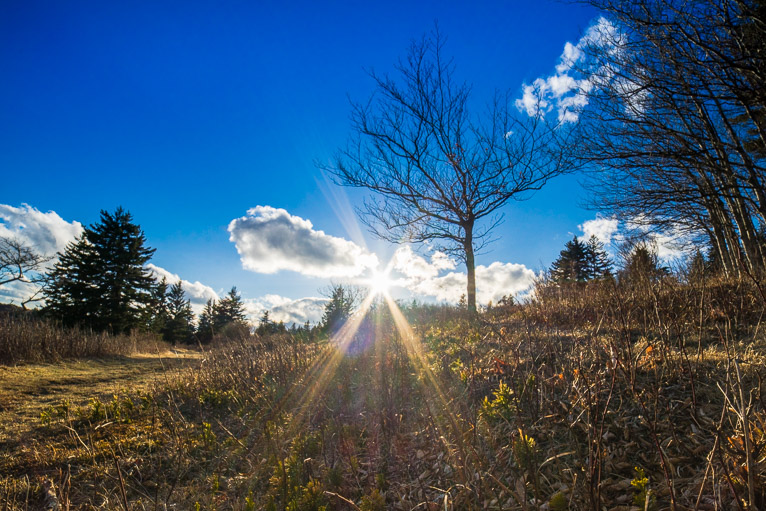
Well, at the very least you have a very normalized image which can be used to base your additional creative processing upon. Keep in mind we went from a completely unedited RAW file to a usable image just by applying TWO graduated filters.

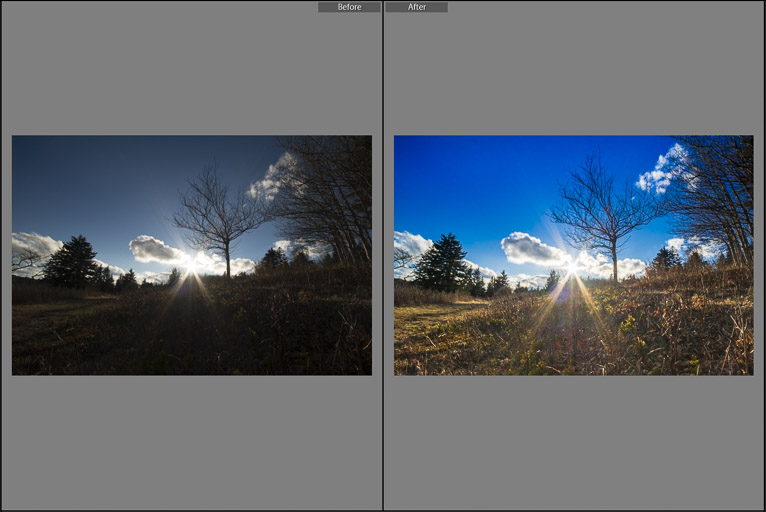
Yeah…two graduated filters can make a huge difference.

Understanding how the graduated filter can help you to take control of your images is a great first step towards becoming a better shooter. Being able to harness the dynamic range of a scene in post processing will open up enormous creative opportunities for your photographs unlike never before. Using the GF is easy and, dare I say, fun. Don’t be afraid to experiment and see what happens. You may be unexpectedly surprised.


Filed Under: Tutorials Tagged With: cameras, digital photography, lightoom, Photography, processing

Review: Vanguard VEO 235AB Travel Tripod

The Vanguard VEO 235AB tripod is a great travel sized option for those on the go who need a lightweight tripod without compromising strength or durability. I’ve been able to evaluate this offering from Vanguard for a couple weeks. In that time I’ve been impressed not only by it’s flawless function and portability but also its versatility. In this review, we will take a closer look at what makes the Vanguard VEO 235AB such an heavy hitter in the world of lightweight tripods. For those who shoot with mirrorless camera systems or smaller sized dSLR’s  is a wonderful alternative to traveling around with a full sized tripod.

Build Quality and Design

The construction of the tripod is of solid aluminum. The center column of the tripod folds down underneath for compact transport and makes the folded height of this tripod a mere 14.88inches(37.79cm). The legs each extend in five sections with four adjustable tension flip locks. The flip locks seem that secure the legs into place feel extremely secure.

The legs also feature a rubber foot/spike design. When indoors or on solid ground the rubber feet do a great job of providing traction for the tripod. When the terrain turns muddy the rubber feet can be screwed upward to reveal traction spikes that bite into unable ground quite well to ensure the tripod stays put.

The overall maximum height with center column extended is 57.1 inches(145cm.)


The legs of the Vanguard VEO 235AB are capable of being positioned independently at three separate angles depending on your needs. There is a button at the top of each leg that is used to set the legs at the desired position. These buttons feel very secure and lock the legs with a very satisfying “click.” A rubber wrapping on one of the legs also provides a sure grip when in the rain or during extremely cold conditions.

Included with the tripod is a TBH-50 ball head. The ball head features an Arca-Swiss compatible quick release plate which also incorporates a stop pin on the connector plate to prevent your precious camera from slided sideways off the mount should the lock become loose. The ball head is very smooth in movement and locks down extremely securely. The tripod and ball head are rated to support just over 13lbs(5.9).

Here’s a complete list of specifications courtesy of Vanguard…

Also worth mentioning is the included “low angle” adapter. This is essentially a way to bring the camera as close to the ground as possible with a solid low-perspective platform. You lose the flexibility of the ball head but gain a much lower perspective now that the center column is removed. The change out is very easy and might be of use to some.

What You’ll Like

With all the strong points about this tripod here are a few that make the 235AB standout:

  • The weight is feather-like. For an aluminum tripod of this size and load capacity I found the Vanguard to be exceptionally lightweight at just over 3lbs.
  • Rock solid flip locks. I have no concerns whatsoever of these locks failing under normal use.
  • Super fast setup. With the “swing under” design of the center column deployment is efficient and quite fast. Makes for a streamlined package for transport.
  • Quality Ball Head included. The ball head works wonderfully and I have experienced no drift even with my heavier lenses.

What You Might Not Like

It’s difficult to find anything that I don’t like about the Vanguard 235AB. One thing that have been noted by some is the lack of a d-ring on the base plate screw. If you don’t have a coin or tool on hand installing the plate can be a challenge. Other than that, at the time of this writing I have no other negative comments to remark about the performance of the tripod.

Final Thoughts

The main reasons why I purchased the Vanguard 235AB was because I needed a sturdy, lightweight tripod that is packable and easy to carry. I can find no area where the Vanguard falls short of my needs. The weight to height ratio is amazing and it is more than capable of handling the load of my camera setup. It’s small enough to pack into carry-on luggage as well. At it’s price point of around $149US on Amazon you will be hard pressed to find a more capable travel tripod to accompany you on all your adventures.

Filed Under: Gear Tagged With: gear, Photography, tripod, vanguard

Do Photography Trends Stifle Your Style?

Do you allow photography trends to stifle your style, or does your personal passion, style and creativity prevail?

A well-known wedding photographer (who shall remain nameless) once berated me because I was, in his opinion, following the trends and overdoing the new and popular filter effects of the time. I walked away from our conversation feeling mortified and crushed. In short, incredibly defeated. Upon reflection, I realized he was indeed correct in many instances. Some of the images I was creating for my customers were over stylized and would not withstand the test of time. However, these trends are often popular and very much in demand. It is sometimes hard to stick to your guns when asked to create a certain look. Do you allow your artistic style to be compromised because of your clients’ specific requests?

I would suggest that unless your work is synonymous with a particular style, I would highly recommend catering somewhat to their suggestions, but make sure you add plenty of your own artistic vision into the mix. However, some demands can simply rub you the wrong way, and it is ok to say no! I think I can state without much dispute that there is one particular request that simply makes many photographers see red. Namely, trends that clients have found on other photographic websites or on social sites that they want you to copy. So, standing up for your particular style may lose you a few customers in the short term, but tenacity can prevail given time, allowing you to be true to your photographic vision and recognized for your talent.

In my opinion, there are a couple of photographic trends that I thought were amazing at the time, but have not really held up that well. Disclaimer! I am guilty of creating some of these images and will showcase them below.

  • Coloring parts of your black and white image

color

  • Photographs that disrupt the horizon

tilt

  • Over processing the vintage look

filters

Do you ever find yourself re-visiting your website and removing those images that reflect trends that really date your photographs? Generally speaking, the cleaner images do tend to stay in your portfolio longer. Other tips that come to mind are limiting the use of the highlight priority tool. The foggy feel used to feature on my website, but I have since removed most of these. Also, while my children were growing up, I became deeply ensconced in the world of senior photography and I fought hard with many clients to keep the completely unblemished images to a minimum.

Above all, make sure the photograph talks to you. If you want it to be commercially viable, you do need to be critical of your work, and maybe request the opinions of those friends who are happy to be honest with you (time to check the ego!) Take pictures people want to admire. Captured images should not require interpretation they should speak for themselves. Neal Rantoul recounts his opinion on this subject in an enthralling article featured in PetaPixel. I do agree that cameras are most certainly much simpler to use. Great photographs can be taken with only a minimum understanding of ISO; shutter speed and camera settings in general, but eventually the mechanics do need to be understood.

There are many simple plug-ins that allow you to edit your images quickly and efficiently. Plug-ins for use with Photoshop or Lightroom can be used as an artistic tool, allowing you to create your own recipes and layer your effects for all sorts of finished looks. The Nik collection is now offered as a free download, and I would highly recommend it. You can learn a simple edit, or explore the software to create some amazing visual effects. The secret is to use them wisely, and not become obsessed with one particular result.

When it comes to creating images that are just for me, I use all of the software products mentioned above, and enjoy playing with effects and layers. This is especially true when I am editing my IR images, or detail shots where I like to add a little artistic license.

flowers

I recently took senior portraits of my triplets (two girls and a boy) before they left for college, and I admit to enhancing the sunset to create a somewhat vintage look. My girls are extremely close and are now attending colleges in two different states. The candid image of them together means so much to me, and this is the essence of why we chose to be photographers. On a personal level, what pleases you is really all that matters.

seniors

I also had some fun with the DJI Inspire during the family photo-shoot!

tripletsfly

In conclusion, one has to wonder why the paintings of Vincent Van Gogh were not popular during his lifetime. He was a unique painter, pushing the limits, who is now considered to be one of the most famous post impressionist artists of all time. I am sure we can name many popular artists and photographers of our time, but one has to wonder if they will stand up to the opinions of critics, or indeed the general public 100 years from now. Maybe our work will be discovered and we will be revered! It is worth contemplating what it is that constitutes an iconic photograph? I very much enjoyed reading an article by Evie Salmon entitled ‘what is iconic imagery?’ Who is to say what will be revered in the future, which should encourage all of us to keep persevering when it comes to our artistic vision. Don’t let those trends take over and stay true to your vision.

Filed Under: Inspiration Tagged With: artistic vision, creativity, filter effects, inspiration, passion, perspective, Photography, photography trends, trends

Confront Your Photographic Challenges

Are there times when you feel challenged to complete an assignment, or even to just go out and take some photographs? Tangential activities take on an unanticipated urgency. I have never really understood what drives this onset of dispassion for the task, but I know I have experienced it many times, and I find it helps to set myself a few challenges and hold myself accountable until each of  my personal challenges are completed.

Nature photographer Jim Brandenburg is known for challenging himself. Jim decided to limit his images to only one photograph a day for a 90-day period between the autumnal equinox and the winter solstice. His project was deeply personal, and the amazing work that developed over the months most certainly speaks for itself.

Here are a couple of ways you can provoke your challenges, and learn a few new techniques in the process:

Join a Photo challenge site – One great site, Photochallenge.org encourages you to increase your photographic skills by committing to a photo challenge. No tutorials, just photographers interacting with each other. The team sets out common guidelines, which are easy to understand and simple to follow. The challenges are specific, such as; capture black and white shots of the human body, or take portraits of people or animals, and then share with others also participating in the challenge. If you are not quite up to engaging at that level, it is still worth visiting the site to view images and to ultimately gain the courage to start interacting online with other photographers.

Commit to taking a tutorial a week – There are many sites that provide free tutorials, such as Iheartfaces as well as subscription based sites like CreativeLive, KelbyOne, and Lynda.com that offer the opportunity to learn a little more about your camera, as well as how to use software applications to successfully edit your images. If you find it easier to learn in a classroom, give yourself the gift of a workshop a year. The secret is to follow through on what you have learned.

Set specific parameters – Make some definitive decisions each time you go out to take images. Consider some of these ideas:

1 – Take only one lens with you. If you do not have fixed lenses, choose a zoom lens focal length and don’t be tempted to change it. This will encourage you to position yourself correctly for each shot. It will also help you to really understand the capabilities of each lens.

2 – Utilize the full frame. Fill your frame with the shot and don’t plan on cropping in post. This will encourage correct orientation, and enable you to make every pixel count.

3 – Decide upon a color or texture and concentrate on images of that color or texture. This makes you evaluate your surroundings and notice many things you may not normally have seen.

Vegas_Flower

4 – While teaching at a photographic conference in Las Vegas, I played around with the color/full frame challenge and spent a couple of hours in the beautiful botanical gardens located in the Bellagio hotel. I started with some fairly simple images and then dug down into the fragility of petals. I found myself down a whole new path involving the combination of shadow and color.

5 – Dedicate a photographic day to simply using your mobile phone, and get creative. There are many apps for editing camera phone images and some of the results are pretty impressive. While boating in Maine, I was able to capture the old Maine Windjammer, the Isaac H. Evans. I challenged myself to use only my mobile phone all day so that I would concentrate on light and composition. It was quite refreshing to have my head up and looking at my subject, rather than staring down the camera viewfinder!

IMG_8560-Edit

6 – Limit the number of images you take. Imagine you do not have the capability of taking many photographs. Make every image count, and don’t cheat by erasing images!

Win a FREE Camera Conversion!

Sometimes it is important to try to recognize the route of the challenged feeling! Each time I head up to Rockport, Maine to teach drone flight and aerial photography, I find myself having to overcome the inherent fears surrounding the nature of the class. I am not immune to the constant commentary surrounding the use of drones and their various applications. In order to overcome those mental challenges, I remind myself that I teach because I enjoy teaching, and the pleasure I receive from watching students initially grapple with the technology, and then start creating beautiful images is most certainly more contagious than the niggling doubts in my head. I also take time out to go and fly with my teaching partner and hone my skills a little more.

Maine_Lighthouse

Flying over water takes a little more concentration and awareness of the wind conditions. but the results can be incredibly rewarding. The image above is a single capture, and below, a 5 image panorama created in Lightroom. These were taken using a DJI Phantom 4.

Maine_Pano

Finally, I have also noticed that as infrared photography becomes more popular, there are many discussion groups debating about what constitutes a good IR image. No matter what my assignment, I carry my converted Canon 1DS with me and find an opportunity to experiment.

MaineIR

It is interesting to compare my results with images taken from the Phantom 4. In the image below, I am actually much closer to the boats in the harbor, but hovering over the water.

Boats

I challenge you all to experiment with IR. If you are not yet ready to convert one of your cameras, consider purchasing a filter that somewhat replicates the look and feel, and this will give you a great introduction. I am pretty sure you will soon be hooked. Whatever your end goal, don’t let those perceived or real challenges get in the way and don’t let the negativity of others (or your own doubts) prohibit your creativity.

Filed Under: Inspiration Tagged With: aerial photography, Canon, challenge, composition, DJI, DJI Phantom 4, inspiration, IR, landscape photography, Lifepixel, Maine Media Workshops, Panoramas, perspective, Photography, photography tips, Workshops

6 Reasons Why Having People In Your Photos Is A Good Thing

Having people walk into your perfectly composed scene can often be enough to send most photographers into rage. After all, you have spent time getting to this place, waiting for the perfect light only for a unknowing tourist to stand in your way. But having people in your photos can actually be a good thing and some picture editors are now actively looking for images which showcase an experience rather than just a tourist shot.

KD-2016-People In Your Photos-7

Here are 6 reasons why including people in your shots can actually improve the composition.

1. To give a sense of scale

One of the hardest things to portray in photographs is the sheer scale of an epic scene in front of you. The best way to do this is to incorporate something that we are familiar with into the composition so that the viewer can process the difference in scale. For example, if you are photographing a big tree, putting a person near the tree can help the viewer notice the difference in size. Similarly in landscape photography, if you are high up, putting a person in the foreground can help distinguish how high you are.

KD-2016-People In Your Photos-5

 2. To add a point of interest

Very rarely does any image work without a point of interest. Often these can be natural details such as rocks or trees. Sometimes the point of interest is the main purpose of the photo (i.e. a boat on a lake). But sometimes the point of interest needs to be added to the composition by the photographer, and one of the best subjects for this are people. Adding a person into the photograph can be especially pleasing to the composition when you have a scene where the colors and patterns are very similar (for example the desert or water). By putting a person in the frame it helps break that repetition and makes for a pleasing end result.

KD-2016-People In Your Photos-3

3. To give the photo context

One of the great benefits of adding people into your photos is that it can make them easier to sell as the people in the photo can help give it context. For example, a photo of people walking in a landscape scene can portray walking or hiking trips rather than just a generic landscape photo. These images can be easier for picture editors to use as they can accompany articles related to that topic. For example, the photograph of someone cycling could be used to promote adventure holidays, or an article around mountain bikes.

KD-2016-People In Your Photos-4

4. To tell a story

It’s no coincident that that the majority of the most famous photographs ever taken usually include people in them. People in photos can help tell an incredibly powerful story rather than showing a scene. The key is to think about the story that you are trying to portray and then set your composition to highlight it. Sometimes the elements are all there waiting for you to photograph, but often you have to be willing to come back to the scene or wait until the story presents itself.

Win a FREE Camera Conversion!

KD-2016-People In Your Photos-2

5. To show movement

Creating motion blur of people using a slow shutter speed is a great way to add creativity and dynamism to your images. Motion blur or movement, can be a powerful way to really emphasize a story as well. For example a person running can give a sense of speed or lots of movement from a crowd can highlight the hustle and bustle of a place. But as always, when using a slow shutter speed you need to ensure that you use a tripod to avoid camera shake as you ideally want the static parts of the image to be sharp so that it contrasts against the soft motion blur otherwise blur will look like camera shake rather than intentional motion blur.

KD-2016-People In Your Photos-1

6. To make your image unique

In this day and age pretty much everything has been photographed millions of times. So capturing images that are unique can be even more difficult. One of the best ways to do this is to incorporate people into your photos as these are often fleeting moments which can’t be recreated. Not only will they make your images unique but if you are able to get model release they will make your images much easier to sell and more valuable.

So, next time someone accidentally walks into your scene, instead of despairing, think about how you could incorporate them into the photo and if that will improve the composition. You might be surprised at the number of times that it does.

Filed Under: Tutorials Tagged With: Photography, photography tips

Profiled Photographers – Dragan Todorović

Dragan Todorovic

Dragan started photography back in the 80’s through watching his uncle creating his own black and white photos in his darkroom in his hometown of Belgrade in Serbia. He was around twelve and his first camera was an extremely low-tech, fully manual plastic box which was capable of taking surprisingly decent photos. He has been taking photos ever since.

Unlike other photographers, Dargan doesn’t specialize in one genre of photography, but rather tries to break from that mould to create images which rely on different elements to work in harmony with each other. He views his images as “…book jackets for stories I have not written, and never could have written, because they are not stories that can be told in words.”  

His images have a certain elegance and almost dreamlike appearance that capture the viewer’s attention and thoughts. They are works of art that don’t conform to society’s normal views and set-ups of photographs.

Dragan Todorovic

Dragan, where do you currently live?

I live in Belgrade, Serbia. This is also where I’m from.

What genre of photography do you specialize in?

None, I’m trying to replace the monotony of a genre and style with polyphony, or even better, sometimes a formal polyphony using devices from literature and philosophy.

Describe your style of photography?

My desire is for the photograph to not only convey a story about itself, but also about the person who took it, as if each photograph could be a mirror. The benefit of picking a style and staying consistent (and I hate consistency, I love to confuse people) is that having a distinct style is just easier to market. That’s all. And I’m not doing photography to be famous or to sell things and so I don’t try to limit my expression to one voice or tone.

Dragan Todorovic

What are you working on at the moment?

I’m currently in the process of setting up my own studio.

Win a FREE Camera Conversion!

Are there any photographers whose work/style you admire?

I’ve admired the works of Vadim Yusov and Aleksandr Knyazhinsky. They were cinematographers but their work with Andrei Tarkovsky made me love the world of pictures. I was profoundly affected by the photography in his films, more than anything else I had seen before.

What is your favourite memory from your experiences?

Without question, that would have to be developing photos in the darkroom.

Dragan Todorovic

What’s in your camera bag?

I use a Fuji X-T1 with set of different lenses.

What advice you would give anyone who is starting out?

I would advise them to read Camera Lucida. It is a short book published in 1980s by the French literary theorist and philosopher Roland Barthes. It was one of the most important early academic books of theorization on photography.

Any pitfalls they should avoid?

To avoid bad literature.

Dragan Todorovic

Lastly… if you weren’t a photographer what would you be doing?

I’m not a professional photographer but I would have to say an artist of any kind.

To view more of Dragan’s work or get in contact with him visit his website.

Images by Dragan Todorović. All rights reserved. No usage without permission.

Interview by Kav Dadfar.

Filed Under: Inspiration Tagged With: photographers, Photography

Profiled Photographers – Lennart Bader

Lennart Bader_Photography

Semi-professional,  German born photographer Lennart Bader, was only 14 when his classmate bought a Canon 30D camera. He was so impressed by the pictures it produced, he purchased a Canon 350D himself soon after. He spent the next few years photographing mainly during the holidays but without really experimenting with his photos, and because his friends didn’t enjoy having a camera around, it stayed at home most of the time.

It wasn’t until 2015 that he decided to revive his forgotten hobby during a time when he was changing a lot of aspects of his life. He started by contacting some local models in his home town of Cologne who were starting out and did his first shoot in April 2015.

Lennart Bader_Photography

After he finally had the courage to publish his pictures on Facebook and Instagram, the feedback of the community was incredibly overwhelming and his social streams grew fast. He originally shared his work without any big expectations, but photography is now a huge part of his life and even a mentionable source of income. One year on, he is still astonished by the progress he has made.

Lennart, where do you currently live?

I’m studying and living in Aachen, which is quite close to my hometown Cologne.

What genre of photography do you specialize in?

My favourite genre is a mixture of portrait and lifestyle pictures, I also love photographing travel-documentaries.

Lennart Bader_Photography

Describe your style of photography?

I love capturing moments instead of constructed setups. I don’t need a perfectly posed model, what I need is an authentic person in front of my camera and a vivid background. I love placing people in interesting environments. As I almost always shoot at 35mm and f 1.4, the background plays a big role in my pictures.

Someone once told me that I should capture moments, but how you feel them, not how you see them. I like that description.

What are you working on at the moment?

I recently photographed a summer campaign for a German watch-producer and I am still in post-production with those images.

Lennart Bader_Photography

What is your next project or assignment?

This summer is going to be all about travelling for me. I want to go to Asia and travel around without any distractions. My camera of course will always be with me. I hope to create a nice travel documentary and maybe be able to do some shoots with local models.

Are there any photographers whose work/style you admire?

I don’t really have one or two favourite photographers. I like so many styles and many photographers. At the same time I don’t even think I know most of the important photographers that you really should know if photography is your passion… For me, names are not that important. If I like a picture, I like it no matter who took it – not the other way round.

Lennart Bader_Photography

What is your favourite memory from your experiences?

Last year I went on a road trip through Portugal with my friend André Josselin, who is also a photographer and one of my biggest inspirations. The days were so magical. We were a perfect small group of people that, although we didn’t really know each other before, became very close and had a wonderful time.

You can view my photos here.

What’s the biggest photographic challenge you overcame?

Shooting a summer campaign at 4°C with a windy sea and trying to make it look like 30°C.

Lennart Bader_Photography

What’s in your camera bag?

I shoot with a Canon EOS 5D Mark III.

I also have several lenses (24-70mm, 70-200mm, 15mm, 35mm, 50mm, 85mm), but more than 90% of my pictures are shot with my favourite lens – the Sigma 35mm 1.4 ART. Whenever I take my other lenses with me for a job, they usually stay in the bag!

What photographic equipment would you never leave home without?

That would be of course my favourite combination, my Canon EOS 5D MK III and 35mm 1.4 lens.

Lennart Bader_Photography

Win a FREE Camera Conversion!

What advice you would give anyone who is starting out?

As I still see myself as a newcomer, I don’t really feel comfortable giving big courage or advice speeches. What I have learned in the last year is a well said phrase; “Do your thing!”

I regret that I didn’t revive my passion for photography earlier. Just grabbing the camera and capturing these special moments that I love, gives me so much that I can’t really believe how I could have lived without it for such a long time. If your friends don’t get your passion, don’t let them hold you back. Look for people who share your passion and exchange with them – that is the best source of inspiration and support.

Any pitfalls they should avoid?

Don’t pay too much attention to social media numbers. Likes, followers and so on, don’t mean anything. They’re just numbers, plain and simple. The social media photography communities are a great source of inspiration and exchange, but in the long run it is all a big bubble that you should leave every now and then to focus on yourself.

Lennart Bader_Photography

Lastly, if you weren’t a photographer what would you be doing?

Right now I’m still doing my masters degree in industrial engineering. As my photography ‘career’ is getting more and more serious, I don’t really know where and at what point I’m going to be in one or two years time. But as I am an opportunist, I’m really excited about the years to come and look forward to my next challenges.

To view more of Lennart’s work or get in contact with him visit his website.

Images by Lennart Bader. All rights reserved. No usage without permission.

Interview by Kav Dadfar

Share
Pin
Tweet
Email
Share

Filed Under: Inspiration Tagged With: photographers, Photography

Using the “3 Picture Story” Technique to Improve Your Story Telling Images

A picture is worth a thousand words. So does that mean 3 pictures are worth 3000 words? If the photos tell a story, than arguably, the answer is yes. One of the great things about photography is that it can really allow the photographer to tell a story in a series of images that might need hundreds of words to describe. That is why magazines spend time choosing the perfect photos for front covers or to illustrate features, but capturing a series of images to tell a story isn’t easy. You need to avoid repetition whilst ensuring the story or theme is followed through in every photo. One of the best ways to practice and train to do this is using a technique called a 3 picture story where you tell a story in a set of just 3 photographs.

Here’s how it works:

The Big Picture

Your first image will usually be the wide angle photo that captures the general scene. For example, if you are photographing in a market, this might be a photo of the market showing the different stalls. Remember, this needs to work as set of 3 images so it should still convey the story you are telling. Even though you are capturing a wide scene, still keep it relevant to the story. This should be your ‘wow’ photo and often the one that a feature would start with as the opening spread.

Kav Dadfar_Story Telling_1

Main Focus

Once you’ve captured the wider picture it’s time to start getting more focused on the main subject of the story. This photo should begin to tell the viewer what the main story is focused on. Using the market as an example, if the first photo captures the whole of the market, this photo focuses on one of the market sellers. You need to ensure that it isn’t repetition of the wider photo by just zooming in; think about how you can make the two completely different but part of the same story.

Kav Dadfar_Story Telling_1

The Close-up photograph

The final photo needs to be a close-up of what is going on and this highlights the key detail of the story. This means you need to get up close to your subject which in turn means having to interact if it is a person (great practice for anyone who is shy). Try to think about what the single focal point of the story is and then think about how best to show it. For example, it could be the person’s hands if they are making something, or it could be the final plate of food that has been made.

Kav Dadfar_Story Telling_1

The great thing about this technique is that it requires you to use a wide range of photographic technical elements and usually will push people beyond their comfort zone on one of the photos. For example, if you struggle in close-ups, this is a great way to practice to improve. Once you have mastered the 3 photos, you can look to add a fourth or fifth photo if the story requires it, but be aware of repetition. The key is to make sure every photo different and to stand on its own merits whilst also feeling part of the same theme.

Win a FREE Camera Conversion!

Kav Dadfar_Story Telling_1

Telling a story in a set of photos isn’t easy but can be one of the most effective ways of showing a story. Think about all the times you have looked and newspapers and magazines and got a sense of the story without even reading the words. Like any type of photography, with practice, over time you will get better at creating stories using this technique.

Now it’s your turn. Show us your photo stories below?

Photo Credits: Kav Dadfar (All rights reserved).

Share
Pin
Tweet
Email
Share

Filed Under: Tutorials Tagged With: Photography, photography tips, Travel photography

10 Tips to Help You Get Started in Photography

It’s never been easier to embark on a career or hobby in photography. With the development of all sorts of cameras which cater for all levels and budgets, the only decision facing prospective photographers these days is when to start. However, too many new photographers fall into the trap of not going through the proper and well thought out process and being disappointed with the results. Here are 10 tips to help you get started and avoid the pitfalls of new photographers.

Kav_Dadfar_Photography_Get Started in Photography

1. Find your passion

Everyone has a passion – something they love or enjoy doing or observing. For some that might be wildlife or sport, for others it’s walking and camping in the wild, and for some it might just be to walk around a busy city to absorb the atmosphere. Needless to say that if it is something you enjoy doing or watching, you’ll be more likely to enjoy photographing it. This is especially important when you are starting out because it will give you focus. So, whatever your passion is, that should be your first focus when starting photography.

2. Get the equipment

Whatever you are going to photograph, you will need at least a camera of some sort, and this could be a basic point and shoot camera or even a smart phone. The mistake a lot people who are starting out in photography make is that they think a better or more expensive camera will mean better photos. The camera is simply a tool and without an interesting subject, correct composition and good lighting the photo would still fail regardless of how good the camera is, so instead of spending a lot of money on an expensive camera, buy something within your budget and once you are ready, invest in a more expensive one.

Kav_Dadfar_Photography-8_Get Started in Photography

3. Learn the basics

There’s a lot that goes into a capturing a great photo, but there is no getting around the fact that you will need to learn the basics of photography. You will need to understand the technical elements such as depth of field and focusing, as well the specific controls in cameras that can influence these factors. You will need to learn about creative elements of photography such as lighting and composition and how and when to put it all together for a pleasing result. Many successful photographers are self-taught with no formal qualifications in photography, but they have all spent time learning and practicing the basics.

4. Practice, practice, practice

There’s no shortcut to becoming a good photographer. Like any skill or profession it takes practice over a period of time. This is even more imperative when you are starting out as the best way to really understand what you are learning is to go out and do it for real. Every time you read something new, go out and practice it until it becomes second nature to you.

Kav_Dadfar_Photography-11_Get Started in Photography

6. Get inspired

Surround yourself with other photographer’s work that you admire. Study their work and style and try to work out what makes those photos great. Read trade magazines and articles that will inspire you and push you further. Go to galleries, talks and watch videos – anything that will make you feel like you want to go out and take photos is a great way of inspiring yourself.

7. Find your style

There will come a time when you will need to start developing your own style. This is what makes you unique and why photography is such a great and exciting profession. You could look at different photographers work from the same location and they will look completely different. A great experiment for when you are starting out is to start cutting out and keeping any photo that you really like that you see in magazines and newspapers. After a while, spread all of your cut outs and see if there is a resemblance in the style. If there is, this is what your eye sees as a pleasing result and is beginning of your own unique style.

Kav_Dadfar_Photography-4_Get Started in Photography

8. Learn from your mistakes

“…It’s only those who do nothing that make no mistakes…” Joseph Conrad

Win a FREE Camera Conversion!

Making mistakes as a photographer is OK – especially when you are starting out. Back in the days of film, every mistaken photo cost the photography money, but with digital photography this isn’t the case. In fact, often you will learn more from your photography mistakes than you would from any book. The important thing is not to get disheartened and constantly evaluate your work and see why and where you have gone wrong and what the solution is.

9. Set yourself goals

As a photographer you have to constantly look to improve. One of the best ways to do this is to set yourself goals, for example, if you are someone who is shy and struggles to approach people to take their photos, make it a goal that every time you go out for photography, you will photograph at least one person. Once you’ve plucked up the courage to do that once, set yourself a new goal to do it twice and so on. As you move along in your journey as a photographer, your goals will constantly change and evolve.

Kav_Dadfar_Photography-12_Get Started in Photography

10. Take risks

Who wants to see another usual photo of that famous landmark? In this age of smart phones and digital photography, it is more important than ever to take original and unique photos, so be prepared to take risks (within the law and with your personal safety in mind) with your photos and try to look beyond the obvious. The key is to research what you are photographing so that you can see what already exists and how you can make it different.

Kav_Dadfar_Photography_Get Started in Photography

Photography is one of the best professions or hobbies around. Not only will it challenge you creatively and physically, but as you move along your journey is will lead to amazing encounters and opportunities. It will also allow you to see the world in a different light and often experience so much more as you have to analyze every scene. The great thing is that it is now easier than ever to start.

Now it’s your turn. Share your tips and photos below.

Share
Pin
Tweet
Email
Share

Filed Under: Tutorials Tagged With: Getting started, Photography

  • « Previous Page
  • 1
  • 2

Blog Topics

  • Tutorials
  • Inspiration
  • Locations
  • Gear
  • News
  • Other/Misc

What our customers say:

Life Pixel has been a life-changer for me. Continue reading
Eric GConnecticut
Read more reviews
I am more than satisfied with the service I received Continue reading
Christopher JCanada
Read more reviews
I am more than pleased with the conversion job that you did Continue reading
LOUIS MWaco, Texas
Read more reviews
I am VERY impressed with his knowledge of your products and his patience in explaining it to a novice like me. Continue reading
Lynn FEssex, Maryland
Read more reviews
Things will only get better from here thanks to all of you. Continue reading
Phillip FRedding, California
Read more reviews
The Lifepixel newsletter reminds me of not having expressed my gratitude for the excellent job you made. Continue reading
Michael GGermany
Read more reviews
Your staff went above and beyond the call of duty to make sure everything was handled in an excellent manner. Continue reading
Paige RPearland, Texas
Read more reviews
It has given my old camera a new life, I will enjoy using it again. Continue reading
William PAustralia
Read more reviews
Excellent service and the camera works just great Continue reading
Hans FairhurstAustralia
Read more reviews
I just got my converted camera back from you guys. THANK YOU!!!! Continue reading
Anne CutlerForest Knolls, CA
Read more reviews
infrared_filter_choices_sidebar
ir_conversions_explained_sidebar
----------- Watch More Videos -----------
infrared_quick_start_guide

Ready to start shooting Infrared?

Convert My Camera

Subscribe To Our Newsletter

Receive updates, tips, cool tutorials, free stuff and special discounts.

Learn the Basics

  • Video
  • Start Here
  • Filter Choices
  • Focus Calibration
  • Lens Considerations
  • Camera Considerations
  • Place Your Conversion Order

Resources

  • Galleries
  • Lens Hot Spot Database
  • IR Tutorials
  • FAQ
  • Infrared Filter Choices
  • Infrared Photography Guide
  • Infrared DIY Tutorials

Company

  • Why Choose Us
  • Get In Contact
  • Job Openings
  • Write For Us
  • Affiliate Program
  • Terms of Use
  • Privacy Policy
  • Home
  • Start Here
  • Galleries
  • Tutorials
  • FAQ
  • Blog
  • Why Choose LifePixel?
  • Shop
  • Contact

Copyright © 2025 Life Pixel Infrared - All rights reserved - LifePixel Infrared Photography IR Conversion, Modification & Scratched Sensor Repair