• Cart
  • Checkout
  • My Account

Infrared Conversions, IR Modifications & Photography Tutorials | Life Pixel IR

The world leader in infrared conversions, modifications & DIY IR conversion tutorials. Scratched sensor replacement, UV & Full spectrum conversions.

The world leader in infrared camera conversions

866.610.1710
  • Home
  • → Start Here ←
    • 1 – Introduction
    • 2 – Filter Choices
    • 3 – Focus Calibration
    • 4 – Lens Considerations
    • 5 – Camera Considerations
    • 6 – Start Shopping
  • Galleries
    • Infrared Photography
    • Infrared Time Lapse
    • Infrared Cinematography
    • Infrared Stop Motion
    • Ultraviolet Photography
    • Forensic Photography
  • Education
    • Training Sessions
    • How To Shoot Infrared
    • AR Coated Infrared Filters
    • Lens Hot Spot Database
    • Photoshop Video Tutorials
    • Infrared Issues & Solutions
    • IR Basics in Photoshop
    • Camera Quick Start Guide
    • DIY Conversion Tutorials
    • IR Photography Primer
    • Secondhand Cameras
    • Wall Of Shame
  • Workshops
  • FAQ
  • Blog
    • Tutorials
    • Inspiration
    • Locations
    • Gear
    • News
    • Other
  • Why Choose LifePixel?
    • Submit Your Review
  • Contact
  • Shop

What Is the Golden Spiral And How To Use It?

Have you ever wondered why particular natural images appear more visually striking than others? While you might be photographing the same subject, but some angles look better than others? This effect might be because of the Golden Spiral (or golden ratio). But what is it, and how can you apply it in your photographs?

Golden_ratio

What is the golden spiral?

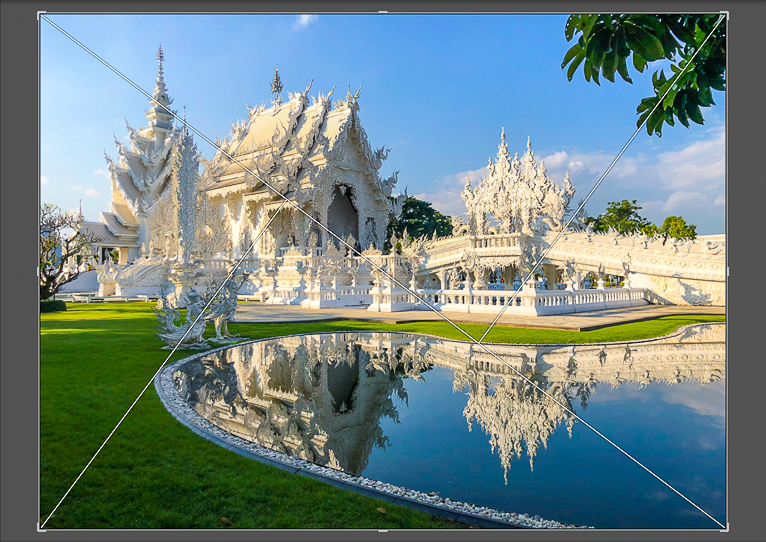
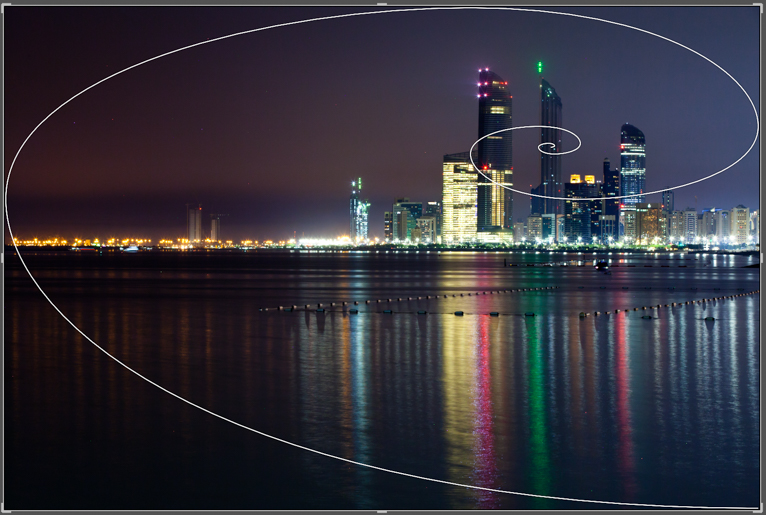
Let’s start by talking about what the golden ratio/spiral is. Leonardo Fibonacci initially designed this mathematical expression. Without getting too complicated, the golden ratio is 1.618 to 1. The golden spiral uses this ratio to create a series of squares. The size and placement of the squares are based on the Fibonacci sequence. Then, working from the opposite corner of each square, you should be able to connect them, which will form a spiralling arc.

While this sounds like a complex concept, it isn’t. The audience’s attention will be focused on the square. The spiral is how the viewer’s eyes will move as they follow the object’s natural curves. This spiral will force you to focus on where objects are in the frame, which we’ll discuss later when discussing how to apply this concept.

Golden_ratio

When this ratio is applied, it can make works of art more visually appealing. For example, the golden ratio was used when designing the pyramids. This ratio was also used by Leonardo da Vinci when he was painting the last supper. It can also be found in the way that shells look. You might also be able to find evidence of the golden ratio when looking at pineapples and honeycomb.

As mentioned earlier, the golden spiral will direct your eye around the picture, which gives you the chance to dictate where the audience should be looking. You’ll also be able to keep everything in the correct proportions. Now, let’s take a closer look at some of the ways that you’ll be able to apply the golden spiral in your photography.

Golden_ratio

Step one: Find the Subject

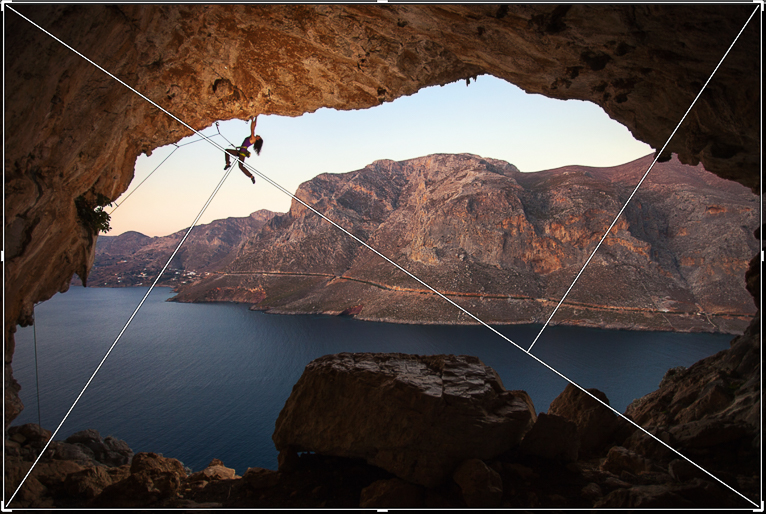
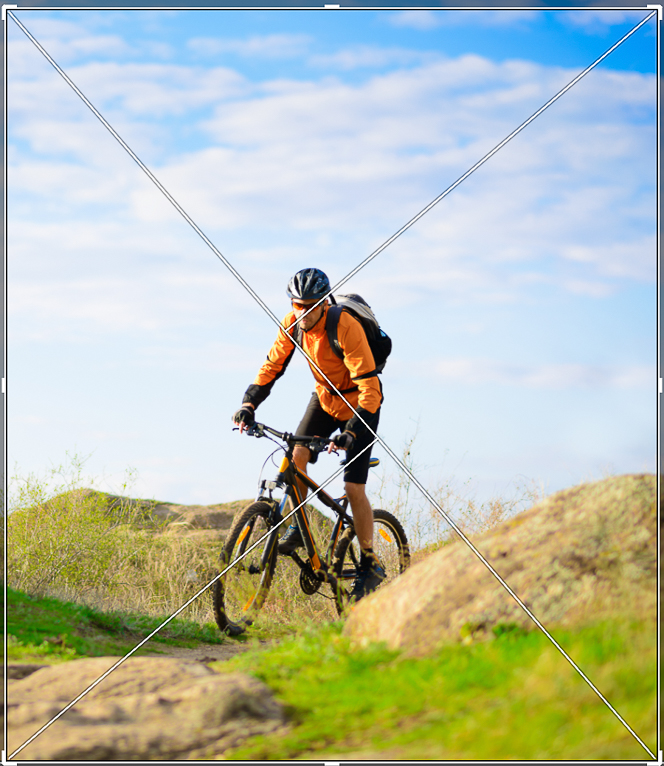
The first thing you’ll need to do is find your subject, which is where you want to focus the audience’s attention. In most cases, the olden ratio works best if the photo’s focus is the most intricate thing in the frame. If you have people, they will often be made the focus. When finding the focus, consider other aspects of photography. For example, the eye will often be drawn to lighter objects before it goes to darker ones. If there is something profoundly emotional in the picture, it should be the focus. Keeping this in mind will help you use the image to tell a story.

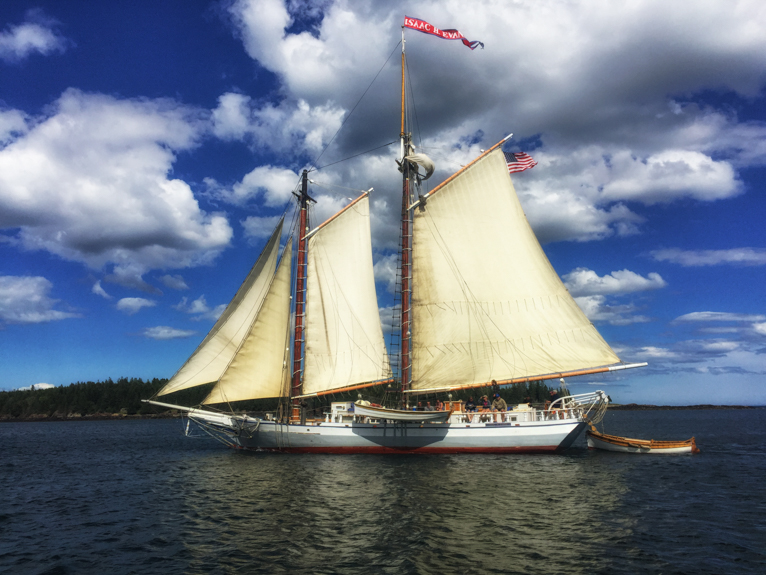
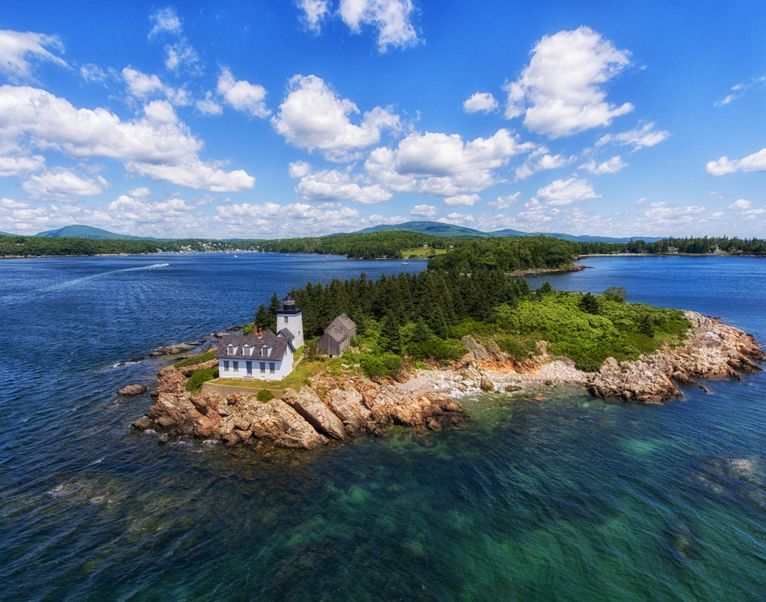
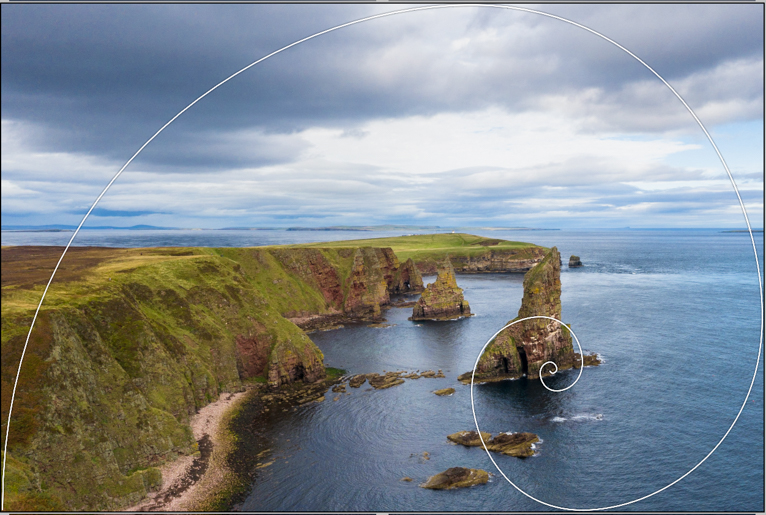
Once you know where you are putting the subject, you’ll need to think about where you will put everything else. It will be easier to apply the golden spiral if you have some natural curves that you can follow. One of the most common examples of this is a surfer riding a wave. In this case, the surfer would be the focus of the picture. The wave would be the natural curve. Coastlines that lead to a point of interest (like a sea stack) are another example.

Golden_ratio

Step two: Adjust the composition

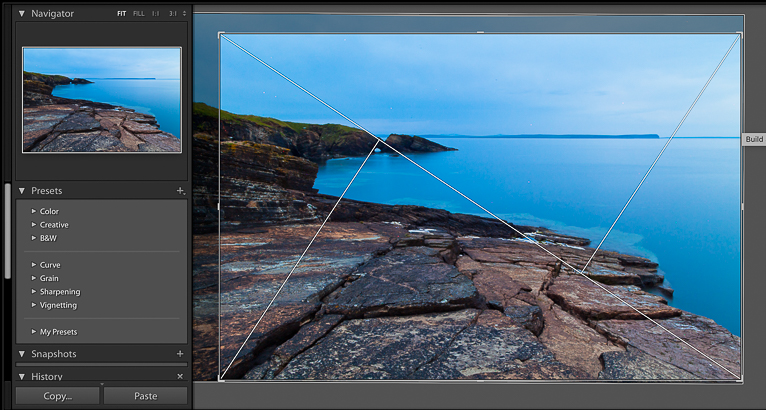
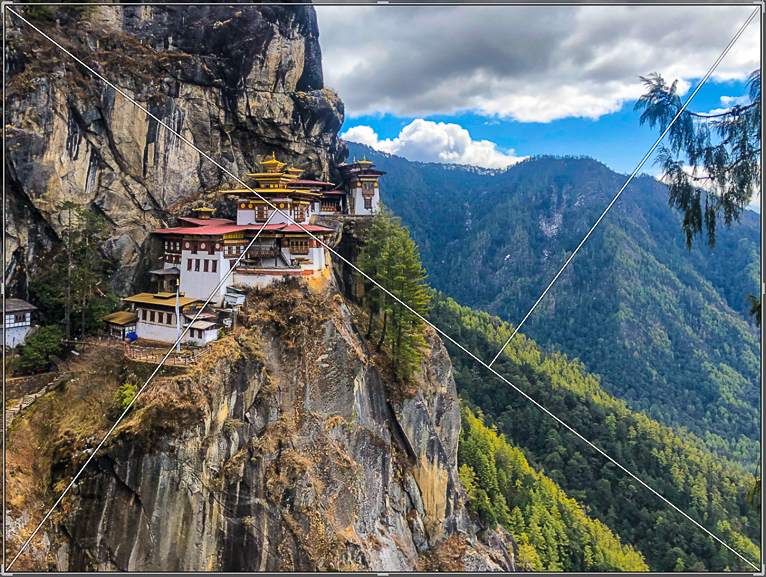
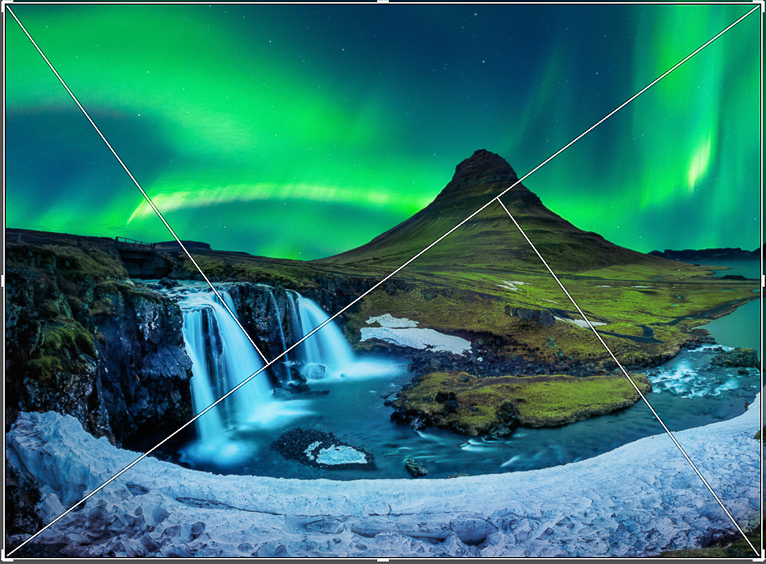
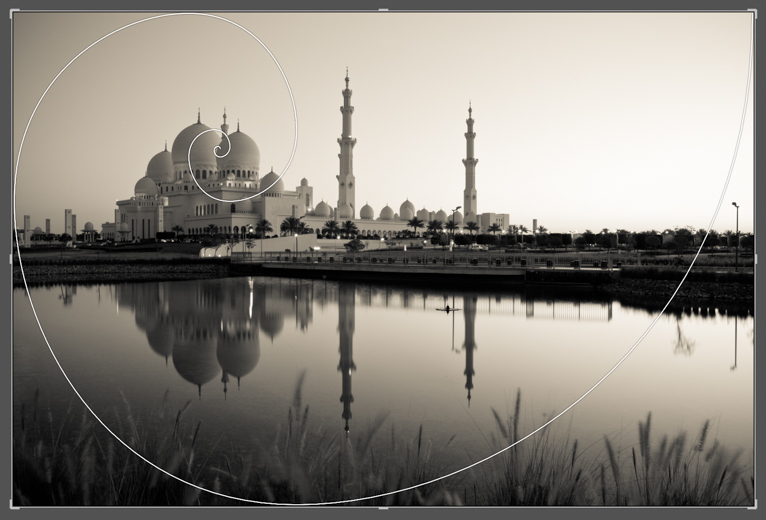
Once you know what the subject will be and where the natural curves will be, you’ll be able to start working on the composition. In some cases, your camera might come with a golden spiral overlay. This overlay will make it easy for you to find where everything should be. If not, you’ll need to do it by eye.

It’s important to remember that the subject can be anywhere in the frame. You’ll then need to follow the natural curves of the item. By doing this, the viewer should automatically be attracted to the object of interest. Then, they will follow it through the frame.

Remember that changing the position you’re standing in, and the angle you’re shooting from can significantly impact the type of pictures you’re getting. Between each shot, check the image. Studying the image will give you a better idea of how you’ll need to adjust the camera to get a better picture next time.

Golden_ratio

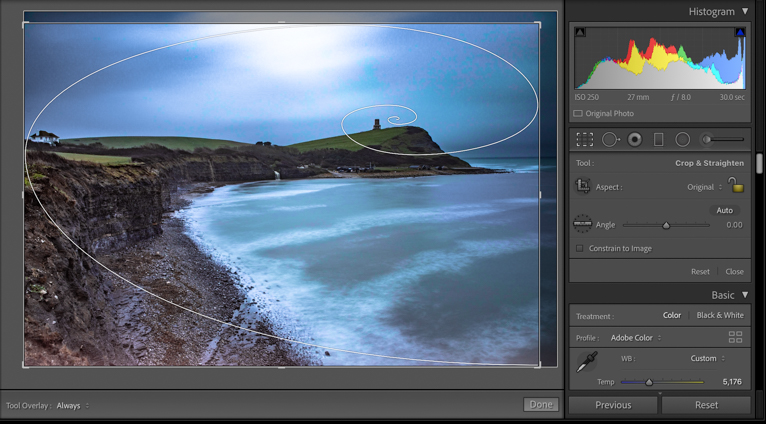
Step three: Edit the photo

The next thing that you’ll need to do is edit the photograph. Editing will allow you to create a golden spiral better by cropping. Most photo editing software will have a golden spiral function built-in, which will bring up a grid pattern. You’ll then be able to match the items in your photo to the grid. You can also edit your photo in a way to enhance the effect of the golden spiral by for example selectively brightening up your point of interest while keeping other parts slightly darker.

Golden_ratio

Step four: Practice

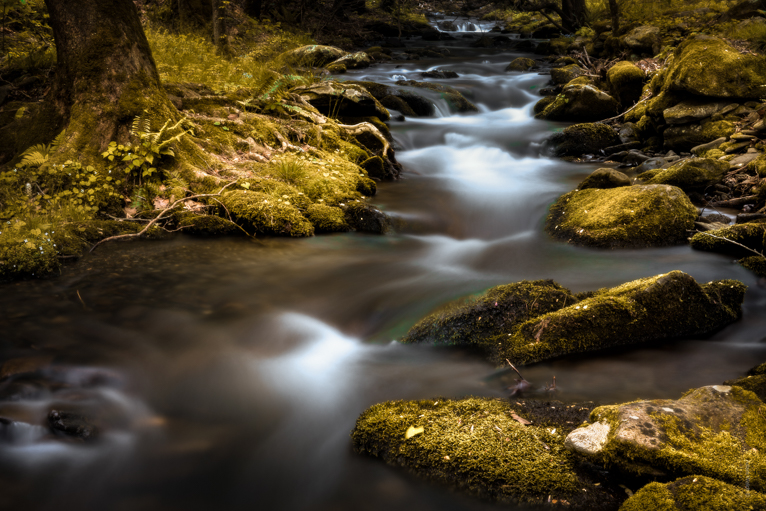
It will often take several photographs before you fully understand the concept behind the golden spiral. During these first few pictures, focus on your composition. Try to know where each element should be going. When you first start taking pictures, it can often be best to focus on things that have a natural curve. Usually, this will mean photographing natural formations like waves, rocks, or trees. You might also find natural curves in architecture, things like staircases or the roof of a building.

Once you are confident with the Golden Spiral, feel free to experiment with other types of curves. For example, you might want to make a curve with the clouds in the sky or people. There are plenty of ways that you’ll be able to apply the golden spiral to direct people’s focus.

Golden_ratio

The Golden Spiral can be a great way to focus the audience’s eye, directing them through your image. This composition technique can help you improve the way you compose the photos. It can also be used when editing to create more appealing shots. So, try taking some pictures that follow the golden spiral today and see if it improves your photography.

Photo credits: Kav Dadfar – All rights reserved. No usage without permission. 

Filed Under: Tutorials Tagged With: composition, Composition rules, Fibonacci rule, Golden ratio, Golden spiral

What Is The Golden Triangle Rule And How To Use It

The Golden Triangle rule is a concept in photography that every good photographer should learn, as it will help set a solid foundation upon which great photos can be taken. Novice photographers often have trouble with composition, so learning about what the Golden Triangle rule is and how you can use it effectively will set you off on the right path in your new hobby. In this article, we’ll take a closer look at the Golden Triangle rule and how to best use it in your photography.

Golden Triangle Rule

What is the Golden Triangle

When you apply the Golden Triangle rule to your photography, you’re setting the stage for successful photography. It involves composing pictures in a classical fashion to create a sense of symmetry, clarity, and even harmony. This visual rule for composition can help you align your subject and other elements in the frame.

You’re not physically smushing your subject into the shape of a triangle, however! You’re just aligning them within imposed, imaginary guiding lines that form four triangles over top of your snapped image. Just like the rule of thirds, this can help you align the composition proportionately within the frame.

Golden Triangle Rule

Where did the Golden Triangle rule come from?

Originally developed when composing paintings, it began as a way to align subject elements in the frame to display a sense of symmetry and planned composition. By dividing a frame in half diagonally (from one corner to the other), and then dividing those two parts perpendicular to your first line with each new line offset slightly toward their respective sides, you create four triangles within the frame.

The focus of your subject(s) would then be centred in the apex of those intersections. Similar to the rule of thirds, this composition technique helps align your subject(s) properly within the frame to create a better composition and bring balance to the overall image.

Even though this concept was originally developed for paintings, it translates very well to modern photography. The Golden Triangle rule helps novice and professional photographers alike compose their frames in such a way that viewers are drawn to the intended points.

Golden Triangle Rule

How to apply the Golden Triangle rule in Photography

The two intersecting points in the triangle grid described above pinpoint two things: guiding lines and points of interest for your subject.

For the leading lines, you will want to align your subjects with the lines directionally. This is the main way that this composition concept differs from the rule of thirds, which is a grid pattern. You will want this leading line to lead to the point of interest for your subject(s).

For example, if you are taking a shot of a wild wolf out in the forest, you’ll want to adjust your position so that the body of the animal falls on the guiding line and the head rests within the point of interest. This draws the line naturally along the body in a symmetrical way in comparison to the rest of the image.

Golden Triangle Rule

If you are shooting a landscape, perhaps a coastal highway, then aligning the road along a guiding line would allow you to follow the Golden Triangle Rule.

Concerning points of interest, this is almost self-explanatory. Make sure that the portion of the image that you want to be focused on fall at one of the intersection points. This is your main points of interest. For example, the wolf’s head we mentioned above would need to be centred not in the actual centre of the frame, but instead at where your diagonal lines intersect. When shooting a portrait, the dominant eye of the subject should be centred within one of these points of interest.

Golden Triangle Rule

Does the Golden Triangle rule work for every subject?

Technically, yes. In practice, not really. While photography can be subjective, some settings do not lend themselves well to the Golden Triangle rule and might be better composed using the rule of thirds. The grid pattern for the rule of thirds may be better applied to certain landscapes, for example.

The Golden Triangle rule is a preferred composition technique for portraits, but not in the standard sense. A standard portrait will have the subject centred, solitary, and looking straight at the camera. This rule is better applied to subjects either sitting or laying down so that you can better arrange your angles and create diagonals that trace the guiding lines.

If you have a sprawling landscape to shoot, the Golden Triangle Rule can help you best align elements leading up to your subject. For example, if you’re shooting a lone tree in a meadow, you can align trails or even rocks in the meadow along the leading line so that the tree itself sits as a point of interest.

Golden Triangle Rule

How will you know if you’ve aligned your subject correctly? 

In photography, since so much can be subjective, it’s great when you can find a technical aspect that you can control. Always take lots of shots, so that you can review them and choose the best one. These shots can allow you to see if what you’ve shot falls as a point of interest and actually landing where it should per the Golden Triangle rule lines.

Golden Triangle Rule

For new photographers that might struggle with composition, this is a surefire way to make sure that your basic compositions and framing is going to bring out the best of your photos.

Photo credits: Kav Dadfar – All rights reserved. No usage without permission. Dreamstime.

Filed Under: Tutorials Tagged With: Composing photos, composition, Composition rules, Golden Triangle Rule

Remembering Why You Shoot

There are times when the most simple of explanations eludes us. When it comes to photography, or more specifically to the point of making strong photographs, we must be fully aware. Not just aware of our settings and camera placement but also our intent. Oddly enough, it’s frightfully easy to lose this awareness during the very process of doing the thing which we love. What I’m so gently hinting at here is this: do you know why you make photographs? Are you aware on an internal level why you you shoot what you shoot?

In this article we’re going to take a look at why we can so easily lose sight of our purpose while making photos. This artistic straying can happen gradually or on a picture by picture basis. Perhaps more importantly we will also examine how you can regain your a creative awareness and become a more deliberate, purposeful photographer.

Obsessing with the Technical

When you think about it there are arguably very few absolutes when it comes to photography. So, why does the pursuit of technical perfection occupy such a large corner of our creative minds? Never place more emphasis on the technical aspects of photography than you do on expressing the feeling of a scene.

How many incredible photographs have you seen that are underexposed? Over exposed? Maybe they are slightly out of focus. The worth of those photographs or any other image doesn’t lie in the balance of a histogram or tack focus. They move us because they were made with intent and show the truth and beauty of a moment. Don’t put so much attention into the way you capture a photograph that forget why you wanted to shoot it in the first place.

Burnout

If you make photographs long enough there will come a dark and wretched day when you simply become tired of it all. It might happen sooner than later or it might take years but to some degree or another you will have to face burnout. When you become tired of shooting there just doesn’t seem to be anything out there to make pictures of that interests you. You just don’t get the joy from the process as you once did.

Don’t worry…this literally happens to us all and it isn’t limited to one event. There are highs and lows throughout a photographer’s journey. The key remedy is somewhat paradoxical, however. To beat burnout you take a break but not altogether stop shooting. Try to take a rest from your camera(and it from you) and breathe for a while without making photographs. When you begin to say “Man, I wish I had my camera with me” you will know you are cured. Do this as needed or as directed by a photo writer….

Self-Doubt

The best way to forget why you make photographs is by trying to make them them exactly the way someone else does. Be mindful that there is an incredibly fine line between inspiration and emulation. Never allow yourself to sacrifice how you want to capture a photograph based on the idea that it’s not the “right way” or just because it might not look like someone else’s version.

There could be an entire book written on this point but I’ll do you the favor of brevity. It’s perfectly alright to absolutely love the way other photographers images might look; that’s great, learn how to make yours in a similar way. But only do this if it fits with your own vision. Don’t do it for ‘likes’, shares, or any other reason that would otherwise cause you to shoot with anything but your own photograph in mind.

Final Thoughts….

Today, it’s easier than ever to allow yourself to forget why you make your photographs. We are constantly bombarded by new and better equipment that make us lose sight of what makes a good photo. Sometimes we simply become tired of shooting and this causes us to forget why we love making images at all. And what maybe be the most common danger, sometimes we doubt our own instincts as photographers. All these reason, and no doubt others, can make us forget our own intent. Luckily, they can all be overcome and if you find yourself in any of the circumstances I’ve mentioned then I hope this article gives you a helping hand. Have fun with what you do and always remember why you do it!


Filed Under: Inspiration Tagged With: black & white, camera, Canon, composition, create, Getting started, inspiration, inspire, Lifepixel, perspective, Photographer, photographers, photography tips

Confront Your Photographic Challenges

Are there times when you feel challenged to complete an assignment, or even to just go out and take some photographs? Tangential activities take on an unanticipated urgency. I have never really understood what drives this onset of dispassion for the task, but I know I have experienced it many times, and I find it helps to set myself a few challenges and hold myself accountable until each of  my personal challenges are completed.

Nature photographer Jim Brandenburg is known for challenging himself. Jim decided to limit his images to only one photograph a day for a 90-day period between the autumnal equinox and the winter solstice. His project was deeply personal, and the amazing work that developed over the months most certainly speaks for itself.

Here are a couple of ways you can provoke your challenges, and learn a few new techniques in the process:

Join a Photo challenge site – One great site, Photochallenge.org encourages you to increase your photographic skills by committing to a photo challenge. No tutorials, just photographers interacting with each other. The team sets out common guidelines, which are easy to understand and simple to follow. The challenges are specific, such as; capture black and white shots of the human body, or take portraits of people or animals, and then share with others also participating in the challenge. If you are not quite up to engaging at that level, it is still worth visiting the site to view images and to ultimately gain the courage to start interacting online with other photographers.

Commit to taking a tutorial a week – There are many sites that provide free tutorials, such as Iheartfaces as well as subscription based sites like CreativeLive, KelbyOne, and Lynda.com that offer the opportunity to learn a little more about your camera, as well as how to use software applications to successfully edit your images. If you find it easier to learn in a classroom, give yourself the gift of a workshop a year. The secret is to follow through on what you have learned.

Set specific parameters – Make some definitive decisions each time you go out to take images. Consider some of these ideas:

1 – Take only one lens with you. If you do not have fixed lenses, choose a zoom lens focal length and don’t be tempted to change it. This will encourage you to position yourself correctly for each shot. It will also help you to really understand the capabilities of each lens.

2 – Utilize the full frame. Fill your frame with the shot and don’t plan on cropping in post. This will encourage correct orientation, and enable you to make every pixel count.

3 – Decide upon a color or texture and concentrate on images of that color or texture. This makes you evaluate your surroundings and notice many things you may not normally have seen.

Vegas_Flower

4 – While teaching at a photographic conference in Las Vegas, I played around with the color/full frame challenge and spent a couple of hours in the beautiful botanical gardens located in the Bellagio hotel. I started with some fairly simple images and then dug down into the fragility of petals. I found myself down a whole new path involving the combination of shadow and color.

5 – Dedicate a photographic day to simply using your mobile phone, and get creative. There are many apps for editing camera phone images and some of the results are pretty impressive. While boating in Maine, I was able to capture the old Maine Windjammer, the Isaac H. Evans. I challenged myself to use only my mobile phone all day so that I would concentrate on light and composition. It was quite refreshing to have my head up and looking at my subject, rather than staring down the camera viewfinder!

IMG_8560-Edit

6 – Limit the number of images you take. Imagine you do not have the capability of taking many photographs. Make every image count, and don’t cheat by erasing images!

Win a FREE Camera Conversion!

Sometimes it is important to try to recognize the route of the challenged feeling! Each time I head up to Rockport, Maine to teach drone flight and aerial photography, I find myself having to overcome the inherent fears surrounding the nature of the class. I am not immune to the constant commentary surrounding the use of drones and their various applications. In order to overcome those mental challenges, I remind myself that I teach because I enjoy teaching, and the pleasure I receive from watching students initially grapple with the technology, and then start creating beautiful images is most certainly more contagious than the niggling doubts in my head. I also take time out to go and fly with my teaching partner and hone my skills a little more.

Maine_Lighthouse

Flying over water takes a little more concentration and awareness of the wind conditions. but the results can be incredibly rewarding. The image above is a single capture, and below, a 5 image panorama created in Lightroom. These were taken using a DJI Phantom 4.

Maine_Pano

Finally, I have also noticed that as infrared photography becomes more popular, there are many discussion groups debating about what constitutes a good IR image. No matter what my assignment, I carry my converted Canon 1DS with me and find an opportunity to experiment.

MaineIR

It is interesting to compare my results with images taken from the Phantom 4. In the image below, I am actually much closer to the boats in the harbor, but hovering over the water.

Boats

I challenge you all to experiment with IR. If you are not yet ready to convert one of your cameras, consider purchasing a filter that somewhat replicates the look and feel, and this will give you a great introduction. I am pretty sure you will soon be hooked. Whatever your end goal, don’t let those perceived or real challenges get in the way and don’t let the negativity of others (or your own doubts) prohibit your creativity.

Filed Under: Inspiration Tagged With: aerial photography, Canon, challenge, composition, DJI, DJI Phantom 4, inspiration, IR, landscape photography, Lifepixel, Maine Media Workshops, Panoramas, perspective, Photography, photography tips, Workshops

Blog Topics

  • Tutorials
  • Inspiration
  • Locations
  • Gear
  • News
  • Other/Misc

What our customers say:

Life Pixel has been a life-changer for me. Continue reading
Eric GConnecticut
Read more reviews
I am more than satisfied with the service I received Continue reading
Christopher JCanada
Read more reviews
I am more than pleased with the conversion job that you did Continue reading
LOUIS MWaco, Texas
Read more reviews
I am VERY impressed with his knowledge of your products and his patience in explaining it to a novice like me. Continue reading
Lynn FEssex, Maryland
Read more reviews
Things will only get better from here thanks to all of you. Continue reading
Phillip FRedding, California
Read more reviews
The Lifepixel newsletter reminds me of not having expressed my gratitude for the excellent job you made. Continue reading
Michael GGermany
Read more reviews
Your staff went above and beyond the call of duty to make sure everything was handled in an excellent manner. Continue reading
Paige RPearland, Texas
Read more reviews
It has given my old camera a new life, I will enjoy using it again. Continue reading
William PAustralia
Read more reviews
Excellent service and the camera works just great Continue reading
Hans FairhurstAustralia
Read more reviews
I just got my converted camera back from you guys. THANK YOU!!!! Continue reading
Anne CutlerForest Knolls, CA
Read more reviews
infrared_filter_choices_sidebar
ir_conversions_explained_sidebar
----------- Watch More Videos -----------
infrared_quick_start_guide

Ready to start shooting Infrared?

Convert My Camera

Subscribe To Our Newsletter

Receive updates, tips, cool tutorials, free stuff and special discounts.

Learn the Basics

  • Video
  • Start Here
  • Filter Choices
  • Focus Calibration
  • Lens Considerations
  • Camera Considerations
  • Place Your Conversion Order

Resources

  • Galleries
  • Lens Hot Spot Database
  • IR Tutorials
  • FAQ
  • Infrared Filter Choices
  • Infrared Photography Guide
  • Infrared DIY Tutorials

Company

  • Why Choose Us
  • Get In Contact
  • Job Openings
  • Write For Us
  • Affiliate Program
  • Terms of Use
  • Privacy Policy
  • Home
  • Start Here
  • Galleries
  • Tutorials
  • FAQ
  • Blog
  • Why Choose LifePixel?
  • Shop
  • Contact

Copyright © 2023 Life Pixel Infrared - All rights reserved - LifePixel Infrared Photography IR Conversion, Modification & Scratched Sensor Repair