Previsualization, or simply “visualization”, is one of the most simply yet alarmingly difficult aspect of making your own photograph become more than just the some of their parts. When we “previsualize” our images it means that the appearance of the final outcome before we ever click the shutter button. The method of previsualization was championed by the photographically indomitable Ansel Adams who believed the best way to convey wholeness within a photograph was to strive to see it in your minds eye from the get go. Everything else would then be a matter of what needs to be done in order to reach your personally desired outcome.
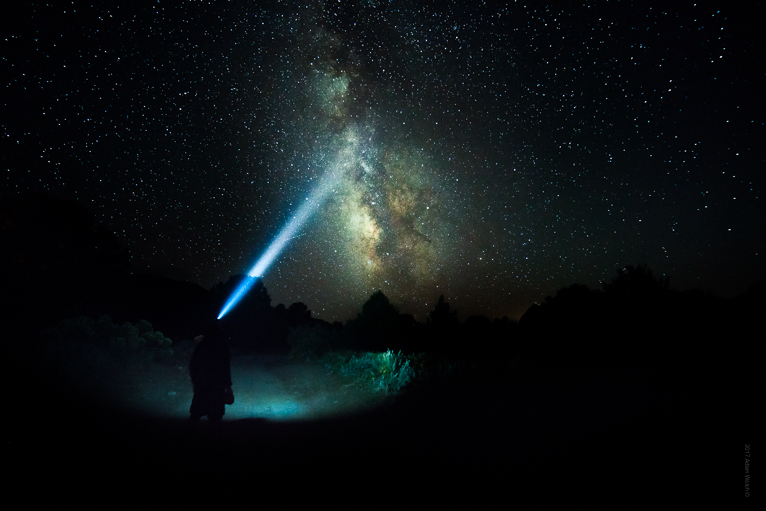
But how is it done? Or more importantly, how can you learn to do it yourself? Ansel gave us a lot to go on and we can learn a lot from his legacy. At the same time, we can mesh together with modern digital techniques and expound into something I like to call dynamic visualization. We’ll get more into that in just a minute. But first, let’s talk about how you can begin to visualize the finished photograph before you actually make it manifest itself from your camera.
Learning to “See”
Teaching yourself to see the finished product on the front end of the process isn’t an easy thing to accomplish, especially not right out of the gate. The ability to visualize a finished photograph is somewhat paradoxical due to the fact that a large component of the skill involves shooting a lot of photographs. This means that visualization is a product of repetition. Each time you make a photograph, you see the effect of shooting at the technical factors you have selected. Pay close attention to what settings you use!
Once you begin to mentally catalog the cause and effect relationship between your techniques and their respective outcomes you will then gradually learn to approximate the particular look of a finished image before it is actually shot.
Be Patient
The largest detriment in learning how to visualize your finished photos is that confidence-killing frustration that often sneaks in from perceived failure. Will you be able to anticipate the exact outcome of your photographs each and every time? Of course not. Failure is an incredible teacher and this is especially true when it comes to learning the skill of photographic visualization.

So, don’t allow yourself to be discouraged by the tedium. Shoot as often as you can, practice seeing the finished photo in your mind, observe the results, and then apply those outcomes to future photographs. I assure you that being able to see a finished photo(or close approximation) will slowly begin to happen on its own.
Dynamic Visualization in the Digital Age
I want to speak briefly on the progression of the visualization process as it pertains to today’s digitally integrated world of photography. The technique is one I have coined as “Dynamic Visualization” and is a direct evolution of the visualization idea of Ansel Adams. It involves the instant feedback we now are capable of achieving with our digital photographs. As we no longer have to wait for development of our film to be completed before we see the results of our efforts, the process of visualization changes. We can now allow the readily displayed outcome of our photos to directly impact the mechanism of visualization in a much quicker and more dynamic fashion.

What I mean here is that we immediately view the image we have just captured and that quick feedback can organically spur our creativity in real-time. This can lead to alternative compositions and exposure combinations that we might not have otherwise considered, thusly changing the final visualized image in our minds. This dynamic visualization could in fact be the continuation of Ansels visualization method. We first visualize the finished photo we want to make, receive real-time feedback from our digital displays, and then use that information to mold alternate(possible better) visualizations.
Final Thoughts on Visualization
The hard truth about learning visualization is that it takes time, effort, and patience. There are no real shortcuts when it comes to teaching yourself to “see” a photograph before it’s made. Shoot as much as you can and observe the results carefully. See the results of your work and study your own work. Visualization happens as much by physical labor as it does by mental flexibility. The key is to keep trying until that visualization “aha” moment makes its way to you. Just keep shooting!
Latest articles by Adam Welch (see all articles)
- Bare Bones Photography: What Gear Do You Really Need? - May 13, 2018
- A Simple Explanation of Aperture - May 13, 2018
- The Case for Black and White Photography - May 13, 2018
Adam Welch
Photo maker, author, and adventurer currently based in the western portion of his home state of Tennessee. You can usually find him on some distant trail making photographs or at his computer writing about all the elegant madness that is photography. Follow his sometimes controversial Blog on everything related to photography and then check out his cozy home on Instagram.
Adam has also authored one of the most comprehensive guide books on using Adobe Lightroom Classic CC. You can get your copy of Lightroom Mastery:
A COMPLETE GUIDE TO WORKING IN LIGHTROOM CLASSIC CC HERE!
See All Articles by Adam Welch


Leave a Reply