• Cart
  • Checkout
  • My Account

Infrared Conversions, IR Modifications & Photography Tutorials | Life Pixel IR

The world leader in infrared conversions, modifications & DIY IR conversion tutorials. Scratched sensor replacement, UV & Full spectrum conversions.

The world leader in infrared camera conversions

866.610.1710
  • Home
  • → Start Here ←
    • 1 – Introduction
    • 2 – Filter Choices
    • 3 – Focus Calibration
    • 4 – Lens Considerations
    • 5 – Camera Considerations
    • 6 – Start Shopping
  • Galleries
    • Infrared Photography
    • Infrared Time Lapse
    • Infrared Cinematography
    • Infrared Stop Motion
    • Ultraviolet Photography
    • Forensic Photography
  • Education
    • Training Sessions
    • How To Shoot Infrared
    • AR Coated Infrared Filters
    • Lens Hot Spot Database
    • Photoshop Video Tutorials
    • Infrared Issues & Solutions
    • IR Basics in Photoshop
    • Camera Quick Start Guide
    • DIY Conversion Tutorials
    • IR Photography Primer
    • Secondhand Cameras
    • Wall Of Shame
  • Workshops
  • FAQ
  • Blog
    • Tutorials
    • Inspiration
    • Locations
    • Gear
    • News
    • Other
  • Why Choose LifePixel?
    • Submit Your Review
  • Contact
  • Shop

6 Tips For Photographing Waterfalls

Who doesn’t like seeing a waterfall? And there is nothing quite like seeing a waterfall in full flow, but capturing unique images of waterfalls can be challenging. You will often be working in low light conditions and unless the waterfall takes a lot of effort to get to, you will be sharing it with hoards of other people. Just follow these few simple tips and transform your photos.

Kav Dadfar-Waterfalls-LifePixel

Wait For The Right Time

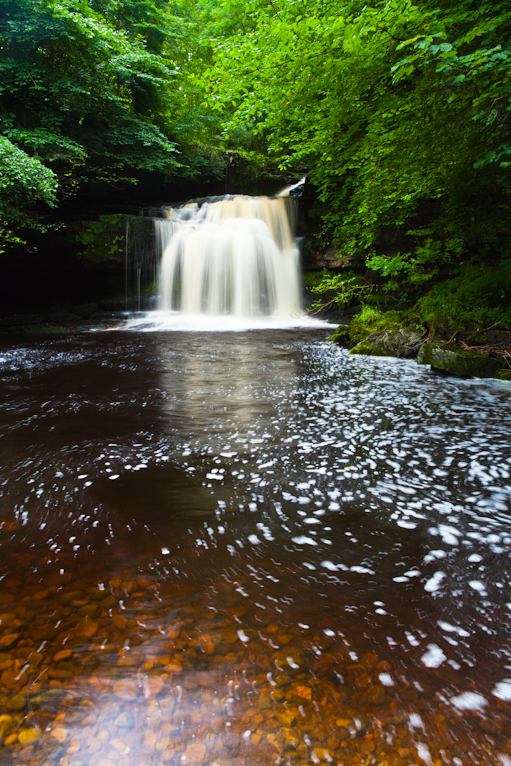
Waterfalls are best seen and photographed in full force which is usually after rainfall. So do your research and find out when the best time is to photograph them. Some waterfalls will be mere trickles in the summer months where as others will flow all year long. Try to work out which way the waterfall faces and plan your shoot accordingly. It will be much easier to photograph the waterfall with the light coming from behind you rather than in front. Cloudy days are great for photographing waterfalls as the diffused light means you will get less contrast between highlights and shadows.

Kav Dadfar-Waterfalls-LifePixel

Think About The Composition

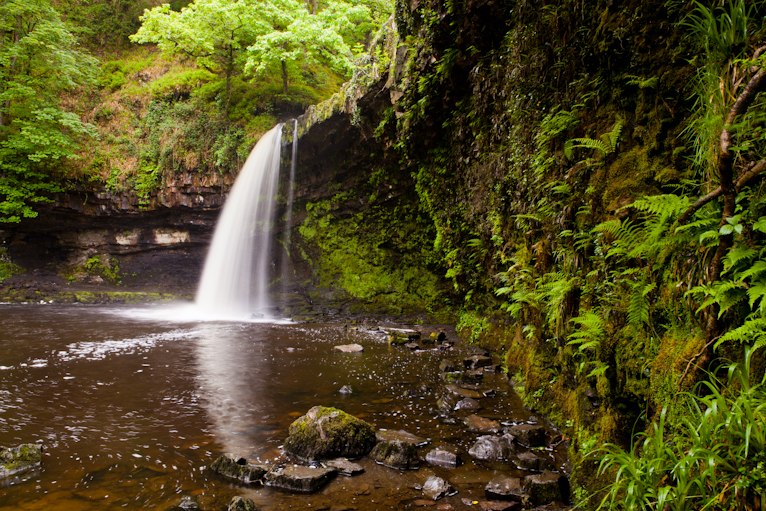
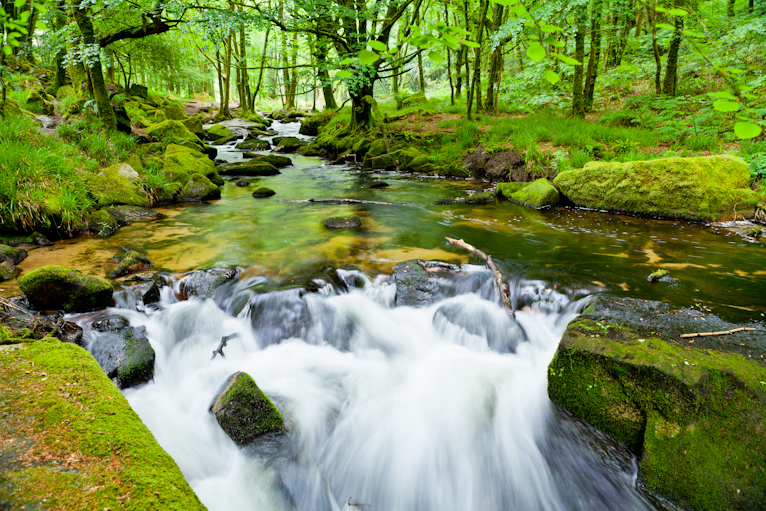
It’s important to compose your images to work with the river and waterfall. Don’t simply place your waterfall in the middle of the picture if it doesn’t look right; instead, try to direct the viewer’s eyes with the shape of the river to the waterfall. Placing a point of interest in the foreground is also a great way of direct the viewers attention from one object to another. The key is to really study the scene, take your time and work out the composition that works best.

Kav Dadfar-Waterfalls-LifePixel

Decide On Your Settings

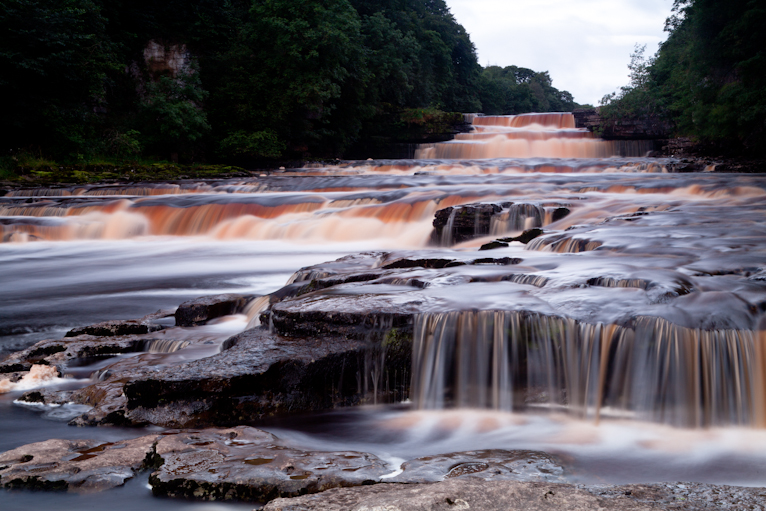
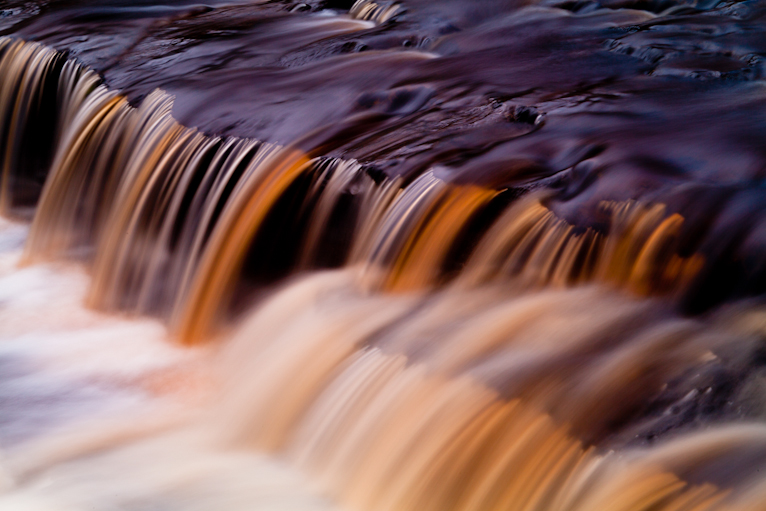
Do you want to freeze that action or get a smooth effect on the water? There’s no right answer, just what you want your photograph to say. If you want to freeze the action you will need a fast shutter speed which will be dependent on how fast the water is flowing. Start at around 1/250s and work your way up until you get the desired effect. For smooth looking water you’ll need a slower shutter speed. Again, start at around 1/15s and work your way down. Remember that if you are going to be using a slow shutter speed you will need a tripod.

Kav Dadfar-Waterfalls-LifePixel

Think About Surroundings

One of the best ways to capture waterfalls is when they are in contrast to the plants, rocks and foliage around them, so look out for these elements around the waterfall that you can incorporate into your photo. Fallen trees, leaves and even people can transform an image and give it a completely unique look and feel. You could even sometimes make the waterfall secondary in the composition and have the focus on another element in the scene such leaves on the ground or even the flow of the water.

Kav Dadfar-Waterfalls-LifePixel

Use A Polarizing Filter

A polarizing filter is incredibly useful when photographing any body of water. Not only will it limit unwanted reflections, but it will also help boost the saturation of blues and greens which are in abundant in and around waterfalls. They are fairly cheap and can also act as extra protection for your lens glass from the water.

Win a FREE Camera Conversion!

Kav Dadfar-Waterfalls-LifePixel

Be Patient

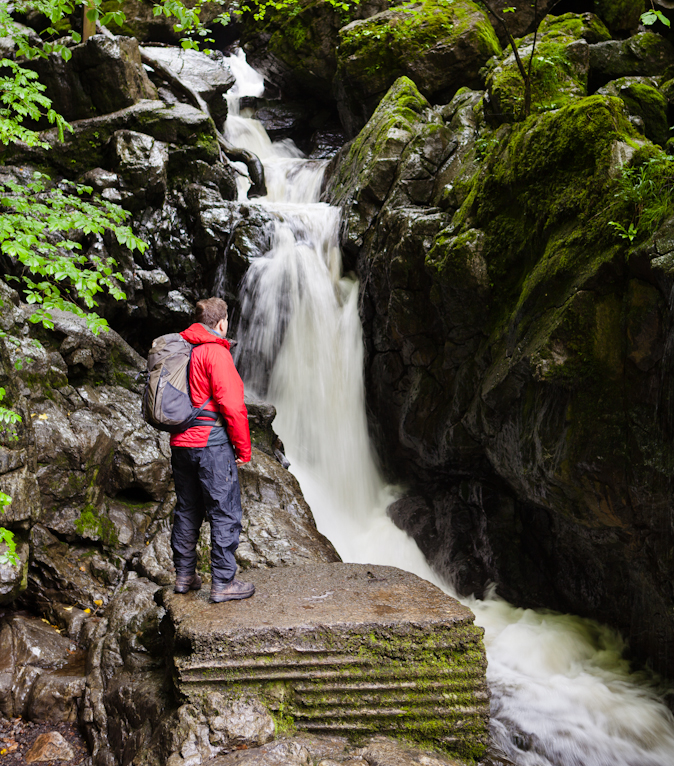
Unless the waterfall you are photographing requires a lot of effort to get to, it will likely attract crowds. One way to avoid this is to arrive very early in the day when you usually have the place to yourself. But if you do find that it’s busy just be patient and wait for a gap, but make sure you are ready and have your camera set up to go so that you don’t miss the opportunity. Or, you could always incorporate people into your composition to give a sense of scale and tell a completely different story.

Kav Dadfar-Waterfalls-LifePixel

Waterfalls make for fantastic photos and offer many different way of capturing them.  But as with all landscape photography, try to think beyond the obvious and don’t be afraid to take risks with your composition and settings. Waterfalls are pretty well photographed and to make your images stand out you need to be prepared to dedicate the time and effort needed to capture them at their best.

Show us your waterfall photos and share your tips and experiences below.

Photo Credits: Kav Dadfar (All rights reserved).

Share
Pin
Tweet
Email
Share

Filed Under: Tutorials Tagged With: landscape photography, photographing waterfalls, Travel photography

Using the “3 Picture Story” Technique to Improve Your Story Telling Images

A picture is worth a thousand words. So does that mean 3 pictures are worth 3000 words? If the photos tell a story, than arguably, the answer is yes. One of the great things about photography is that it can really allow the photographer to tell a story in a series of images that might need hundreds of words to describe. That is why magazines spend time choosing the perfect photos for front covers or to illustrate features, but capturing a series of images to tell a story isn’t easy. You need to avoid repetition whilst ensuring the story or theme is followed through in every photo. One of the best ways to practice and train to do this is using a technique called a 3 picture story where you tell a story in a set of just 3 photographs.

Here’s how it works:

The Big Picture

Your first image will usually be the wide angle photo that captures the general scene. For example, if you are photographing in a market, this might be a photo of the market showing the different stalls. Remember, this needs to work as set of 3 images so it should still convey the story you are telling. Even though you are capturing a wide scene, still keep it relevant to the story. This should be your ‘wow’ photo and often the one that a feature would start with as the opening spread.

Kav Dadfar_Story Telling_1

Main Focus

Once you’ve captured the wider picture it’s time to start getting more focused on the main subject of the story. This photo should begin to tell the viewer what the main story is focused on. Using the market as an example, if the first photo captures the whole of the market, this photo focuses on one of the market sellers. You need to ensure that it isn’t repetition of the wider photo by just zooming in; think about how you can make the two completely different but part of the same story.

Kav Dadfar_Story Telling_1

The Close-up photograph

The final photo needs to be a close-up of what is going on and this highlights the key detail of the story. This means you need to get up close to your subject which in turn means having to interact if it is a person (great practice for anyone who is shy). Try to think about what the single focal point of the story is and then think about how best to show it. For example, it could be the person’s hands if they are making something, or it could be the final plate of food that has been made.

Kav Dadfar_Story Telling_1

The great thing about this technique is that it requires you to use a wide range of photographic technical elements and usually will push people beyond their comfort zone on one of the photos. For example, if you struggle in close-ups, this is a great way to practice to improve. Once you have mastered the 3 photos, you can look to add a fourth or fifth photo if the story requires it, but be aware of repetition. The key is to make sure every photo different and to stand on its own merits whilst also feeling part of the same theme.

Win a FREE Camera Conversion!

Kav Dadfar_Story Telling_1

Telling a story in a set of photos isn’t easy but can be one of the most effective ways of showing a story. Think about all the times you have looked and newspapers and magazines and got a sense of the story without even reading the words. Like any type of photography, with practice, over time you will get better at creating stories using this technique.

Now it’s your turn. Show us your photo stories below?

Photo Credits: Kav Dadfar (All rights reserved).

Share
Pin
Tweet
Email
Share

Filed Under: Tutorials Tagged With: Photography, photography tips, Travel photography

Photogenic Places – a simple guide to photographing London

Kav Dadfar_London_Tower Bridge

It’s fair to say that London has been through a lot through the years.  After all, this is the city that survived the plague, a great fire, aerial bombardment during World War II and more recently terrorist attacks and even rioting. It’s risen from the ashes more than once to become one of the most significant cultural, financial and historical cities in the world, so it’s no wonder that London recently came top for the most visited city in the world and even less of a surprise that it’s one of the most photographed places.

But with so much to see and photograph it’s easy to feel overwhelmed, here are some simple tips for capturing the best that London has to offer.

1. Head to the River

If you are after the quintessential photograph of the London skyline, you need to head to the River Thames. From the banks of the river and the various bridges that cross over it, you can capture almost all of the famous landmarks London has to offer. The best time to capture these landmarks is early morning or late afternoon where you’ll have a soft light to make them glow. Another good place to capture the skyline of London is St Paul’s Cathedral where you can climb to the Golden Gallery at the very top for panoramic views of London. You should check The Photographer’s Ephemeris for the direction of the light and plan your shoot accordingly.

Big Ben and the Houses of Parliament, The London Eye, St Paul’s Cathedral, Tower Bridge, The Tower of London and even the financial centre are all visible from somewhere along the river. Head further east along the river and eventually you will reach the O2 arena and Maritime Greenwich which is a World Heritage Site and famous for such historic landmarks as the Cutty Sark.

London

Houses Of Parliament and Big Ben

2. Capture London’s Markets

Markets are great places to photograph and should be on every photographer’s shot list and London has no shortage of great markets to photograph. In fact, markets have been an essential part of London’s history right from their origins in the middle ages to today. These markets are now some of the best places in London get great food, original clothing and bargain antiques, and for photographers this means ample opportunities for great photos that often capture the real London away from the glitz and glamour of the West End.

There are lots of markets in London. Here are some of the main markets to add to your shot list:

  • Borough Market
  • Brick Lane Market
  • Camden Lock Market
  • Columbia Road
  • Covent Garden
  • Greenwich Market
  • Portobello Road Market
  • Old Spitalfields Market
Borough Market

Borough Market

Kav Dadfar_London_Portobello Market

Portobello Market

3. Go Beyond the West End

Most of the photos of London you’ll see are of the famous landmarks or the icons like the black taxis or pubs, but to really capture the heart of London you’ll need to go beyond these tourist spots to the various communities that reside in the different parts of the City, for example, head to Southall and you’ll see why this area is often described as Little India. Venture to Edgware Road for a distinctly Middle Eastern vibe or head to Soho where you’ll find Chinatown. All of these communities help make London what it is and are often much more unique and rewarding to photograph than the famous monuments.

Win a FREE Camera Conversion!

Chinatown_London

Chinatown

4. Head to London’s green spaces

There is no shortage of public parks and open spaces in London. On any given sunny or warm day, these parks are filled with walkers, sun bathers, runners, cyclists and people playing team sports or just relaxing whilst eating their lunch. These parks offer some of the best places to capture beautiful images that depict London. Some of these spaces are Royal Parks which house historic buildings such as Buckingham Palace or Kensington Palace and are also teeming with local wildlife.

The main parks to photograph in London are the Royal Parks which consist of:

  • Green Park
  • St. James’s Park
  • Greenwich Park
  • Hyde Park
  • Kensington Gardens
  • Regent’s Park
  • Bushy Park
  • Richmond Park
Richmond Park

Richmond Park

5. Don’t forget Londoners

Often the best way to bring to life a destination is through its locals and London is no exception. It might be commuters heading over the Millennium Bridge on their way to work, a busker near some of the famous landmarks or a store owner watching the world go by outside their shop. These Londoners are what make London what it is and should be a must for any photographer.

Kav Dadfar_London_Busker

Busker in London’s Notting Hill area

6. London Loves an Event

There’s nothing more Londoners love more than an outdoor event. Arguably, the biggest of these is the Notting Hill carnival – Europe’s biggest street festival which has been running since 1964 and it occurs at the end of August over 2 days in London’s trendy Notting Hill area.  But there’s plenty more across the year worth photographing like St Patrick’s Day, St George’s Day, Thames Festival, Chelsea Flower Show, Trooping The Colour, The Lord Mayor Show and the various cultural celebrations such as Diwali and Chinese New Year.

London_Notting Hill Carnival

Notting Hill Carnival

Kav Dadfar_London_Chinese New Year

Chinese New Year celebrations in London

7. London Things

Yes it’s a clichés, and yes they have been photographed a million times, but those iconic London things like black taxis, red phone boxes and the Queen’s guards are a part of makes London so special, so don’t be afraid to photograph them. After all, they are a big part of the experience of visiting London.

Kav Dadfar_London_Guard

A guard outside Horse Guard Parade

London is a photographer’s paradise with so much to photograph and see and with careful planning and research you can cover a lot in just a few days. In fact, the only thing that might scupper your plans is the weather.

Now it’s your turn, share your tips and photos below.

Photo credits: Kav Dadfar – All rights reserved. Dreamstime. 

Share
Pin
Tweet
Email
Share
7 Shares

Filed Under: Tutorials Tagged With: london, london photography, Travel photography

How to Photograph the Desert

Deserts are one of my favourite places to photograph because there’s nothing quite like gazing out into the wilderness and seeing continuous rolling sand dunes against a beautiful blue sky, but the harsh conditions and lighting can make photographing the desert a challenge. Follow these simple tips and you could improve your desert photos.

Kav_Dadfar_Desert_7

Beware of sand

If you are going to be photographing in the desert, the first thing you need to do is protect your camera. Sand particles can cause havoc to your camera and even if it is a calm day with little wind, there will still be sand blown from dunes. Avoid changing lenses and if possible take two cameras with different lenses. If you have to change your lens, do it as quickly as possible and try to protect it by shielding against the wind. It is a good idea to wrap your camera in a cloth when you are not using it and use a UV filter to protect the glass on your lens. Remember it’s much cheaper to replace a filter than have to repair a scratched lens glass. And always remember to clean your camera thoroughly when you get back to your hotel room as the particles of sand would still be on the outside of your camera.

Avoid harsh light

In any form of landscape photography, the light is one of the most critical elements of the photo. Early morning or late afternoon light is usually best and this is even truer for photography in the desert. The soft golden light will enhance the image and give you much more contrast in the patters of the sand, but be mindful that your shadow isn’t intruding into your image and if you are going to be using a slow shutter speed make sure you use a sturdy tripod. Try to avoid the harsh midday sun which will make your scene look flat.

Kav_Dadfar_Desert_1

Use the correct settings

Like any type of photography, you need to ensure that your photos are technically correct and don’t have unwanted noise or camera shake.  There is no hard and fast rule for photography and every scene and its conditions will require its own settings, but here are a few simple tips to get you started:

1. Low ISO – There’s no shortage of light in the desert, so keep your ISO as low as possible to avoid unwanted noise in your images. If you are photographing early or late in the day, use a tripod.

2. Middle range f-number (i.e. f/11) – In most cases you would want the majority of your image sharp and in focus. To achieve this you need to close the aperture as much as you need in order to get the required depth of field.

3. Polarizing Filter – A polarizing filter can be really beneficial in bringing out the blue sky and also reducing reflections from the sand. A cool blue sky can really compliment the golden or red colour of the sand.

4. Turn off stabilization – If you are using a tripod, make sure you turn off your camera’s image stabilization. This does not provide extra benefits and can actually be detrimental to your images by causing artefacts.

Kav_Dadfar_Desert_6

Find something interesting

Let’s be honest, sand itself is pretty boring. What makes those amazing photographs of deserts stand out is usually something that makes them interesting, like a point of interest, so always be on the lookout for plants, wildlife or even people that you can incorporate into your composition. Not only will this make your images much more interesting and tell more of a story, but it will help draw the viewer’s eyes to the subject rather than trying to process the whole image.

Kav_Dadfar_Desert_5

Create stories

Photography allows us to tell a story in just a few photos and the desert can provide an amazing backdrop for these stories, so instead of just concentrating on the landscape, try to look for and capture images that can tell a story. Footprints in the sand, an insect scurrying along or an animal resting in the shade can all provide amazing photographs, which also tell a story and can really help diversify your portfolio.

Kav_Dadfar_Desert_4

Details matter

Sometimes the most evoking photos of places are the small details. This is because our eyes usually look for the big picture and we miss some of the small details around us. In the desert this is in the form of the amazing sand lines that the wind creates. With the light coming from the side these can look fantastic as the shadows can really highlight the lines even more, so instead of trying to capture the whole scene, simply crouch down and focus on the detail in the sand. Make sure you are aware of where you are planning to photograph – the last thing you would want are footprints unintentionally spoiling the beautiful untouched scene.

Win a FREE Camera Conversion!

Kav_Dadfar_Desert_3

Think beyond the obvious

If you really want to become a successful photographer, often you have to try and capture photos that are in some way different to what already exists. Sometimes this happens by luck in that you capture a scene with beautiful lighting, a dramatic sunset or a wildlife encounter, but the majority of the time you have to be willing to work hard to capture something unique. You might have to hike for a few hours to a location to give you a different view or keep coming back to a location until the conditions and composition are right. The key is to always analyze what you are seeing and try to think of how you can show it differently. Then be willing to do whatever it takes (within the law) to capture it.

For example, I made it a mission that one day during my stay I was going to try and capture this road from a point that could show it against the vastness of the desert, so I drove around until I could find the highest dune and then walked up in the searing heat and humidity to be able to capture this photograph.

For example, I made it a mission that one day during my stay I was going to try and capture this road from a point that could show it against the vastness of the desert, so I drove around until I could find the highest dune and then walked up in the searing heat and humidity to be able to capture this photograph.

Deserts are truly wonderfully places to photograph. The sheer vastness of the dunes often captivates anyone who sees them in real life or in photographs. With the right approach and hard work you can capture stunning photographs that will stand the test of time.

Show us your great photographs of the desert and share you tips and experiences below.

Share
Pin
Tweet
Email
Share

Filed Under: Tutorials Tagged With: deserts, Photographing deserts, Travel photography

  • « Previous Page
  • 1
  • 2
  • 3

Blog Topics

  • Tutorials
  • Inspiration
  • Locations
  • Gear
  • News
  • Other/Misc

What our customers say:

Life Pixel has been a life-changer for me. Continue reading
Eric GConnecticut
Read more reviews
I am more than satisfied with the service I received Continue reading
Christopher JCanada
Read more reviews
I am more than pleased with the conversion job that you did Continue reading
LOUIS MWaco, Texas
Read more reviews
I am VERY impressed with his knowledge of your products and his patience in explaining it to a novice like me. Continue reading
Lynn FEssex, Maryland
Read more reviews
Things will only get better from here thanks to all of you. Continue reading
Phillip FRedding, California
Read more reviews
The Lifepixel newsletter reminds me of not having expressed my gratitude for the excellent job you made. Continue reading
Michael GGermany
Read more reviews
Your staff went above and beyond the call of duty to make sure everything was handled in an excellent manner. Continue reading
Paige RPearland, Texas
Read more reviews
It has given my old camera a new life, I will enjoy using it again. Continue reading
William PAustralia
Read more reviews
Excellent service and the camera works just great Continue reading
Hans FairhurstAustralia
Read more reviews
I just got my converted camera back from you guys. THANK YOU!!!! Continue reading
Anne CutlerForest Knolls, CA
Read more reviews
infrared_filter_choices_sidebar
ir_conversions_explained_sidebar
----------- Watch More Videos -----------
infrared_quick_start_guide

Ready to start shooting Infrared?

Convert My Camera

Subscribe To Our Newsletter

Receive updates, tips, cool tutorials, free stuff and special discounts.

Learn the Basics

  • Video
  • Start Here
  • Filter Choices
  • Focus Calibration
  • Lens Considerations
  • Camera Considerations
  • Place Your Conversion Order

Resources

  • Galleries
  • Lens Hot Spot Database
  • IR Tutorials
  • FAQ
  • Infrared Filter Choices
  • Infrared Photography Guide
  • Infrared DIY Tutorials

Company

  • Why Choose Us
  • Get In Contact
  • Job Openings
  • Write For Us
  • Affiliate Program
  • Terms of Use
  • Privacy Policy
  • Home
  • Start Here
  • Galleries
  • Tutorials
  • FAQ
  • Blog
  • Why Choose LifePixel?
  • Shop
  • Contact

Copyright © 2025 Life Pixel Infrared - All rights reserved - LifePixel Infrared Photography IR Conversion, Modification & Scratched Sensor Repair