• Cart
  • Checkout
  • My Account

Infrared Conversions, IR Modifications & Photography Tutorials | Life Pixel IR

The world leader in infrared conversions, modifications & DIY IR conversion tutorials. Scratched sensor replacement, UV & Full spectrum conversions.

The world leader in infrared camera conversions

866.610.1710
  • Home
  • → Start Here ←
    • 1 – Introduction
    • 2 – Filter Choices
    • 3 – Focus Calibration
    • 4 – Lens Considerations
    • 5 – Camera Considerations
    • 6 – Start Shopping
  • Galleries
    • Infrared Photography
    • Infrared Time Lapse
    • Infrared Cinematography
    • Infrared Stop Motion
    • Ultraviolet Photography
    • Forensic Photography
  • Education
    • Training Sessions
    • How To Shoot Infrared
    • AR Coated Infrared Filters
    • Lens Hot Spot Database
    • Photoshop Video Tutorials
    • Infrared Issues & Solutions
    • IR Basics in Photoshop
    • Camera Quick Start Guide
    • DIY Conversion Tutorials
    • IR Photography Primer
    • Secondhand Cameras
    • Wall Of Shame
  • Workshops
  • FAQ
  • Blog
    • Tutorials
    • Inspiration
    • Locations
    • Gear
    • News
    • Other
  • Why Choose LifePixel?
    • Submit Your Review
  • Contact
  • Shop

Colour Theory And Photography

The word photography derives from the Greek words photos (light) and graphien (to draw), literally translating to mean “drawing with light.” When you take a photograph, your film or digital image sensor captures light rays comprised of photons. In layman’s terms, photons are responsible for which colours we see with our eyes.

A photographer who intentionally utilizes colours is more likely to produce content that catches attention and evokes emotion. Psychologists have studied the effects of colours on the human mind, providing us with an understanding of how a colour can persuade behaviour, mood, and perception. If you’re new to photography and looking to step up your game, focus on the colours you’re capturing, not what is in front of you. In this article, we will cover how to use a colour wheel and different types of colour schemes.

Colour_theory_photography

The colour wheel

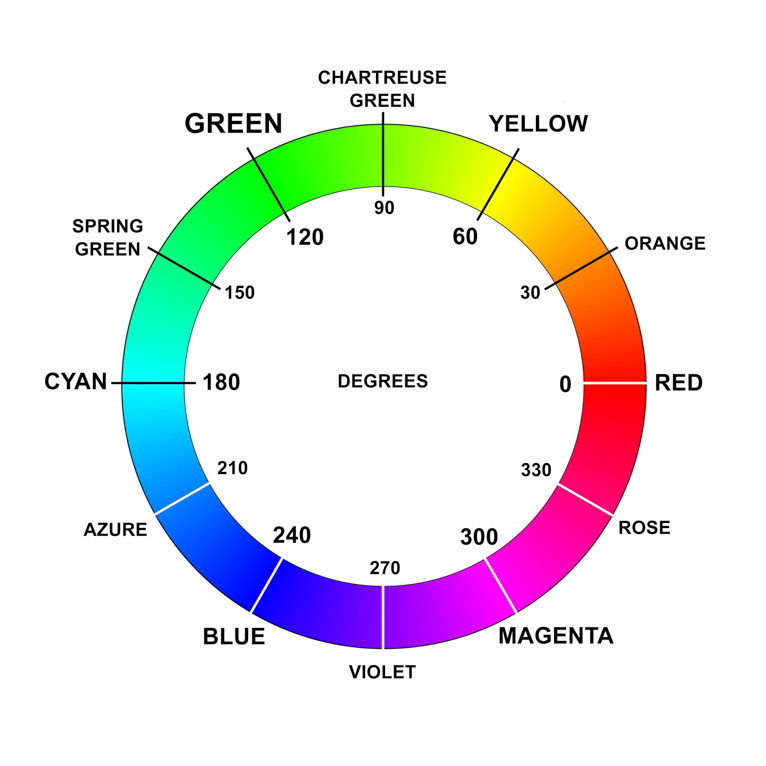
As a child, most of us learned in school that the primary colours are red, yellow, and blue, which is referred to as the RYB system that was applicable because you were probably learning by mixing paints on a piece of paper. Today, the majority of the population is spending more time looking at devices to see images. Televisions, computer screens, and cell phones all display colour by using red, green, and blue as primary colours because of the relationship between light and how our eyes perceive colour. We will focus on the RGB system as our base primaries for the sake of adapting and improving. The RGB colour wheel is versatile with a more extensive range of colours, making it the perfect tool.

Colour_theory_photography

A colour wheel allows you to visualize how colours affect each other. Primary colours are the foundation from which new colours can be created when mixed. Let’s start with red, green, and blue as our primaries. If you mix any two of them, you create what is called a secondary colour.

  • Red + green = yellow
  • Green + blue = cyan
  • Red + blue = magenta

Take it one step further and mix a secondary colour with one of its primary parent colours to get what is called a tertiary colour. There are six tertiary colours on the colour wheel.

  • Yellow + red = orange
  • Yellow + green = spring green
  • Cyan + green = chartreuse green
  • Cyan + blue = azure
  • Magenta + red = rose
  • Magenta + blue = violet

These twelve colours make up the RGB colour wheel and act as a guide to figuring out which colours are harmonious together. It’s important to note that it is possible to use these colours in a visually unpleasing way. This next section will help you to understand different ways to use colour properly through the help of colour schemes.
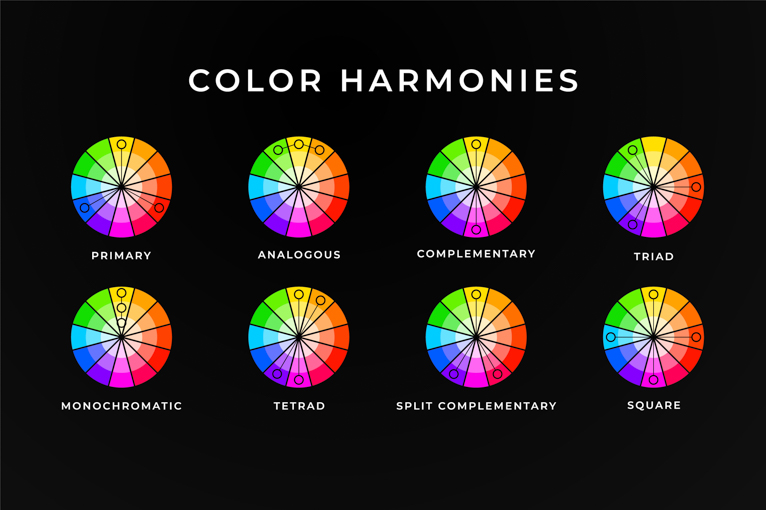
Colour_theory_photography

Colour schemes

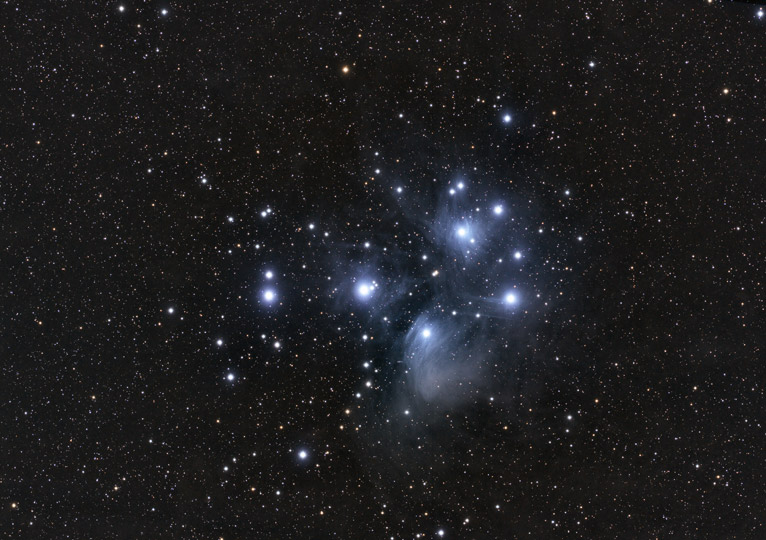
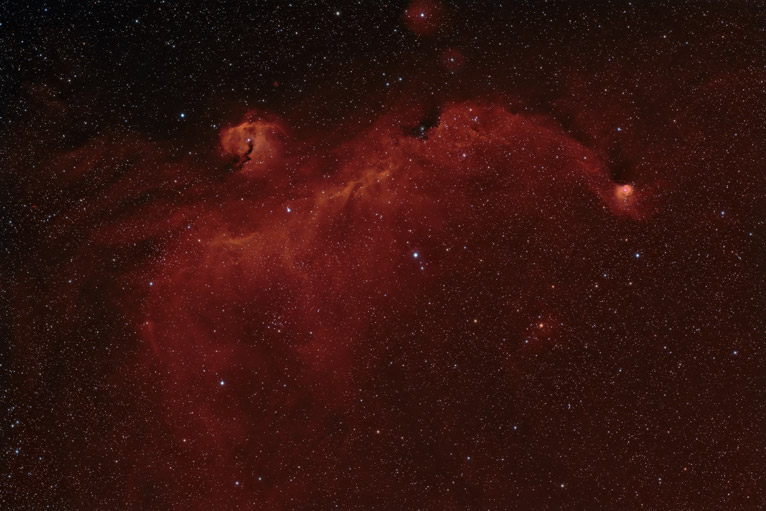
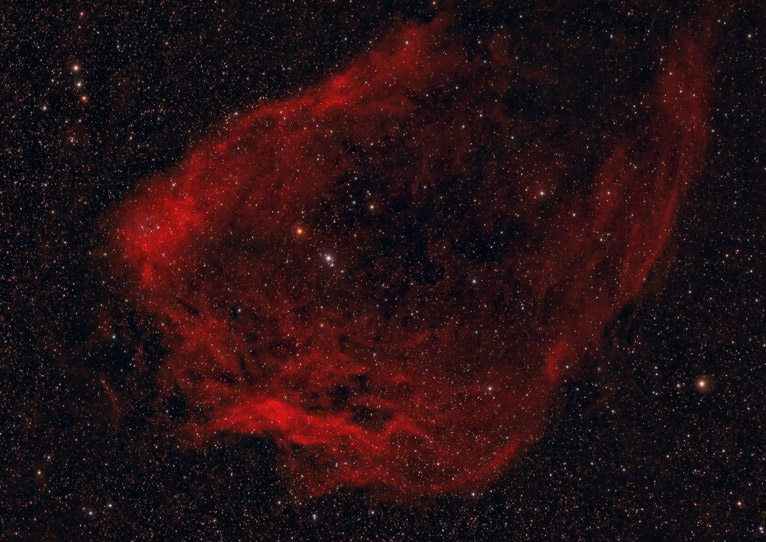
Monochromatic Colours – In monochromatic photography, only one colour is used. The use of different tints and shades of one particular colour is used to depict depth and content in the photograph. A monochromatic colour scheme can provide an emotional photograph, especially if you consider the psychological aspect. Take the colour blue as an example. Depending on how you use a blue scheme, you can portray sadness, tranquillity, or loneliness.

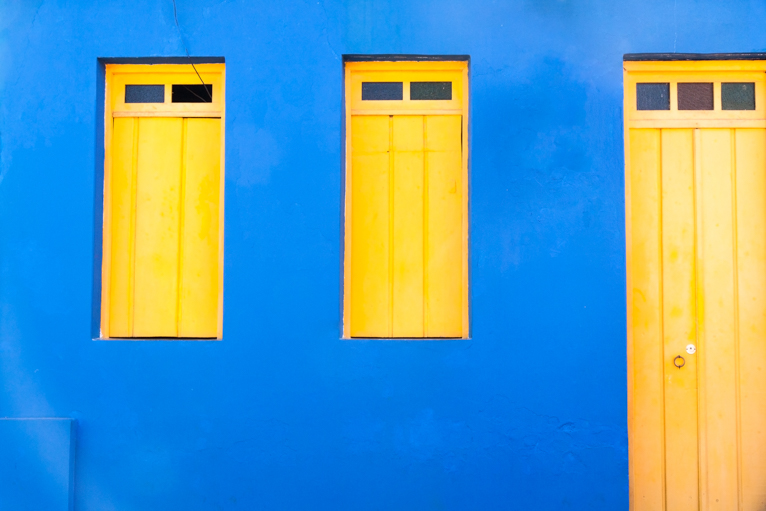
Complementary Colours – When using a complementary colour scheme, a photographer uses two colours that are on opposite sides of the colour wheel. Complementary colours are useful for providing a contrast that makes subjects pop and can easily stand side by side. This useful scheme works if you are looking to have a colourful yet straightforward photograph.

Split-Complementary Colours – The split-complementary colour scheme uses three colours. After recognizing what your base colour is, find the colour that is opposite of it, but don’t use that colour. Instead, look to the two colours on either side of it. On the colour wheel, you can see that the split-complimentary colours of blue are orange and chartreuse green.

Tetradic Colours – Also known as double-complementary, the tetradic scheme involves four colours. Theses colours are two sets of complementary colours in one photograph. A tetradic scheme can be challenging to accomplish if you don’t moderate your uses of the colours. A good rule of thumb when trying to pull this scheme off is to start small. A photo can become overwhelming if your four colours seem to take over the entirety of the image.

Analogous Colours – Commonly found in nature, analogous colours are known to be quite pleasing to the eye. This scheme is made up of three colours that are directly next to each other on the colour wheel. Artists of many forms suggest the 60-30-10 rule when attempting an analogous colour scheme. 60% of the image should be dedicated to your base colour, 30% accent colour, and 10% to your colour that adds a pop in a balanced photograph. Think of it this way – one colour is your main star while the other two are supporting colours.

Triadic Colours – If the goal of your photo is to have an image that is immensely colourful and vibrant, triadic colours can be a grand scheme to use. As the name suggests, this involves three colours that are evenly spaced apart on the colour wheel, taking over the majority of your photo. The primary colours that we are focusing on is a perfect sample scheme that quickly adds boldness.

Colour_theory_photography

Utilizing the colour wheel and understanding how to create your colour schemes is something that every photographer should apply to their work. Even when you’re not taking a photo, practice recognizing colour schemes in everyday life. This approach will help you to develop a keen eye to spot a good opportunity for an image. If you have the time to set up your scene, take your time, and refer back to the colour wheel and colour schemes list. With practice, you’ll be able to see these colours naturally in everyday life.

Photo credits: Dreamstime – All rights reserved. No usage without permission.

  •  

Filed Under: Tutorials Tagged With: Colour, Colour theory, Colour wheel, RGB, RGB Colour

If Your Eyes Could See… – Part 1

For those of us that shoot IR photos, we already have a glimpse into what the world looks like illuminated in the invisible light of infrared. It has fascinated me that photos photographed in this light can have such interest and depth. Similarly, I have seen things in the heavens that only those with the appropriate telescope and imaging equipment have seen. I say “seen”, but it in reality, our eyes are not sensitive enough to actually see these magnificent & hidden astroscapes.

In this series, I’ll be showing a few of my deep sky astrophotos.  These were all shot with my widefield imaging equipment. First covered will be the nebula shot in “color”. The camera (a cooled, full frame CCD) is monochrome. So the color is assembled by shooting through a series of filters and assembling the color images in Photoshop. There are a couple RGB images that contain only red green and blue light and others shot through narrowband filters. You can also review my Astrophotography series, for more detail on some of this, including shooting with a DSLR.

M45 – The Pleiades

M45 is a beautiful open cluster that’s a little difficult to photograph.  It’s a reflection nebula, which means the dust that is visible is being reflected from the nearby starlight.  It needs to be imaged with RGB filters, instead of narrow band filters.  So it is much more affected by light pollution.  Even so, this image was shot from my backyard in a fairly heavily light polluted area.  There is much more dust and nebulosity to be seen here when imaged from darker skies.

Tulip Nebula

If your eyes were much more sensitive, the night sky would look very different. Most of these images represent a field of view of about 4 x 8 full Moons. So the features are large and would be prominent in the night sky. Imagine looking out your window and seeing the Tulip Nebula rising from the East.

A telescope’s main function is to gather light. This is one of the purposes for larger and larger telescopes. Resolution is also improved, but let’s just look at the light gathering ability. Compare the diameter of a telescope’s aperture with the pupil in your eye. This large aperture gathers many times more photons than your eye alone. The larger the diameter, the better the light gathering and the easier it is to see faint objects.

M42 _The Great Orion Nebula

With the exception of the Orion nebula (shown above), most of the objects in photos shown here are not visible to the naked eye. The additional light gathering ability of the telescope helps to increase the visibility.  Long exposures improve the image depth and visibility even more. This basically stacks more and more photons on the film or CCD until the image is visible.  All of the images shown here contain at least several hours of integration time.  As an example, the California Nebula was photographed with 6 filters, RGB and 3 narrow band filters over a period of 7 nights.  This resulted in a total integration time of 18 hours.  This may seem excessive, but image stacking helps significantly reduce the image noise.  Even images from a modified DSLR produce fantastic results.

RGB Barnard 30 & Sh2-264

The image above was shot only with RGB filters and exposures of 5 and 10 minutes.  The total integration time was 2.5 hours.  I wanted to point out the difference of this image and the one directly below, which also includes data from 3 additional filters, Hydrogen Alpha (H-Alpha), Oxygen III and Sulphur II (narrowband filters).  Each narrow band exposures were 30 minutes in length.  Many were recorded over several nights bringing the total exposure integration time to nearly 20 hours.  As you can see with longer the exposures, much more detail is visible.

HaRGB Barnard 30 + Sh226

Each of these images also requires a significant amount of processing time.  The individual monochrome image stacks needed to be processed.  Then the data from each filter color needed to be color mapped, aligned and overlayed.  Some final processing is done and the image is complete.  At least, that’s the way it’s supposed to work.  I always found that I never seemed to actually finish any image.  I’d continually tweak and adjust until I was happy, each time thinking it was done.

IC2177 – The Seagull Nebula

My imaging telescope is considered widefield (530mm f/5).  It provides lower magnification, in favor of wider views of the night sky.   Although slightly magnified, the images would still appear fairly large if you could see with super sensitivity.

SH2-129 – The Flying Bat Nebula

In the next part of this short series, we’re going to take a look at similar celestial views.  However, these images were recorded using only a single filter. I’ll share some of my all-time favorites in my favorite formats.  Stay tuned.


Aside:  Did you know that Life Pixel does camera modifications for astrophotography?  As I described in an earlier astrophotography blog , most stock cameras need to be modified to be able to see the all-important hydrogen-alpha emission.  This emission is deep red and is blocked by most stock camera UV/IR cut filters.  Replacing this filter with a modified version that passes the H-alpha emission is very important for the highest sensitivity and best results.  Alternatively, the camera can be modified for full spectrum use and external filters added for astrophotography use.   You can find details in the links below:

Full Spectrum Modifications

Hydrogen-Alpha Modification

Filed Under: Inspiration Tagged With: Astrophotography, Barnard Dark, Bat, Eric Chesak, full spectrum, H-alpha, Ha, HaRGB, IC2177, M42, M45, Modification, Narrowband, Nebula, NGC1499, Orion, Pleiades, RGB, Seagull, Sh2-129, SH2-264, Tulip

Blog Topics

  • Tutorials
  • Inspiration
  • Locations
  • Gear
  • News
  • Other/Misc

What our customers say:

Life Pixel has been a life-changer for me. Continue reading
Eric GConnecticut
Read more reviews
I am more than satisfied with the service I received Continue reading
Christopher JCanada
Read more reviews
I am more than pleased with the conversion job that you did Continue reading
LOUIS MWaco, Texas
Read more reviews
I am VERY impressed with his knowledge of your products and his patience in explaining it to a novice like me. Continue reading
Lynn FEssex, Maryland
Read more reviews
Things will only get better from here thanks to all of you. Continue reading
Phillip FRedding, California
Read more reviews
The Lifepixel newsletter reminds me of not having expressed my gratitude for the excellent job you made. Continue reading
Michael GGermany
Read more reviews
Your staff went above and beyond the call of duty to make sure everything was handled in an excellent manner. Continue reading
Paige RPearland, Texas
Read more reviews
It has given my old camera a new life, I will enjoy using it again. Continue reading
William PAustralia
Read more reviews
Excellent service and the camera works just great Continue reading
Hans FairhurstAustralia
Read more reviews
I just got my converted camera back from you guys. THANK YOU!!!! Continue reading
Anne CutlerForest Knolls, CA
Read more reviews
infrared_filter_choices_sidebar
ir_conversions_explained_sidebar
----------- Watch More Videos -----------
infrared_quick_start_guide

Ready to start shooting Infrared?

Convert My Camera

Subscribe To Our Newsletter

Receive updates, tips, cool tutorials, free stuff and special discounts.

Learn the Basics

  • Video
  • Start Here
  • Filter Choices
  • Focus Calibration
  • Lens Considerations
  • Camera Considerations
  • Place Your Conversion Order

Resources

  • Galleries
  • Lens Hot Spot Database
  • IR Tutorials
  • FAQ
  • Infrared Filter Choices
  • Infrared Photography Guide
  • Infrared DIY Tutorials

Company

  • Why Choose Us
  • Get In Contact
  • Job Openings
  • Write For Us
  • Affiliate Program
  • Terms of Use
  • Privacy Policy
  • Home
  • Start Here
  • Galleries
  • Tutorials
  • FAQ
  • Blog
  • Why Choose LifePixel?
  • Shop
  • Contact

Copyright © 2025 Life Pixel Infrared - All rights reserved - LifePixel Infrared Photography IR Conversion, Modification & Scratched Sensor Repair