• Cart
  • Checkout
  • My Account

Infrared Conversions, IR Modifications & Photography Tutorials | Life Pixel IR

The world leader in infrared conversions, modifications & DIY IR conversion tutorials. Scratched sensor replacement, UV & Full spectrum conversions.

The world leader in infrared camera conversions

866.610.1710
  • Home
  • → Start Here ←
    • 1 – Introduction
    • 2 – Filter Choices
    • 3 – Focus Calibration
    • 4 – Lens Considerations
    • 5 – Camera Considerations
    • 6 – Start Shopping
  • Galleries
    • Infrared Photography
    • Infrared Time Lapse
    • Infrared Cinematography
    • Infrared Stop Motion
    • Ultraviolet Photography
    • Forensic Photography
  • Education
    • Training Sessions
    • How To Shoot Infrared
    • AR Coated Infrared Filters
    • Lens Hot Spot Database
    • Photoshop Video Tutorials
    • Infrared Issues & Solutions
    • IR Basics in Photoshop
    • Camera Quick Start Guide
    • DIY Conversion Tutorials
    • IR Photography Primer
    • Secondhand Cameras
    • Wall Of Shame
  • Workshops
  • FAQ
  • Blog
    • Tutorials
    • Inspiration
    • Locations
    • Gear
    • News
    • Other
  • Why Choose LifePixel?
    • Submit Your Review
  • Contact
  • Shop

What Shots Should Be In Your Vacation Photo Book?

A really great way to improve your photography and also to ensure that your photos from a trip don’t just stay on your hard drive is to create a photo book. Doing so will not only mean you can show off your trip (and photography skills) to your friends and family, but it will also give you a goal to aim for after a trip. It will help you be able to edit your photos and only select the very best ones. It will teach you how to ensure your photos flow in a clear pattern and story rather than a repetitive set of shots. So here are some tips to help you capture the shots you should, to be able to create a beautiful photo book.

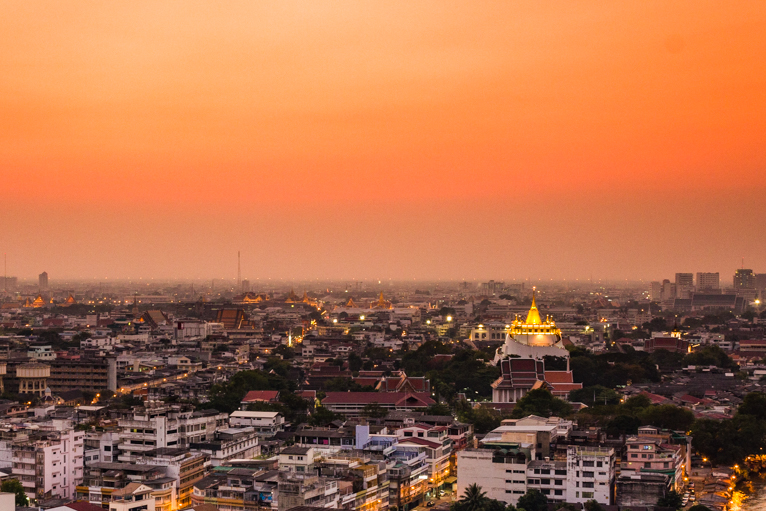
The “show stopper” shot

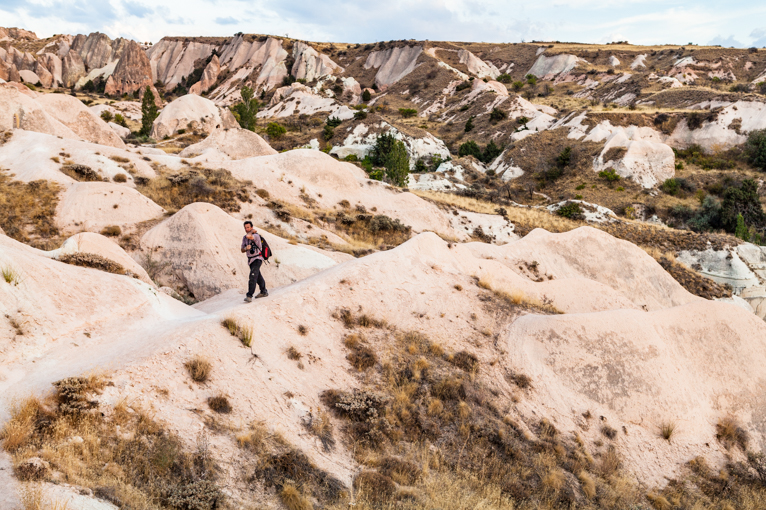
This is the one that most people love to capture. The iconic, wide-angle shot that would look amazing on the wall or in a double-page spread. For example in a magazine, this would be the opening double-page spread that would grab people’s attention. Depending on your destination this shot should be something that captures the overall narrative. For example, if you are hiking, this might be a photograph of someone walking or camping in the wild. Whereas a train journey might feature a landscape photo of a train in a beautiful landscape. This photo might be your cover or even as an opening spread.
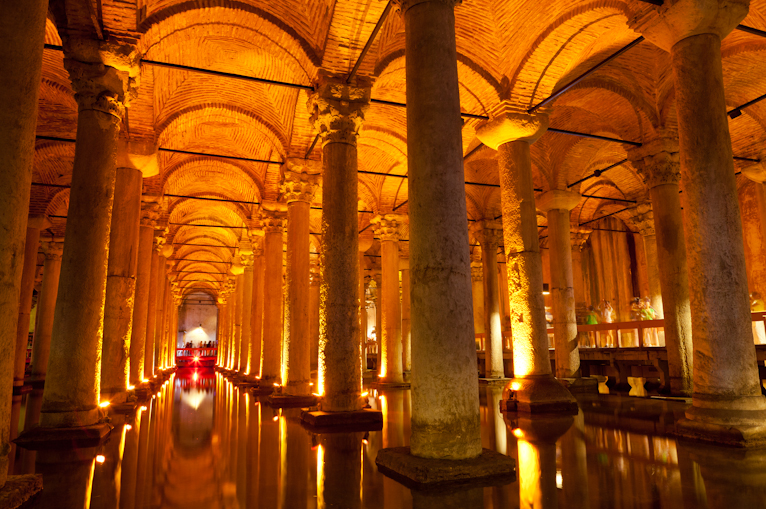
Main icon

How can you have a book about a destination without the main landmark featuring in it? Imagine a book about your time in Paris without the Eiffel Tower. These famous icons have been photographed millions of times but that shouldn’t discourage you from taking your own shots. You can either try to come up with a unique way of photographing them or you can just take the obvious shot – but try to do it better. That might be in a better light or different season to the usual. Even in this day and age, there are still opportunities for unique shots of those famous landmarks but try not to fill your photo book with them. Three or four shots will be more than enough and try to make them a little different from one another. For example, one could be a wide-angle view that captures the whole landmark. Another could be a close up of the details and the third could be showing what is happening around it.

This will help people stay more engaged with the story and make the book less repetitive and boring to look through.
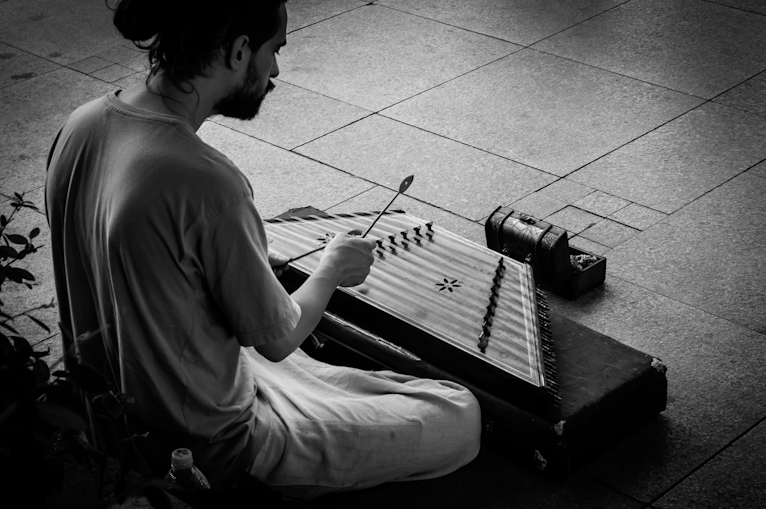
People

Often this is one area that you are able to really capture different shots to what already exists. People are such an essential part of our experience of a place that it is vital to capture photos if possible. Obviously, sometimes the story may not warrant that. For example, a safari or a National Park is more about the landscape and wildlife. But if you can incorporate a human element into the photo then you will often find that not only will they give your story more variety, but you will be able to capture more unique shots. So whether it is a simple head and shoulder portrait, people going about their daily lives or even as a point of interest in a wide-angle shot, don’t forget to capture photos of people.

Local food

It doesn’t matter where you are in the world, everywhere has it’s own unique types of food. So it should be one of the shots that you cover on any trip. But photographing food can often be challenging. Most of the time you will be inside and so low light will be an issue. Without a tripod, this will mean that you have to raise your ISO which in turn means more noise in your photos. The best thing you can do is to try and photograph food on an outside table (if possible). If not possible, then sitting at a table near a window will help. A good accessory to have is a gorilla pod. It’s far more discrete than a tripod and you will be able to set it on the table. Select the lowest ISO (i.e. ISO 100) and an aperture of around  f/9 – f/11. This will ensure that your dish will be sharp throughout. Make sure you use a remote or set the camera on a timer to avoid touching the camera. As with all other shots you take on your trip, edit carefully to only feature a few key shots.
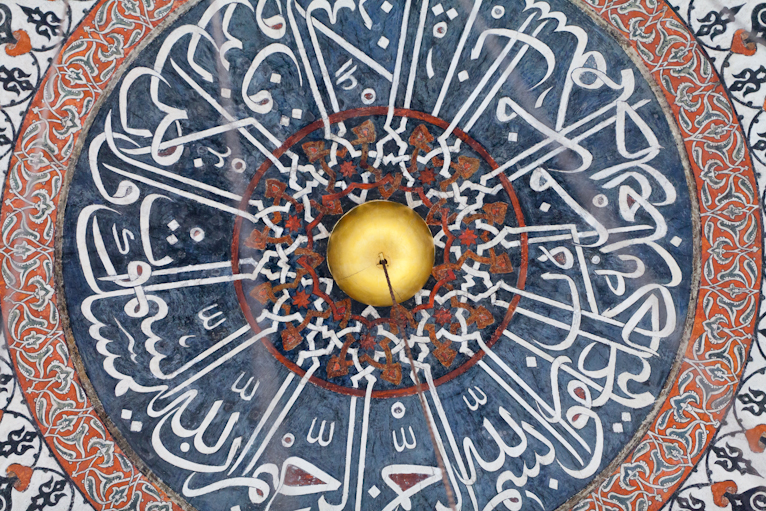
Details

The key to any great photo book is a god flow through the different images. But it also needs to have a variety. Looking through page after page of the same type of shot can leave the viewer feeling uninterested and bored. A really good way to add variety to your photos is to capture details. These are the things that often people miss when they go somewhere which is why they are so fascinating to look at. Closeups could be of anything from food to carvings on a wall. They could even be natural elements like rocks or wood. Imagine having a series of 16 of these images next to each other as thumbnails in a square. Not only will they look fantastic but they will also engage the viewer as they look through them.

Something different

It’s not an easy task, but if you can capture something a little different from a well-photographed location, then it can make a big difference to your photo book. The best way to do this is to do as much research as you can on a location. The more you know about what already exists and what type of photos have already been taken, the better your chances will be of creating something unique. Sometimes you will get lucky and a unique opportunity will present itself. But usually, you will have to work hard to make that happen. If you can capture a few unique shots, it will make your photo book far more interesting for friends and family and potential clients to look through.

Putting together a photo book is a great way to showcase your photos in a cohesive and interesting way. People would much rather flick through a book with 20 photos than have to sit through someone showing them hundreds of the same shots. But even if the book is just for you, by having an end goal it can help you ensure that you capture a variety of different shots. It will also mean that your photos won’t just end up being on your hard drive for eternity.

Photo credits: Kav Dadfar – All rights reserved. No usage without permission. Dreamstime.

Filed Under: Tutorials Tagged With: photo book, travel photo, Travel photography

Photogenic Places – Simple Tips On Photographing Bangkok

Sitting on the Chao Phraya River, Bangkok certainly isn’t new on the tourist map. But this is a city that has been captivating visitors for years. Yes, it’s hot, yes, it’s busy and yes, there are usually people that try to rip off unsuspecting tourists, but few capital cities in the world offer the diversity for photography that Bangkok offers. Here are some simple tips on photographing Bangkok.

The Basics

Often the big danger with a place like Bangkok is to try and cram too much into your trip. Bangkok is deceivingly big and unless you are planning on spending a considerable amount of time there you won’t be able to cover too much. Factor in the heat and you will often find that you are short of time to be able to capture everything. So instead of trying to, focus on a few of the key points below.

Grand Palace

No first time visit to Bangkok will be complete without a visit to the Grand Palace. Once the residence of the Thai monarchy, it now sees thousands of visitors pass through it’s gates on a daily basis, but it is still one of the most beautiful tourist sites in the world. The big draw here is Wat Phra Kaew commonly known in English as the Temple of the Emerald Buddha (the official name is Wat Phra Si Rattana Satsadaram). This is the most sacred Buddhist temple in Thailand and as a result there is a strict dress code. Make sure you fully know this before you turn up as you will not be allowed in.

The first thing that you need to accept is that there is no way to get the place to yourself. You will be in a confined space with lots of other tourists, so you need to think creatively on how to capture good photos that don’t have lots of other people in them.

Arrive at opening time (8.30 am at the time of writing), and you will already see masses of tourists descending on the gates. Don’t be put off by this as the crowd moves quickly. Once inside, quickly head to the ticket office with the correct entrance fee (500 baht per person at the time of writing) and get your ticket. Most of the tour groups at this stage are posing for group photos on the main lawn so if move quickly you can get inside and have a few valuable minutes where the main sites are still relatively quiet.

Do you research before you go so you know exactly what photos you want to take so that you can head straight to those locations and capture the photos you want. Once the crowd gets inside unfortunately there will be no quiet period. From this point onwards you need to rely on patience (in the flow of traffic) and also carefully framing your photos to eliminate people behind columns or buildings. If you are willing to be patient you will still be able to capture some great photos even once the tourists are inside. Don’t forget about close ups of the temples and statues that will often look great and can avoid tourists being in your shot.

Other Temples

There are no shortage of other temples in Bangkok. The biggest highlight of the rest is Wat Pho or Temple of the Reclining Buddha which sits beside the Grand Palace and is another busy tourist site. But unlike the Grand Palace, if you can arrive at opening time (currently 8 am) you will get around 45 minutes where the grounds are almost empty. Start by capturing photos of the grounds first and then head over to see the reclining Buddha at 8.30 am when it opens. There will usually only be a few visitors here at this point. From around 8.45 am onwards the grounds will begin to get busier, so as per the Grand Palace you will need to be creative in how to frame your shots.

There are lots more temples in Bangkok other than the big two above and most others will see less tourists than the two above.

Here are a few of the other temples you can photograph:

  • Wat Arun
  • Wat Saket
  • Wat Traimit
  • Wat Suthat
  • Wat Benjamabhopit

Roof Top Bars

There can’t be many cities in the world with more roof top bars than Bangkok. There is everything from places that sell cheap drinks with great views, right the way through to amazing skyscrapers where you’ll see glitz and glamour. If you want to capture photographs that show off Bangkok, views from rooftop bars have to be high on your list.

Arguably the most famous view is from the Skybar at Lebua Hotel made famous by the Hangover 2 movie. Currently the bar opens at 6 pm and there are no tripods allowed which means you have to shoot everything handheld. You can rest your camera on the narrow steel ledge of the bar but don’t expect to be able to capture anything at slow shutter speeds. The only way is to bump up your ISO and hold the camera as steady as you can. Be warned that there is a strict dress policy and drinks are expensive by Bangkok standards. But then again you are partly paying for the experience and the view.

If that doesn’t seem the right place for you, thankfully there are plenty of other options. The view from the SO Sofitel bar is one of the best in the city and Baiyoke Tower II is the second tallest building in Bangkok and offers an observation deck. Away from the big skyscrapers, the selection of hotels on the opposite bank to Wat Arun on the Chao Phraya River offer fantastic views at sunset and are a lot cheaper and more relaxed than the big skyscrapers.


Chinatown

One of the most vibrant areas of Bangkok, Chinatown is a wonderful place to just wander around. During the day you’ll see locals going about their day, small markets in every side street and alleyway and an abundance of street food and restaurants. Come here at night and the whole area is a hive activity all lit up by the huge lights on Yaowarat Road. You could easy walk around for hours and capture numerous wonderful shots.

To photograph the lights on the main road the best way is to find a slight curve in the road and position yourself so you that you can see all the way down. Needless to say, that for any low light photography you will need a tripod. The area really is a paradise for photographers and should be a must on any shot list.

Markets

Whether you are after one of the biggest markets in Thailand, a night market or a small local market, you’ll be hard pushed not to at least stumble onto a road with a market. But markets are such a vital part of culture in this part of the world that you should spend time visiting and capture some of them. Most of the markets will be in covered areas which means you’ll be fighting against low light conditions. There are also often narrow walkways between them which can feel claustrophobic and doesn’t give you much room to move around.

Capturing photos in markets can be challenging so try to concentrate on focusing correctly and keeping your shutter speed fast enough to avoid camera shake. Try to capture a mix of subject like locals interacting with the market vendor, the products on sale and even portraits. You will most likely need to set your ISO pretty hight to be able to capture sharp photos so make sure you check your camera’s capabilities before hand so you know the acceptable level of noise it can handle.

Just walk

But above all of the sites and rooftop bars, arguably the best thing to do in Bangkok is just to walk around. You’ll be harassed by tuk tuk drivers asking you where you are going but if you can ignore them and just walk around you’ll often by rewarded with places and photos that you didn’t expect. One minute you’ll see a someone making something in their shop and the next you’ll see monks walking around in a market. Walking in Bangkok is arguably the best thing to do as a tourist and photographer and will give ample opportunities for photos. Just set yourself an A to B point and walk between them. Then set another and so on.

Bangkok is truly one of the most photogenic places in the world. From vertigo inducing views, to charming and friendly locals, from mouth-watering street food to authentic shots of locals going about their daily life, Bangkok has it all. Follow these simple tips for photographing Bangkok and you’ll be coming back with some outstanding photos.

Photo credits: Kav Dadfar – All rights reserved. No usage without permission. Dreamstime.

Filed Under: Inspiration Tagged With: location photography, photoraphy, travel photo

Photogenic Places – a simple guide to photographing Istanbul

KD-2016-Istanbul-1

A city that sits across two continents, divided only by the Bosphorus Strait, Istanbul has had a long and illustrious history. The Old City still boasts landmarks from the many different empires that once ruled these parts. From the Romans to the Egyptians and beyond, Istanbul has been shaped to become one of the most iconic cities in the world. For photographers this means there is no shortage of photography opportunities. Here is a simple guide for photographing Istanbul.

The Mosques

Istanbul is packed full of mosques with incredibly ornate architecture and these mosques should be a priority on any photographers shot list of Istanbul. Besides the usual cityscape photos that can capture the mesmerising minarets against a backdrop of a bustling city, there are ample opportunities for photographing the beautiful architecture, tiles and decoration up close. The most famous of all of these is arguably Sultanahmet or more commonly known as the Blue Mosque (due to the tiles which decorate it’s interior), however Ortaköy Mosque, Süleymaniye and Rüstem Pasha mosques are also a must.

Inside Rustem Pasa Mosque

Inside Rustem Pasa Mosque

To photograph any of these mosques in their entirety you will need to spend a bit of time researching locations to find one that will give you the photograph that you want. For example, the Blue Mosque can be captured from one of the many rooftop bars that surround it, or if you are after more of a skyline, you’ll need to head towards the river and photograph looking back towards the city. Through research you should be able to get an idea of the kind of locations that you can find, but there is no shortcut. You need to be prepared to go to them and check them out for yourself.

KD-2016-Istanbul

These mosques do allow visitors and photography inside although not during prayer times when the mosques are closed for locals’ use. If you do want to photograph the inside of the mosques, keep in mind that these are religious buildings, so demonstrate respect towards them and their staff. Never take photos of people praying without prior permission.

Historical Buildings

Istanbul as its known today has been part of human history for around 3,000 years. Colonized by the Greeks in the 7th century BC, it was invaded by the Romans and was eventually renamed Constantinople (previously called Byzantium) and became the capital of the Roman Empire. It rose to become the biggest city of the western hemisphere and was subject to the Muslim conquest in 1453 when it became the capital of the Ottoman Empire. This history is dotted all around the Old City and is an important part of capturing this diverse city. The main highlights of these are:

Hagia Sophia – one of the most iconic and photographed buildings in the world, but no portfolio of Istanbul would be complete without it. To capture Hagia Sofia from the outside, look for one of the many rooftop bars that sit around it. Usually the owners will be more than happy to allow you to even set up a tripod as long as you are not obstructing or disturbing other customers and you are going to be eating or drinking there.

Hagia Sofia

Basilica Cistern – the largest of several hundred ancient cisterns that lie beneath the city of Istanbul. To capture these you either need to have hands as steady as a rock or you need to think more innovatively as tripods are not allowed. You might get away with using small gorilla pods but if they can’t hold the weight of your camera try either resting your camera on the ground and propping the lens up slightly with an object such as a flash, or resting it on top of your bag. You will need to play around with your ISO setting to get the desired result, but keep in mind that the higher your ISO the more noise it will create in the photograph.

KD-2016-Istanbul-5

Topkapi Palace – the largest palace in Istanbul, this was once where the Ottoman sultans resided. Although photography is not allowed in the exhibition halls, there are still plenty of opportunities to photograph inside and outside the grounds.

Win a FREE Camera Conversion!

KD-2016-Istanbul-15

Bazaars

One of the best places in any city to get a glimpse of everyday life is its markets, and Istanbul has two of the best for photography – The Grand Bazaar and Spice Bazaar. The Grand Bazaar is one of the busiest places in Istanbul and is packed full of tourists, but it’s also one of the largest and oldest covered markets in the world, with 61 covered streets and over 4,000 shops.  Simply walking around this gigantic market will make you wish you had more memory cards as the opportunities for photos are endless. The spice bazaar is a great place to capture spices and ingredients. The key is to have your camera on the correct settings and be aware and ready to capture the photo at any moment. Things happen quickly in places like this so make sure you keep your eyes open to moments of interaction between people or between shop keepers and tourists.

KD-2016-Istanbul-12

The Locals

Turkish people are incredibly friendly, so taking either portraits or environmental portraits shouldn’t be difficult. The key with any sort of people photography is the connection you build with your subject, so spend time talking to them (if they’re not busy) before asking to take photos. Not only will this relax them but it will make the photo feel more intimate. Make sure you know your settings so that once you are ready to take their portrait they do not have to wait around too long.

KD-2016-Istanbul-8

Food & Drink

Istanbul is a city that is full of places to eat, snack and drink in, so it is essential that you capture this part of your travel experience as well as all of the main tourist sites. There is everything from kebab shops to expensive eateries to photograph in Istanbul, so the choice is down to you. The best ways to photograph food outside a studio set up is outside using natural light, but avoid direct sunshine, which causes harsh shadows. Instead, try to either find shade or photograph food dishes on cloudy days. The overcast sky diffuses the light and gives an even light across the dish. Don’t forget that the preparation of the food or drink is also an important part of the story, so if possible try to capture this too.

KD-2016-Istanbul

Street Photography

There is something happening in every street that you walk through in Istanbul. Look in any street and you will see everything from people sitting and talking, drinking tea, playing backgammon or simply working. All of these scenarios offer great opportunity for street photography. In fact, one of the best ways to capture unique travel photos is to simply walk the streets keeping your eyes open because you never know what photo opportunities will present themselves.

KD-2016-Istanbul-14

Turkish Traditions

Whether its whirling dervishes or Turkish baths, every place in the world has some unique experiences that are an essential part of that destination. Photographing these should be on your list but they require effort, prior planning and some skill to achieve.

Whirling dervish – a form of physical meditation, these events are usually held inside restaurants in the evenings so you’ll need to find the right place and speak to the owners to make sure they are happy for you to take photos. You are going to be photographing in low light conditions so you’ll have no choice but to increase your ISO setting. How high you set your ISO will depend on what sort of photo you are hoping to capture (i.e. slower shutter speed to capture movement, or faster to freeze the action). You may also need a flash, but instead of aiming the flash directly at the performers, try to bounce them off a surface such as wall or ceiling. It won’t be easy, but with practice you’ll be able to capture some great photos.

KD-2016-Istanbul-13

Turkish baths – these are a must for anyone visiting Istanbul whether you are planning to photograph them or not. If you do want to photograph Turkish baths, first and foremost you will need to find one that will let you photograph inside. If you want people in your photos then you will likely need to find models as any bath will only usually let you photograph inside when other customers aren’t around. You are going to be photographing in a humid and steamy environment so you need allow your camera to acclimatize to avoid your lens steaming up. You’ll need a towel and around 20 minutes before you can start photographing. Simply sit and wait whilst wiping the moisture from the outside of your camera with your towel until when you wipe the lens glass it doesn’t steam up immediately. Your camera is then ready.

KD-2016-Istanbul-13

Istanbul is one of the most iconic cities in the world with its rich and diverse history and culture, and probably nowhere else in the world showcases their old and new ways more than this incredible city. With careful planning and a good shot list you can cover a lot, but don’t be surprised if you find yourself yearning to come back.

Photo credits: Kav Dadfar – All rights reserved. Dreamstime. 

Filed Under: Tutorials Tagged With: photographing istanbul, travel photo

Blog Topics

  • Tutorials
  • Inspiration
  • Locations
  • Gear
  • News
  • Other/Misc

What our customers say:

Life Pixel has been a life-changer for me. Continue reading
Eric GConnecticut
Read more reviews
I am more than satisfied with the service I received Continue reading
Christopher JCanada
Read more reviews
I am more than pleased with the conversion job that you did Continue reading
LOUIS MWaco, Texas
Read more reviews
I am VERY impressed with his knowledge of your products and his patience in explaining it to a novice like me. Continue reading
Lynn FEssex, Maryland
Read more reviews
Things will only get better from here thanks to all of you. Continue reading
Phillip FRedding, California
Read more reviews
The Lifepixel newsletter reminds me of not having expressed my gratitude for the excellent job you made. Continue reading
Michael GGermany
Read more reviews
Your staff went above and beyond the call of duty to make sure everything was handled in an excellent manner. Continue reading
Paige RPearland, Texas
Read more reviews
It has given my old camera a new life, I will enjoy using it again. Continue reading
William PAustralia
Read more reviews
Excellent service and the camera works just great Continue reading
Hans FairhurstAustralia
Read more reviews
I just got my converted camera back from you guys. THANK YOU!!!! Continue reading
Anne CutlerForest Knolls, CA
Read more reviews
infrared_filter_choices_sidebar
ir_conversions_explained_sidebar
----------- Watch More Videos -----------
infrared_quick_start_guide

Ready to start shooting Infrared?

Convert My Camera

Subscribe To Our Newsletter

Receive updates, tips, cool tutorials, free stuff and special discounts.

Learn the Basics

  • Video
  • Start Here
  • Filter Choices
  • Focus Calibration
  • Lens Considerations
  • Camera Considerations
  • Place Your Conversion Order

Resources

  • Galleries
  • Lens Hot Spot Database
  • IR Tutorials
  • FAQ
  • Infrared Filter Choices
  • Infrared Photography Guide
  • Infrared DIY Tutorials

Company

  • Why Choose Us
  • Get In Contact
  • Job Openings
  • Write For Us
  • Affiliate Program
  • Terms of Use
  • Privacy Policy
  • Home
  • Start Here
  • Galleries
  • Tutorials
  • FAQ
  • Blog
  • Why Choose LifePixel?
  • Shop
  • Contact

Copyright © 2025 Life Pixel Infrared - All rights reserved - LifePixel Infrared Photography IR Conversion, Modification & Scratched Sensor Repair