• Cart
  • Checkout
  • My Account

Infrared Conversions, IR Modifications & Photography Tutorials | Life Pixel IR

The world leader in infrared conversions, modifications & DIY IR conversion tutorials. Scratched sensor replacement, UV & Full spectrum conversions.

The world leader in infrared camera conversions

866.610.1710
  • Home
  • → Start Here ←
    • 1 – Introduction
    • 2 – Filter Choices
    • 3 – Focus Calibration
    • 4 – Lens Considerations
    • 5 – Camera Considerations
    • 6 – Start Shopping
  • Galleries
    • Infrared Photography
    • Infrared Time Lapse
    • Infrared Cinematography
    • Infrared Stop Motion
    • Ultraviolet Photography
    • Forensic Photography
  • Education
    • Training Sessions
    • How To Shoot Infrared
    • AR Coated Infrared Filters
    • Lens Hot Spot Database
    • Photoshop Video Tutorials
    • Infrared Issues & Solutions
    • IR Basics in Photoshop
    • Camera Quick Start Guide
    • DIY Conversion Tutorials
    • IR Photography Primer
    • Secondhand Cameras
    • Wall Of Shame
  • Workshops
  • FAQ
  • Blog
    • Tutorials
    • Inspiration
    • Locations
    • Gear
    • News
    • Other
  • Why Choose LifePixel?
    • Submit Your Review
  • Contact
  • Shop

4 Tips For Better Photo Filing On Lightroom

Every photographer over time will build up a huge collection of photos. These can mount up into thousands of images on your hard drive. Without an adequate and efficient filing process, you may find that you cannot find images that you need to. Why is this important? The obvious reason is if you receive a client request that you need to fulfil quickly. If you have to spend days looking for an image, the client may look elsewhere. But even if you are not a professional photographer, a good filing setup will allow you to be able to actually find and see your images. Whether that is to share on social media or to print out for your house. Thankfully Adobe Lightroom has a whole host of different features that makes filing your photos easy and efficient. So here are 4 tips to help your sort your photos better.

Lightroom_Filing

Folders

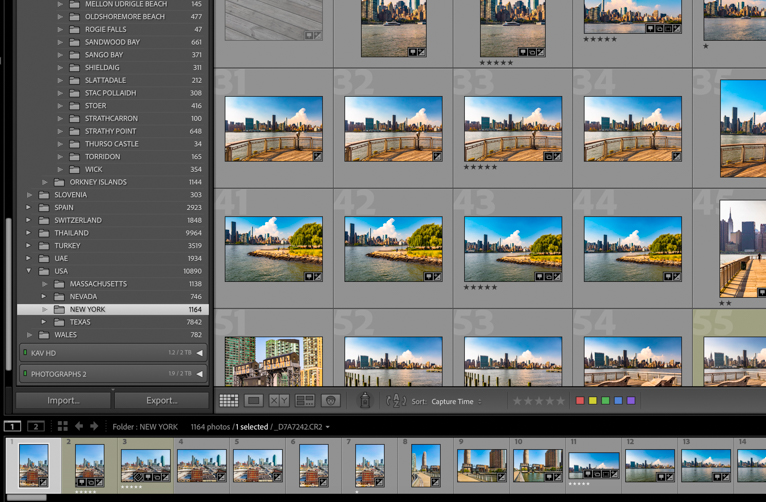
One of the best features of Lightroom is that you can access your folders from your hard drive directly in the interface. On the left-hand side of the library module, you can see all of your folders that have been imported into Lightroom. These work in the same way as traditional files on any computer in that you can create files within files. This is a great way to break your images down into segments depending on what you specialise in.

For example, if you are a travel photographer like me, you may want to break your images down into folders for different countries and then specific cities. Or if you are a wedding photographer you may choose to have a separate folder for each client. Or you can just have different folders for different types of photos like landscapes, portraits, wildlife and so on. But keep in mind that when you move an image into a folder in Lightroom, it physically moves it into another folder.

Lightroom_Filing

Collections

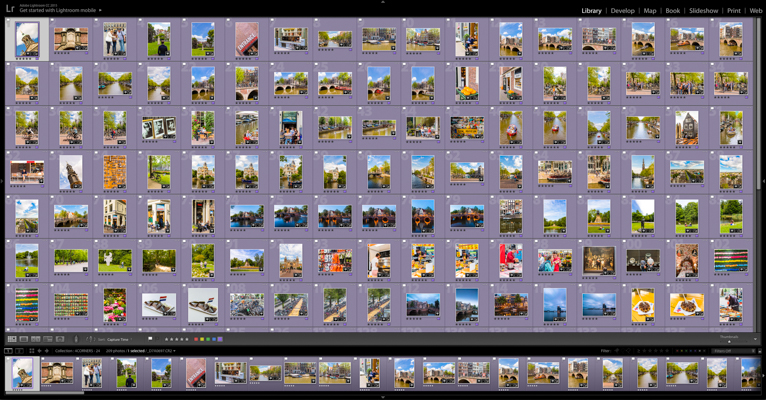
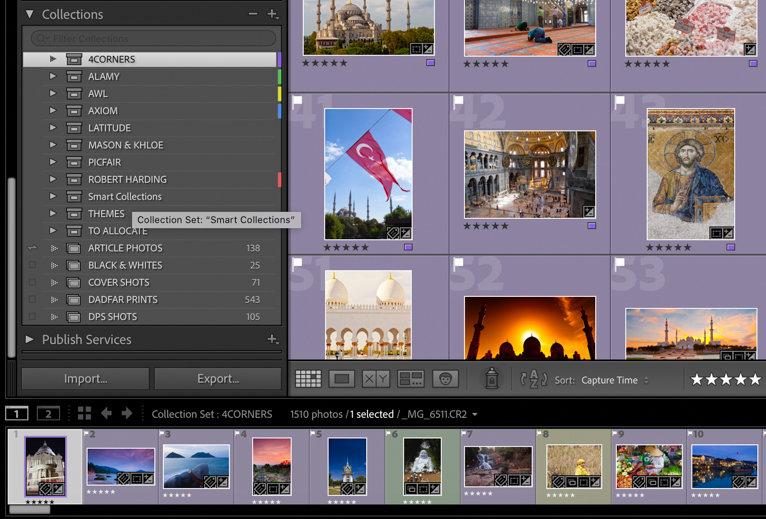
Whilst folders (as described above) are great for your actual filing, their limitation is that you can only have an image in one folder (unless you duplicate an image. But that means more memory space being used up). This is where “collections” becomes such a valuable option for photographers. Collections can be seen in the “Library” and “Develop” modules and works in the same way as folders in that you can have folders within folders. But the big difference between “collections” and “folders” is that when you place an image into a collection it doesn’t physically move the image. As a result, you can add the same image to as many collections as you want.

This means you can have lots of different collections based on your needs with the same images appearing in all of them. For example, I have collections based on clients that have licenced images. So that I can always see where an image was used. This is important if, for example, a client wants exclusivity.

But I also have collections based on genres like landscape, portrait, food, black and white and so on. And I also have collections called “front cover” and “DPS” where I place images that I feel would work well on front covers or double-page spreads. All of these collections make it much easier to find images quickly but also know where and how they have been used.

Lightroom_Filing

Smart collections

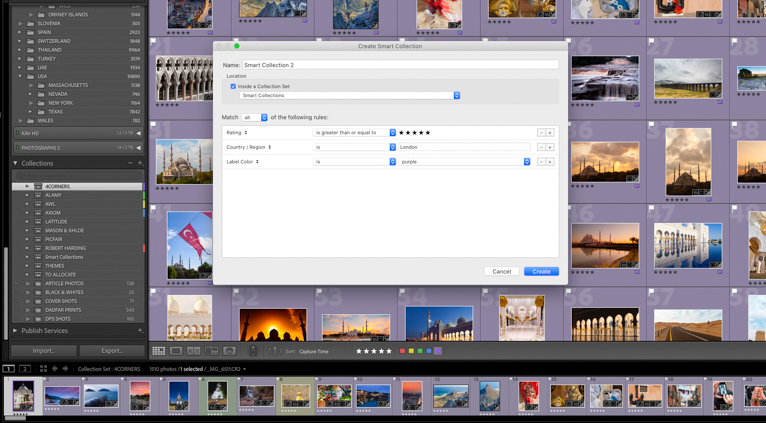
This is another superb feature of Lightroom that can take adding images to collections to new levels of ease. It’s an automated way to create collections based on a whole host of different filters and settings that are available. You simply create a “smart collection” and then add in the settings and filters that you would like to include. Then any images which fit within these criteria will be instantly added to the collection. And the great thing about smart collections is that anytime a new image is added which falls within these parameters, it is also added to the smart collection automatically.

For example one of my commonly used smart collections is for photos with no people in it. So as I’m editing my photos I add a keyword of “no one” for images without people in. My smart collection is set up to filter based on this keyword and also based on any that I have rated 5 stars. So in other words I always have an up-to-date collection of images with no people in them ready for a client request. You can have as many smart collections as you want to speed up your workflow.

Lightroom_Filing

Flags, Stars & Colours

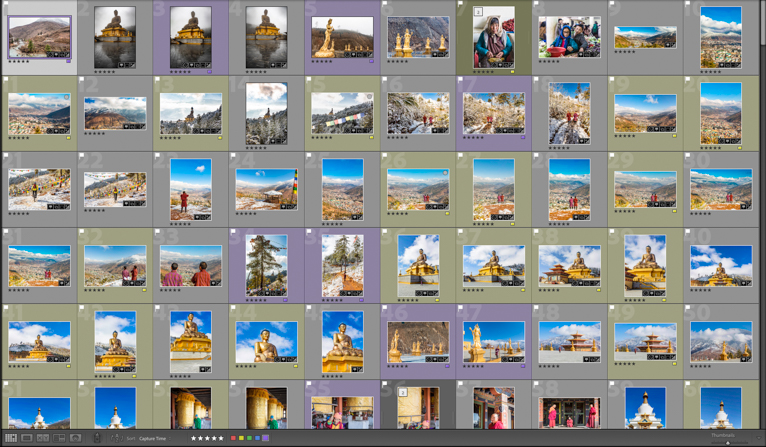
Different photographers use these indicators for different uses. For example, you may choose to use the colours like a traffic light system with your best images being green and the worst being red. I use stars to rate my photos with 5-star shots being the ones that I would send to clients or stock sites. But then there might be times when a client requires a slightly different crop of a shot which might not be one of my favourites. So I can then find my 5-star image and look for a 4-star version of it.

I use the colours to differentiate between the different stock sites that I contribute to. That way I can look at a selection of images and from the colours, I can work out which stock sites they are with. I only really use the rejected flags (not the pick flag) to flag the images that are to be deleted (i.e. these might blurred photos or photos of place names etc). But as I mentioned above different photographers use these elements in different ways so it’s important to use them in a way that works for you.

Lightroom_Filing

Lightroom really is a piece of editing software that I couldn’t live without. But beyond its editing capabilities, if you can sort out an efficient and easy to use filing system, it will help you immensely in keeping on top of your images. Use the tips above to help you sort your photos more efficiently.

Photo credits: Kav Dadfar – All rights reserved. No usage without permission. Dreamstime.

Filed Under: Tutorials Tagged With: Adobe Lightroom, Collections, lightroom, Photo Filing, Photography workflow, Workflow

5 Ways To Ensure You Spend More Time Shooting Rather Than Editing

Unless you are one of those rare breeds of photographers who actually enjoy sitting in front of a monitor for hours editing your photos then no doubt you would rather be outside shooting. For me personally one of the positives that has come out of being in lockdown is being able to catch up with my editing. But it has also confirmed how much I despair at this part of the photography process. If you are like me and prefer to limit your editing time then here are 5 ways to ensure you make your photography process more efficient. Meaning, less time in front of a monitor and more time taking photos.

faster_editing_tips

Take fewer photos

This doesn’t mean that you should photograph less, but rather to be more selective about your shots. When I first began on my photography journey I, like many other beginners felt that the more photos I took the better the chance of a great photo. But the problem with this is that firstly you don’t spend as much time thinking and analyzing your shot before taking it. So you end up with a lot of mediocre shots rather than a few great ones. But also, taking lots of photos means, lots of time spent going through them. Don’t get me wrong sometimes you need to take lots of shots. Like for example if you are photographing events or sport. But in a landscape scene, a few shots will be more than enough.

faster_editing_tips

Get it right first time

A common phrase that I hear from beginners on my photography workshop is “I’ll fix that later in Lightroom”. You should always aim to get as much of the photo correct at the time of actually taking the photo. Not only will this give you the best quality photo but it will also allow you to make tweaks there and then. For example, if your photo needs to be cropped slightly on one side, instead of thinking you can do this in post-production see if you can move slightly or zoom in to crop it. Or when you are taking a shot that requires filters, use them. Don’t be lazy and just think I’ll add a gradient in Lightroom.

Don’t get me wrong there are times when there is no other option and you have to fix something in post-processing. But the more you can get right in the camera means the less time you will have to “fix” things in Lightroom or Photoshop.

faster_editing_tips

Build an efficient workflow

There is no getting around the fact that every photo will still require some level of editing. So it’s important to set up an efficient workflow for yourself that can speed up your editing process. How you edit will come down to your own preferences. But here are some things that could help you make your workflow faster.

  • Be ruthless in your editing. Rather than trying to edit every photo, go through your collection a couple of times and only select the strongest shots (and delete the ones that are blurred).
  • Use the “sync” or “copy from previous” function in Lightroom. There are some great functions in Lightroom that allow you to bulk edit multiple photos by pasting your edits from other photos. So if you have a set of photos that are all taken at the same location around the same time, the chances are that the required edits will be the same.
  • Create presets. You can also create unlimited presets that are based on your own editing preferences and use them to quickly get the look you want. Again this will depend on your type of photography but it’s something that can really help you speed up your editing.
  • Use an editing accessory such as a tablet or a controller to give you more control. For example, something like TourBox allows you to build your own set of shortcuts on the controller and it makes adjusting sliders much easier than using a mouse.
faster_editing_tips

The TourBox controller makes editing much quicker and easier

Set yourself editing time

One of my biggest challenges is editing fast enough to avoid a backlog of images piling up. At one point I had over 10,000 images to edit through spanning a few years. Thankfully I’m now caught up with these and I have promised myself I’ll avoid it happening again. One way that I found that I was able to get through my editing was by setting myself specific times for this. So over a week I would set myself specific days and dedicate 3 – 4 hours to just edit. Because it wasn’t all day, every day, I found it easier to get through and I was able to still have days away from the computer. So if you struggle to edit through big collections, breaking it down into chunks like this might help.

faster_editing_tips

Get someone else to do it

If money is no object or you are too busy to be able to edit the shots yourself you can always hire someone to do the editing for you. This is something that portrait, wedding and even property photographers often take advantage of. There are plenty of companies out there that offer a variety of editing services at different costs. So if you really don’t want to edit the photos yourself, this is another solution that you could consider.

faster_editing_tips

Editing is an essential part of the photography process but also one that most photographers would happily forego if they could. By using the tips above you will be able to speed up your editing which means you will be able to spend more time taking photos.

Photo credits: Kav Dadfar – All rights reserved. No usage without permission. Dreamstime.

Filed Under: Tutorials Tagged With: editing, editing workflow, Photography editing, Photography workflow

A Travel Photographer’s Workflow

Travel photography like any other business requires you to put in a workflow to maximize your efficiency. The other advantage of a good workflow process is that it will ensure that you keep your images safe whilst traveling. Over time every photographer will develop their own processes and steps that they will go through. The key to any workflow is that it works for you but don’t be surprised if over the time you end up tweaking it. So here is my entire workflow to help you develop your own version.

Travel-Photographers-Workflow-2018-Kav-Dadfar

1. Preparation before a trip

My workflow starts a few days before I am due to start my shoot. I begin by charging all of my camera batteries and checking that all my memory cards are in working order. Then it’s time to clear them all and format my portable hard drives so that they are ready to use when I am away. I carry three small 250gb hard drives with me (they are colored red, black and blue – more on that later). I always pack the black one in my suitcase and the red and blue one in my camera bag.

Travel-Photographers-Workflow-2018-Dreamstime

2. Back up each day

When I am on location photographing, I follow the same workflow each day. If throughout the day I finish a memory card I turn it over in the memory card case that I have (this way I always know that if a memory card is turned over, it has photos on it). Once the day has finished and I am back at my hotel, I always back up every single card that I have used that day onto all three hard drives.

Travel-Photographers-Workflow-2018-Kav-Dadfar

The reason I carry three hard drives is that the red one always goes into my camera bag which I carry with me whilst I’m out. The black one goes into my hotel safe and the blue one will either be stored in my rental car (if I have one and it’s not going to be too hot) or in my suitcase back in my room.

This might seem like paranoia but whilst having a camera stolen or damaged will be incredibly annoying and frustrating, nothing can replace the photos that I have taken that day. The conditions or that moment might not arise again so protecting your photos is vital. By storing the hard drives in three places at least you can rest assured that you’ll always have a backup of your photos.

Travel-Photographers-Workflow-2018-Kav-Dadfar

3. Note down important info

The other key aspect of my workflow is that each day I make a note either in my post-processing software or in a notebook of any important information about the photos taken that day. Which temple was the photo taken at? The contact details of the person I have taken a portrait of and so on. One of the great features of my Canon 5D MKIV is that it has GPS tagging and so this saves me having to note down locations. But in some countries, you are not allowed to use this feature so I will also sometimes manually write the locations down. I try to do this every night whilst it is fresh in my mind rather than relying on my memory when I get home.

Travel-Photographers-Workflow-2018-Kav-Dadfar

4. Packing to leave

Once my trip has finished and I’m heading home I follow the same logic when packing my hard drives. One goes into my suitcase to be checked in and the other two will be packed in my camera bag. You never know when a strict security official at an airport will take exception to your hard drives and ask you to leave them behind. It has never happened to me so far but I’d rather travel with the knowledge that I have a backup in my suitcase.

Travel-Photographers-Workflow-2018-Kav-Dadfar

5. Transfer your photos

Once I am home I will transfer my photos from my portable hard drives to my main hard drives at the earliest opportunity. I use 2TB external hard drives that are always connected to my desktop computer. I also subscribe to Blackblaze as my backup provider incase of something going wrong. Once my images are on the main hard drive I can begin the post-processing part of my workflow.

Travel-Photographers-Workflow-2018-Dreamstime

6. Post-processing your photos

There’s no doubt that every photographer will have their own steps for post-processing. Mine starts by organizing my photos into folders using Lightroom by country, then location. So, for example, photos from Bangkok will be in a folder for Thailand and a subfolder called Bangkok. Once the images are organized I begin by looking through the photos and deleting any obvious errors liked blurred photos. Once this quick edit is done I then go back and flag the ones that I feel have potential. This is a pretty loose edit so the vast majority of the photos will be flagged.

The next step is to begin working on each photo and post-processing it to enhance it. Normally I will copy and paste settings on similar photos to save time from having to do it all again and just tweak them for each photo. Once the post-processing is finished I then go back to the start and begin to edit the photos down using the star ratings in Lightroom. I will go through each round by increasing the stars until I end up with a set of 5-star photos. These, in essence, are the ones that I will then send to clients or submit to stock agencies.

Some photographers will also re-name or number their photos once it is imported into Lightroom. I don’t do this as each client is different and requires a different file naming format, so I do this when I export photos from Lightroom.

Travel-Photographers-Workflow-2018-Kav-Dadfar

7. Double check your photos

Before I do anything else with the final 5-star shots, I go through each one and check them at 100%. This is so that I can check that they are sharp, correctly focused but also free of dust and blemishes. If any require further or more extensive retouching I will do that in Photoshop and import back into Lightroom as I want all my photos in one place. I also use the color tag functions in Lightroom to color code images based on which of my regular clients they are being sent to. This is to ensure that I don’t send or use photos that are for a client somewhere else.

Travel-Photographers-Workflow-2018-Dreamstime

8. Descriptions and keywords

Before I export the photos to send to clients, I go through and add in descriptions and also keywords as required by the client. This is a really important step especially in stock photography as without good keywording your photos might not actually be seen by customers. Once all keywording and descriptions are finished I then export the photos using the preset I created for each client.

Travel-Photographers-Workflow-2018-Dreamstime

As you can see, most of this might seem pretty straightforward and might be things that you are already doing. Over time depending on your own preference and genre of photography you will develop your own unique workflow. But in the meantime, this list might help you on your way.

Photo credits: Kav Dadfar – All rights reserved. No usage without permission. Dreamstime.

Filed Under: Tutorials Tagged With: Photography workflow, Travel photography

Blog Topics

  • Tutorials
  • Inspiration
  • Locations
  • Gear
  • News
  • Other/Misc

What our customers say:

Life Pixel has been a life-changer for me. Continue reading
Eric GConnecticut
Read more reviews
I am more than satisfied with the service I received Continue reading
Christopher JCanada
Read more reviews
I am more than pleased with the conversion job that you did Continue reading
LOUIS MWaco, Texas
Read more reviews
I am VERY impressed with his knowledge of your products and his patience in explaining it to a novice like me. Continue reading
Lynn FEssex, Maryland
Read more reviews
Things will only get better from here thanks to all of you. Continue reading
Phillip FRedding, California
Read more reviews
The Lifepixel newsletter reminds me of not having expressed my gratitude for the excellent job you made. Continue reading
Michael GGermany
Read more reviews
Your staff went above and beyond the call of duty to make sure everything was handled in an excellent manner. Continue reading
Paige RPearland, Texas
Read more reviews
It has given my old camera a new life, I will enjoy using it again. Continue reading
William PAustralia
Read more reviews
Excellent service and the camera works just great Continue reading
Hans FairhurstAustralia
Read more reviews
I just got my converted camera back from you guys. THANK YOU!!!! Continue reading
Anne CutlerForest Knolls, CA
Read more reviews
infrared_filter_choices_sidebar
ir_conversions_explained_sidebar
----------- Watch More Videos -----------
infrared_quick_start_guide

Ready to start shooting Infrared?

Convert My Camera

Subscribe To Our Newsletter

Receive updates, tips, cool tutorials, free stuff and special discounts.

Learn the Basics

  • Video
  • Start Here
  • Filter Choices
  • Focus Calibration
  • Lens Considerations
  • Camera Considerations
  • Place Your Conversion Order

Resources

  • Galleries
  • Lens Hot Spot Database
  • IR Tutorials
  • FAQ
  • Infrared Filter Choices
  • Infrared Photography Guide
  • Infrared DIY Tutorials

Company

  • Why Choose Us
  • Get In Contact
  • Job Openings
  • Write For Us
  • Affiliate Program
  • Terms of Use
  • Privacy Policy
  • Home
  • Start Here
  • Galleries
  • Tutorials
  • FAQ
  • Blog
  • Why Choose LifePixel?
  • Shop
  • Contact

Copyright © 2025 Life Pixel Infrared - All rights reserved - LifePixel Infrared Photography IR Conversion, Modification & Scratched Sensor Repair