• Cart
  • Checkout
  • My Account

Infrared Conversions, IR Modifications & Photography Tutorials | Life Pixel IR

The world leader in infrared conversions, modifications & DIY IR conversion tutorials. Scratched sensor replacement, UV & Full spectrum conversions.

The world leader in infrared camera conversions

866.610.1710
  • Home
  • → Start Here ←
    • 1 – Introduction
    • 2 – Filter Choices
    • 3 – Focus Calibration
    • 4 – Lens Considerations
    • 5 – Camera Considerations
    • 6 – Start Shopping
  • Galleries
    • Infrared Photography
    • Infrared Time Lapse
    • Infrared Cinematography
    • Infrared Stop Motion
    • Ultraviolet Photography
    • Forensic Photography
  • Education
    • Training Sessions
    • How To Shoot Infrared
    • AR Coated Infrared Filters
    • Lens Hot Spot Database
    • Photoshop Video Tutorials
    • Infrared Issues & Solutions
    • IR Basics in Photoshop
    • Camera Quick Start Guide
    • DIY Conversion Tutorials
    • IR Photography Primer
    • Secondhand Cameras
    • Wall Of Shame
  • Workshops
  • FAQ
  • Blog
    • Tutorials
    • Inspiration
    • Locations
    • Gear
    • News
    • Other
  • Why Choose LifePixel?
    • Submit Your Review
  • Contact
  • Shop

Understanding Shutter Speed And How To Use It Effectively

Cameras are easy to use, aren’t they? You just point and click. Taking photographs can be one of the simplest things you ever attempt, and with camera phones so readily available, virtually everyone on the planet is a digital photographer. But for those people who want to do more than take selfies and post relentlessly online about their food, learning a little more about your camera’s capabilities can be the difference between selfie quality and professional excellence.

One of these elements is shutter speed and it may be more important than you first thought. The basics of how a camera functions is you:

  1. Push the button
  2. The shutter opens to let in light
  3. The film captures whatever the lens is pointed toward
  4. The shutter closes.

From start to finish, that is the most entry-level version of why a shutter is important to photography. So, does speed really matter if it’s actually that basic of a function?

Shutter Speed

It matters

Yes. It absolutely does. You should take the time to look at your camera’s default settings to better understand why your images are coming out the way they are, and then you can better control the end results. It can be very frustrating when you’re trying to capture that fleeting moment, something precious that you want to remember forever, and then when you print the photo you see that everything is blurry.
Understanding shutter speed can help you fix problems like that before they even happen. In addition to a basic comprehension of aperture and ISO, you’ll quickly see that setting your shutter speed for any given subject or scene will result in much better photos.

Shutter Speed

What is shutter speed?

The shortest explanation is that shutter speed is how quickly the shutter opens and closes, allowing light exposure. This is the determining process for how back in the day, film accepted an image. This process is exactly the same, the only difference is that the film has been replaced by a digital sensor. Obviously, without this mechanical process, you wouldn’t have an image in the first place. The shutter cuts off light coming inside the camera completely, leaving the light-sensitive sensor unexposed. When the shutter opens, the sensor is exposed, and you get a photograph.

If it’s really that simple, then why is shutter speed so important? The quickness at which the shutter opens and closes either lengthens or shortens the exposure time. The slower the shutter opens and closes, the longer exposure time, and vice versa. In a digital camera, this translates to the amount of time that the sensor within the camera is exposed to light.

Shutter Speed

Why should I care about shutter speed?

Shutter speed is primarily responsible for two for important aspects of how your photo turns out:

  1. The brightness of your photo
  2. The amount/lack of blurring in your photo

Controlling these two aspects becomes critical when you’re attempting to photograph a different subject. For example, if you’re taking a picture of a person riding a bicycle, do you want the subject to appear to be moving fast? Or do you want the subject to be frozen in your frame? Adjusting your shutter speed can have an effect on what action your subject may be in the middle of doing.

Shutter Speed

What is the right shutter speed?

Shutter speed is measured in fractions of a second, almost faster than you can perceive with the naked eye. This means that the 1/250 setting on your camera will be making the shutter to open for only one-two-hundred-and-fiftieth of a second. That might sound fast, but there are shutter speeds as fast as 1/8000.

How shutter speed is marked on your camera can be different from brand to brand. Some will mark the increments as actual fractions (like 1/250) and others will simply put 250, so it’s good to know what the settings mean beforehand.

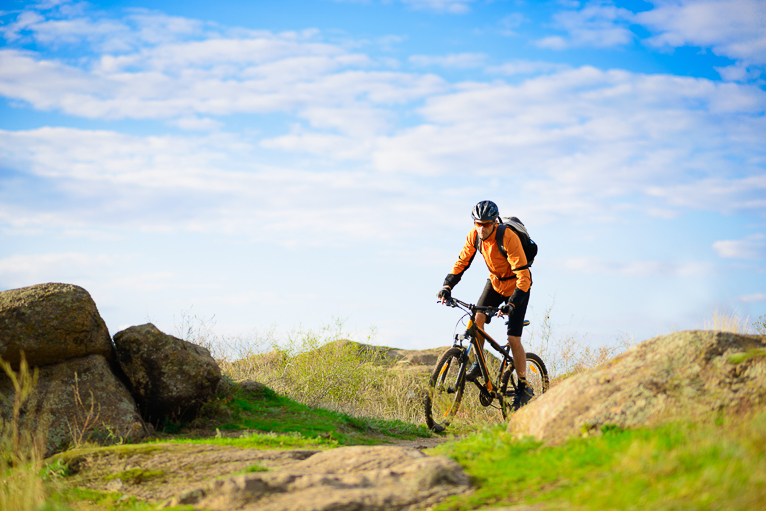
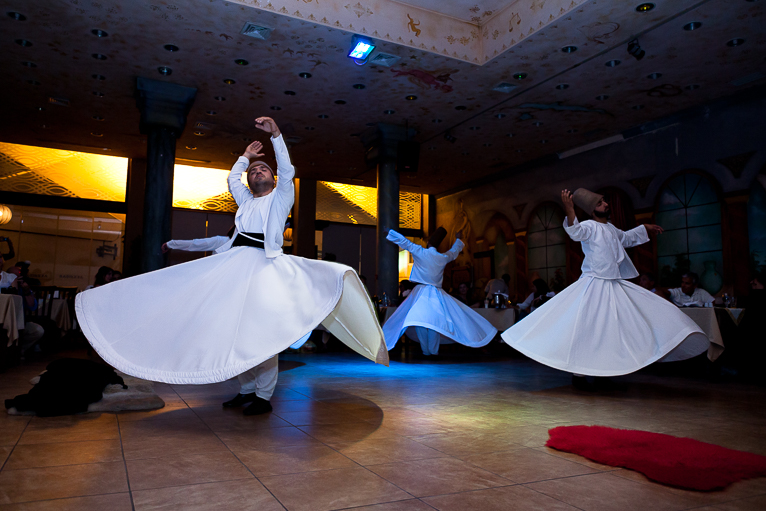
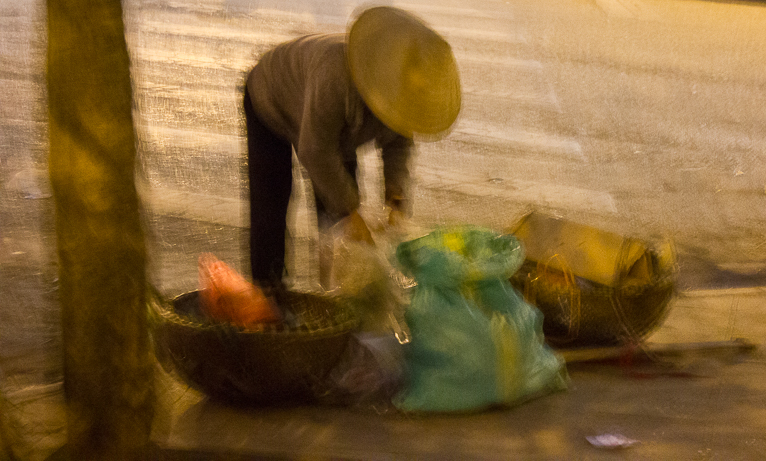
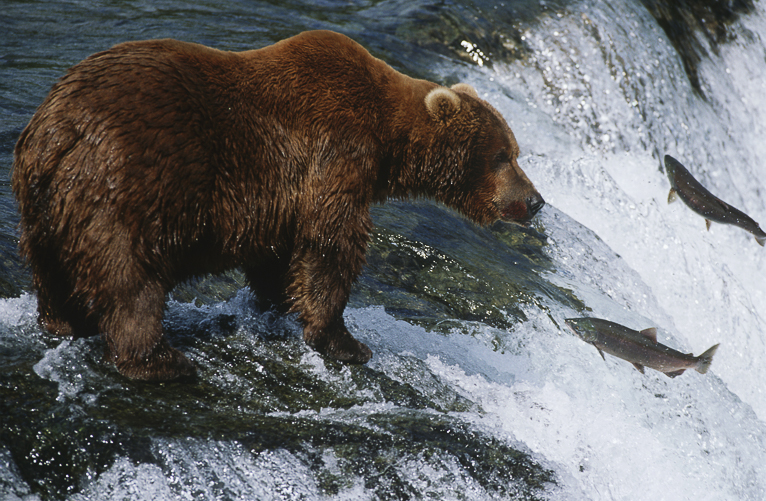
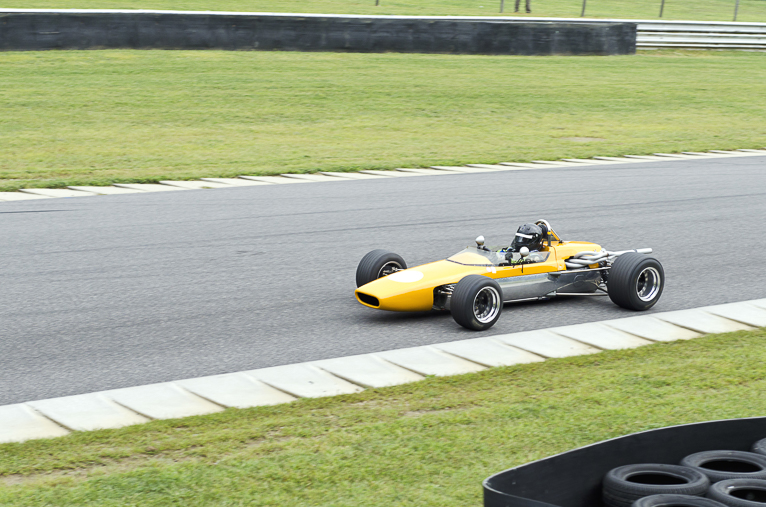
With such a large spread of shutter speeds to choose from, which is the right one? Well, it depends on what you are photographing, what you’re trying to accomplish and how crisp you want your photo to look. Faster shutter speed means less blurring, but you won’t be exposing it to as much light, and therefore the photos might be underexposed. If you want to freeze a moment in time, then the faster the shutter speed, the better. If you want to show movement in your image, then you may consider a slower shutter speed with a longer exposure, creating a blurring effect that captures active movement.

Your decision might also be based on the light that you have available in the scene. Since the longer the shutter speed is, the more light is hitting the sensor, if you have low light conditions then a slower shutter speed is the only way to capture the shot without using flashes. This is great for nighttime photography like for example photographing city scenes or stary skies. To better capture those stars, you want a longer exposure, and therefore a slower shutter speed. Needless to say that a tripod is a must when you are shooting with slow shutter speeds.

Other factors

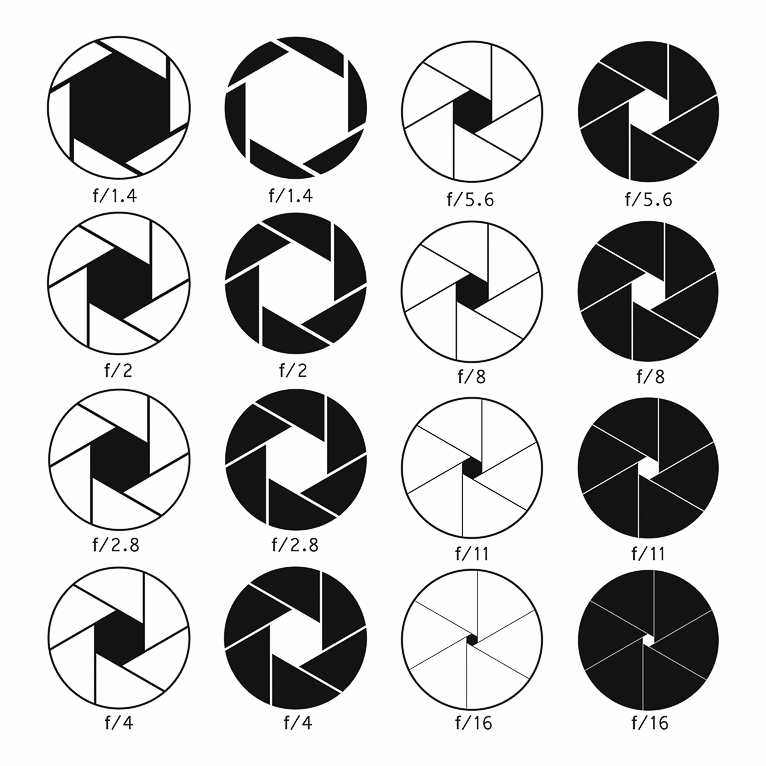
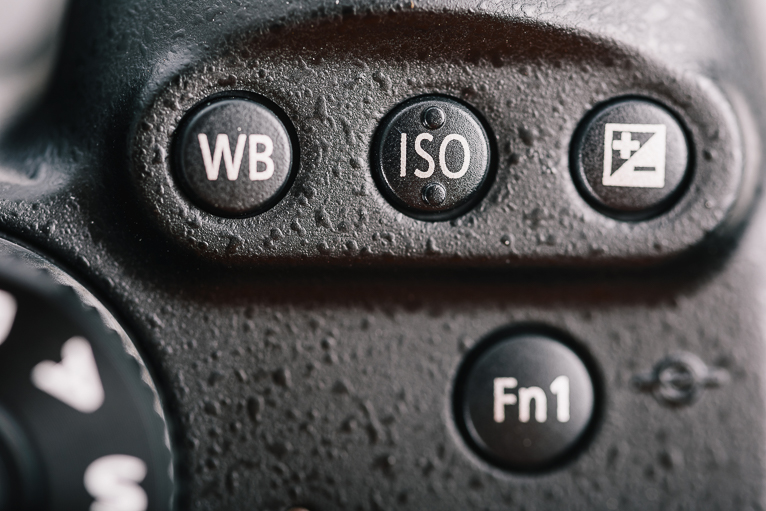
Shutter speed isn’t the only factor that affects the brightness of your photo. Aperture (the lens opening where light passes through) and ISO (International Organization for Standardization) also impact how bright or dark your photo comes out.

For aperture, consider your own eye and how the iris opens and closes depending on the amount of available light in your immediate area. Aperture works the same way, but for a camera lens. By widening the aperture on your camera, you effectively allow a larger amount of light to enter the camera when the shutter opens. It can cause a blurred background or sharp foreground photos.

ISO is the result of combining two film standards in 1974 which defines film sensitivity. In digital cameras, the setting maintains similar brightness levels. Basically, the lower the ISO setting (such as ISO 100), the darker your photo. If you increase your level from ISO 100 to ISO 200, you’re effectively doubling the brightness of your photo. Beware of using very high ISOs as it can add unwanted noise to your image.

The best way to understand shutter speed is to get out there and start taking pictures! You can avoid having unintentionally blurry pictures or photos that are way too dark by experimenting with your camera. Don’t wait to try and play with the shutter speed, aperture, or ISO settings when you’re about to take an important photo. Go test them out first.

Photo credits: Kav Dadfar – All rights reserved. No usage without permission. Dreamstime.

Filed Under: Tutorials Tagged With: shutter, Shutter Speed

Aperture Priority Or Shutter Priority – Which To Use And When?

Anyone with a DSLR or Mirrorless camera would have probably seen the initials Av or Tv on their mode dial (or somewhere on their camera). But most newbie photographers avoid these elements and just go straight to the auto setting. Whilst auto settings on cameras have advanced a lot in the last few years, they are still no match for actively taking control of the photo taking process manually. After all, that is the whole point of an expensive DSLR camera.  Not only do high-end cameras take better quality photos but they also give you more control. Aperture and shutter priority modes are commonly used by photographers and are very easy to understand and utilize. So, if you are unsure what aperture priority or shutter priority modes are and when to use them, then read on…

The basics

Before understanding and being able to use these modes, you need to have a basic understanding of the photo taking process. There are three main elements that determine how a photo is captured and looks. These three elements are shutter speed, aperture, and ISO. Together they are referred to as the exposure triangle. As the name suggests these three elements of photography are linked together and so a change in one has an impact on another one. On manual mode on a camera, the photographer is responsible for adjusting all three of these elements. Whilst that gives a lot of control sometimes it isn’t feasible and can mean missing the key moment because you are changing settings. This is where shutter priority and aperture priority can help immensely.

Aperture priority

Every time you click to take a photo, the shutter that is situated in your lens opens and closes to allow light to hit the sensor in your camera. The amount that the shutter leaves open is indicated as an f/number. The higher the f/number the smaller the opening for light to get into the camera. This is important because how much this opening is, determines your depth of field. In other words how much of your image is sharp from the foreground to the background.

The higher your f/number the more your image will be sharp from front to back. The lower your f/number is the shallower your depth of field will become. So for example, if you are taking a portrait of someone, you will ideally want their face to be in focus and the background blurred so that they stand out. In this scenario, you would use a low f/number to achieve this. But in landscape photography where you need more of the image to be sharp, you will want to use a higher f/number.

Aperture priority mode allows you to set this f/number so that any photo taken will be at the desired aperture. The camera then automatically sets the other components of the exposure triangle (i.e. ISO and shutter speed) to ensure the photo can be taken at this aperture.

When would you use aperture priority mode?

This mode is ideal when you want to have control over your depth of field. So for example, if you are photographing a person in daylight you can set your aperture knowing that the camera can then do the rest. Or for example in landscape photography, if you are using a tripod, then you can set your aperture as this is a key setting to ensure you have the depth of field required. Another example would be if say you are photographing something close-up like a flower or food where you need a fairly shallow depth of field.

Where you need to be careful when using aperture priority mode is when there is a chance that your shutter speed will end being too slow or your ISO will be too high. For example, if you are photographing in low light condition and have set your aperture to f/18, then the camera will either have to raise your ISO really high to capture the image. Or if you have set a maximum on your ISO setting on your camera it will select a slow shutter speed. Anything less than 1/60 sec and your image will likely be blurred due to camera shake (unless you are using a tripod).

So if you are going to use aperture priority mode, make sure:

  1. Your shutter speed isn’t going to be too high
  2. Your ISO isn’t going to be too high (as this will mean noise in your image)

Shutter priority

The other element of the shutter opening and closing that is vital to photographs is how long the shutter remains open. Naturally, the smaller the opening is to allow light into the camera the longer it needs to stay open. For example at f/22, your shutter will need to stay open longer to allow enough light in to be able to capture the image. How long this time needs to be will be determined by the available conditions. If you are photographing in bright sunshine it would be less time. But in low light conditions, your shutter may have to remain open for seconds or even minutes!

The other factor is what you are actually photographing. For example, a statue will not move so you can use slower shutter speeds to capture sharp images. Whereas if you are photographing a racing car you have to use faster shutter speeds to be able to freeze the action. So as you can see, there may be times where you will be more concerned about the shutter speed rather than the depth of field.

Shutter priority mode allows you to set your minimum shutter speed so that the camera will not select anything slower when you take a photo. But of course, this means that the camera will then select the aperture and ISO automatically (unless you have set a minimum ISO).

When would you use shutter priority mode?

This mode should be selected when your shutter speed is key to capturing a photo. This is generally when you are photographing moving subjects where you need to ensure that you have a shutter speed fast enough to freeze the action. Sport, wildlife and even people moving or dancing are all examples of when you will likely need to use shutter priority mode.

But as per aperture priority mode, shutter priority also comes with factors that you need to consider. For example, if you have set your camera at a fast shutter speed but there isn’t enough light, your camera will raise your ISO. But if it is too high, it will mean too much noise in your photos which will then make them look soft. Or the camera might choose a wider aperture (i.e. shallower depth of field) which might mean that your subject won’t be sharp.

So if you are going to be using shutter priority mode, make sure:

  1. Your ISO is not going to be too high
  2. Your depth of field (i.e. aperture) will allow you to capture the subject or scene in focus

Most cameras will allow you to set various factors such as maximum ISO even when using these modes. So, you can fine-tune your settings to ensure you can capture the image you want. Of course, it will take practice and you have to accept that you will end up with some blurred images. But if you can master these modes it will go a long way to ensuring you can capture great photos.

Photo credits: Kav Dadfar – All rights reserved. No usage without permission. Dreamstime.

Filed Under: Tutorials Tagged With: aperture, aperture priority, shutter, shutter priority

Blog Topics

  • Tutorials
  • Inspiration
  • Locations
  • Gear
  • News
  • Other/Misc

What our customers say:

Life Pixel has been a life-changer for me. Continue reading
Eric GConnecticut
Read more reviews
I am more than satisfied with the service I received Continue reading
Christopher JCanada
Read more reviews
I am more than pleased with the conversion job that you did Continue reading
LOUIS MWaco, Texas
Read more reviews
I am VERY impressed with his knowledge of your products and his patience in explaining it to a novice like me. Continue reading
Lynn FEssex, Maryland
Read more reviews
Things will only get better from here thanks to all of you. Continue reading
Phillip FRedding, California
Read more reviews
The Lifepixel newsletter reminds me of not having expressed my gratitude for the excellent job you made. Continue reading
Michael GGermany
Read more reviews
Your staff went above and beyond the call of duty to make sure everything was handled in an excellent manner. Continue reading
Paige RPearland, Texas
Read more reviews
It has given my old camera a new life, I will enjoy using it again. Continue reading
William PAustralia
Read more reviews
Excellent service and the camera works just great Continue reading
Hans FairhurstAustralia
Read more reviews
I just got my converted camera back from you guys. THANK YOU!!!! Continue reading
Anne CutlerForest Knolls, CA
Read more reviews
infrared_filter_choices_sidebar
ir_conversions_explained_sidebar
----------- Watch More Videos -----------
infrared_quick_start_guide

Ready to start shooting Infrared?

Convert My Camera

Subscribe To Our Newsletter

Receive updates, tips, cool tutorials, free stuff and special discounts.

Learn the Basics

  • Video
  • Start Here
  • Filter Choices
  • Focus Calibration
  • Lens Considerations
  • Camera Considerations
  • Place Your Conversion Order

Resources

  • Galleries
  • Lens Hot Spot Database
  • IR Tutorials
  • FAQ
  • Infrared Filter Choices
  • Infrared Photography Guide
  • Infrared DIY Tutorials

Company

  • Why Choose Us
  • Get In Contact
  • Job Openings
  • Write For Us
  • Affiliate Program
  • Terms of Use
  • Privacy Policy
  • Home
  • Start Here
  • Galleries
  • Tutorials
  • FAQ
  • Blog
  • Why Choose LifePixel?
  • Shop
  • Contact

Copyright © 2025 Life Pixel Infrared - All rights reserved - LifePixel Infrared Photography IR Conversion, Modification & Scratched Sensor Repair