• Cart
  • Checkout
  • My Account

Infrared Conversions, IR Modifications & Photography Tutorials | Life Pixel IR

The world leader in infrared conversions, modifications & DIY IR conversion tutorials. Scratched sensor replacement, UV & Full spectrum conversions.

The world leader in infrared camera conversions

866.610.1710
  • Home
  • → Start Here ←
    • 1 – Introduction
    • 2 – Filter Choices
    • 3 – Focus Calibration
    • 4 – Lens Considerations
    • 5 – Camera Considerations
    • 6 – Start Shopping
  • Galleries
    • Infrared Photography
    • Infrared Time Lapse
    • Infrared Cinematography
    • Infrared Stop Motion
    • Ultraviolet Photography
    • Forensic Photography
  • Education
    • Training Sessions
    • How To Shoot Infrared
    • AR Coated Infrared Filters
    • Lens Hot Spot Database
    • Photoshop Video Tutorials
    • Infrared Issues & Solutions
    • IR Basics in Photoshop
    • Camera Quick Start Guide
    • DIY Conversion Tutorials
    • IR Photography Primer
    • Secondhand Cameras
    • Wall Of Shame
  • Workshops
  • FAQ
  • Blog
    • Tutorials
    • Inspiration
    • Locations
    • Gear
    • News
    • Other
  • Why Choose LifePixel?
    • Submit Your Review
  • Contact
  • Shop

How To Photograph Cathedrals, Churches Or Abbeys

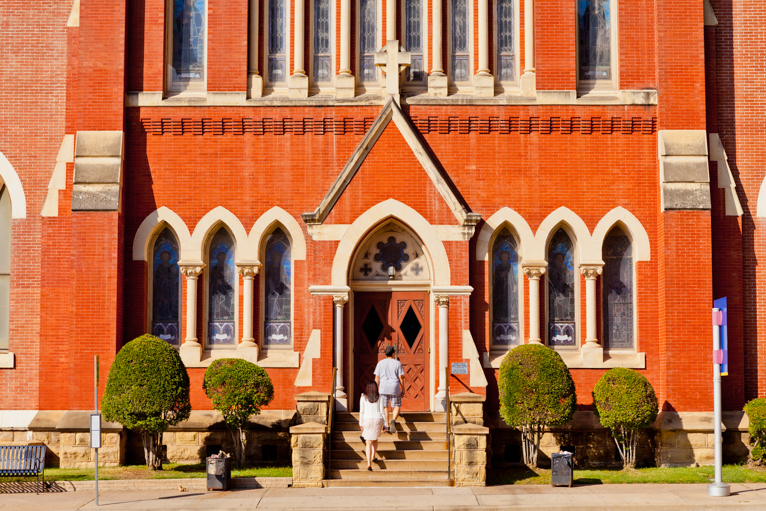
There are spectacular cathedrals, churches and abbeys in Europe and the United Kingdom that each provides a feast for both amateur and professional photographers. These places are not only amazing feats of architecture and engineering; they are filled with patterns, lines, light, frames, features, and details that will keep a photographer busy for hours.

No matter their architectural style, whether Gothic, Renaissance or Baroque, they are all phenomenal structures with cavernous interiors and a multitude of features that provide a range of opportunities for photographers. Wide-angle shots can capture the grandeur of the spaces, and close-ups can focus on the patterns and details. You can experiment with the full gamut of focal lengths as well as with colour and light.

photographing_Cathedrals_churches_abbeys

The tremendous scope that these buildings offer as a photographic subject provides an opportunity for photographers to learn a lot about various aspects of photography while being creatively stimulated. But photographing cathedrals, churches or abbeys – especially the inside can be very tough due to low light. So here are some tips and tricks to help you when photographing these buildings.

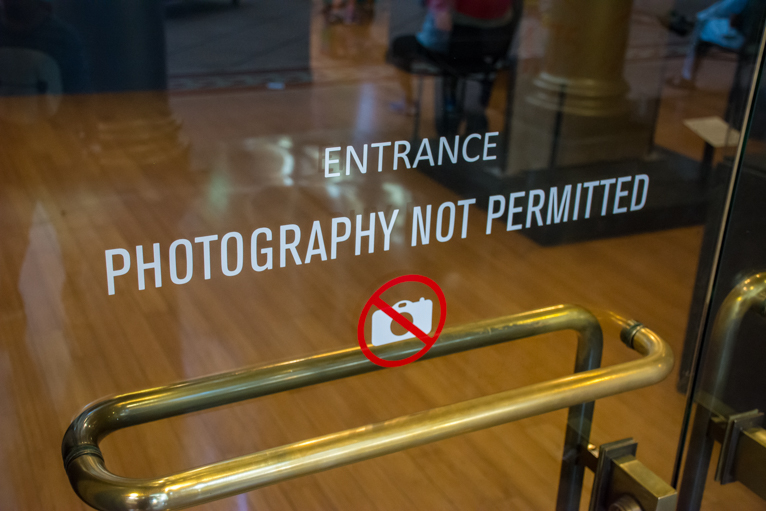
Find out what the rules are

First up, you need to be mindful that you are potentially in a place of worship and need to respect the space, the people running the place, and its congregations, which means that before you take a single picture, you must check what is and isn’t allowed. For example, many cathedrals, churches and abbeys have artefacts that cannot be photographed with a flash and others that don’t allow you to take photographs at all. As they are buildings of religious significance, it is essential to be responsible and respect the rules no matter how badly you want to get that fantastic shot. Luckily, many cathedrals allow photographers, and once you have found one, you’ll be able to get your camera out and put your photography skills to the test.
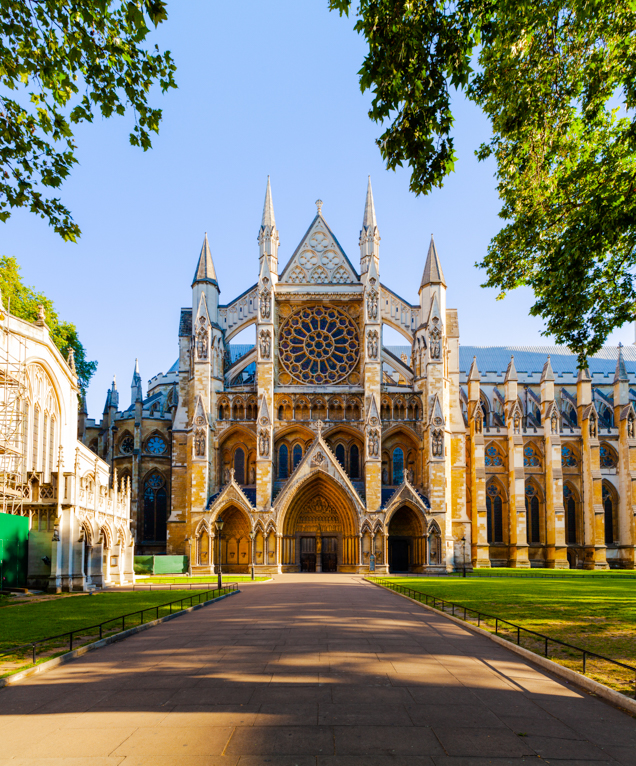
photographing_Cathedrals_churches_abbeys

The outside

Most people are naturally drawn to spend most of their time capturing shots of the outside of these buildings. These shots will be a lot more straightforward than those of the inside. For one there won’t be restrictions on tripods. You also won’t have opening and closing times to deal with either. So you can plan to take shots in the best light using a tripod for those wow factor images. The best way to ensure you capture great shots of the outside is to plan your shoot before you get there. Once on location have a scout around to see what the best angles are at different times of the day (factoring in the light). Also, be on the lookout for rooftop bars or lookout points that will offer a different perspective of the building.
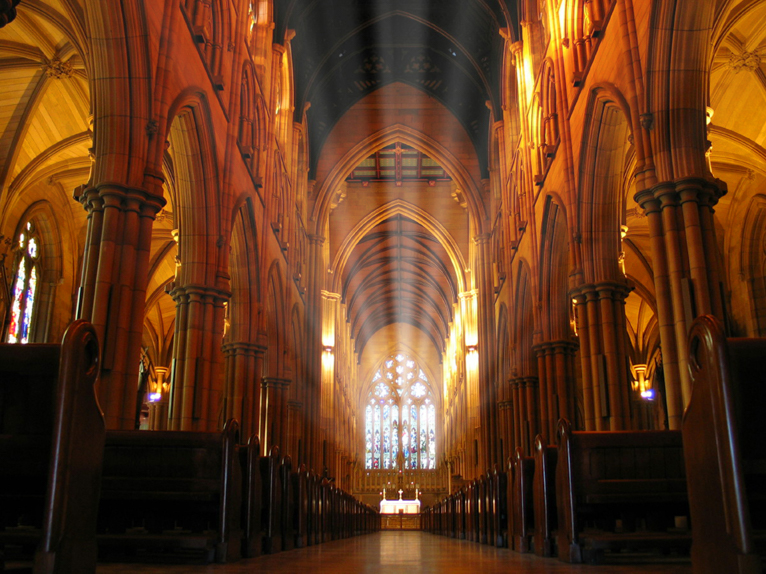
photographing_Cathedrals_churches_abbeys

Play with the light

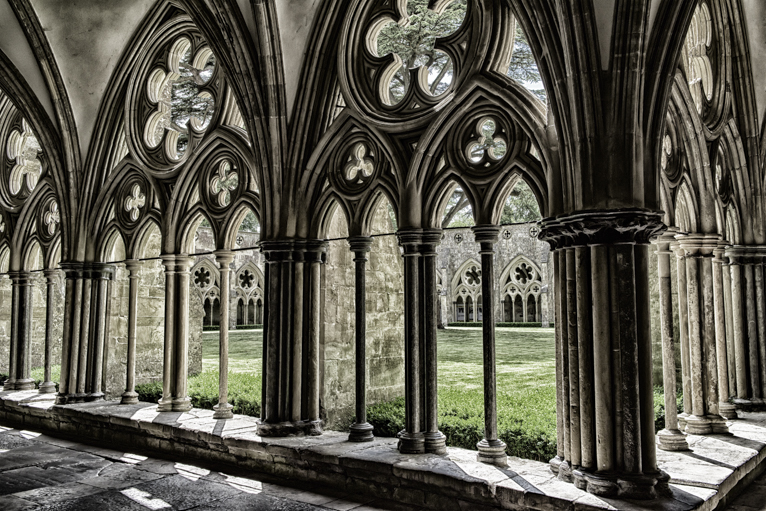
Most old religious buildings were built before there was electricity and designed to maximize natural light. This design aspect can produce interesting photographs when the photographer uses this natural light to create unique compositions. Light glimmering through stained glass windows can create interesting reflections, which almost always make interesting photos. Look for interesting light and shadows to see if you can frame your shot accordingly.
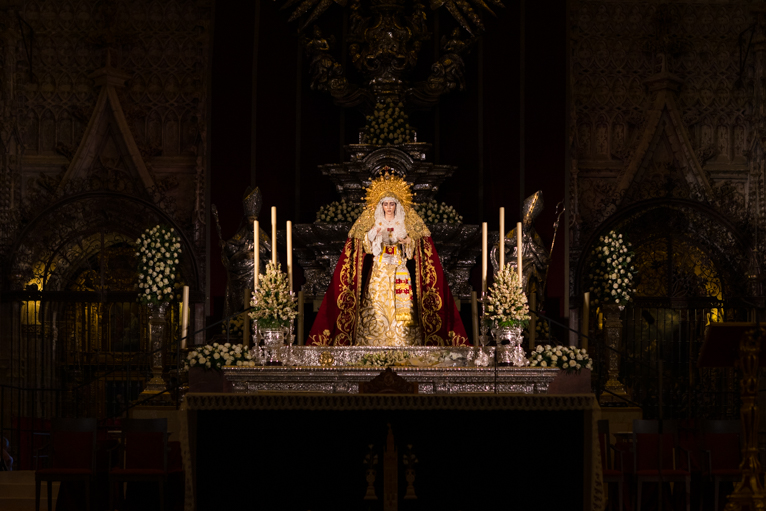
photographing_Cathedrals_churches_abbeys

Look everywhere

One of the great things about these buildings is the incredible and often ornate details all around. So look up, down and all around you and capture everything from the paintings and statues to carvings and even patterns. Get up close to these details and let them fill the frame. You can even look for shots where you incorporate people into the shot. Whether it’s tourists looking around or worshipers, when you combine these types of shots with the grand overall images it will give you a much better portfolio of images.

photographing_Cathedrals_churches_abbeys

How to photograph in low light

Even though cathedrals have many large windows to let in the natural light, there are still many dark areas that will be difficult to photograph. Often you will not be able to use artificial lighting or a flash and will have to tweak your camera settings to photograph in one of these darker spots. To be able to shoot handheld, usually, it will mean increasing your ISO as most cathedrals won’t allow tripods either.

But you also need to think creatively about how you may able to take shots and slower shutter speeds without raising your ISO too much. One of the best ways to do this is to find places to rest your camera on like ledges, benches or even the floor. You can even use your camera bag to prop up your camera. Most of these places won’t allow tripods but camera bags will be allowed.

photographing_Cathedrals_churches_abbeys

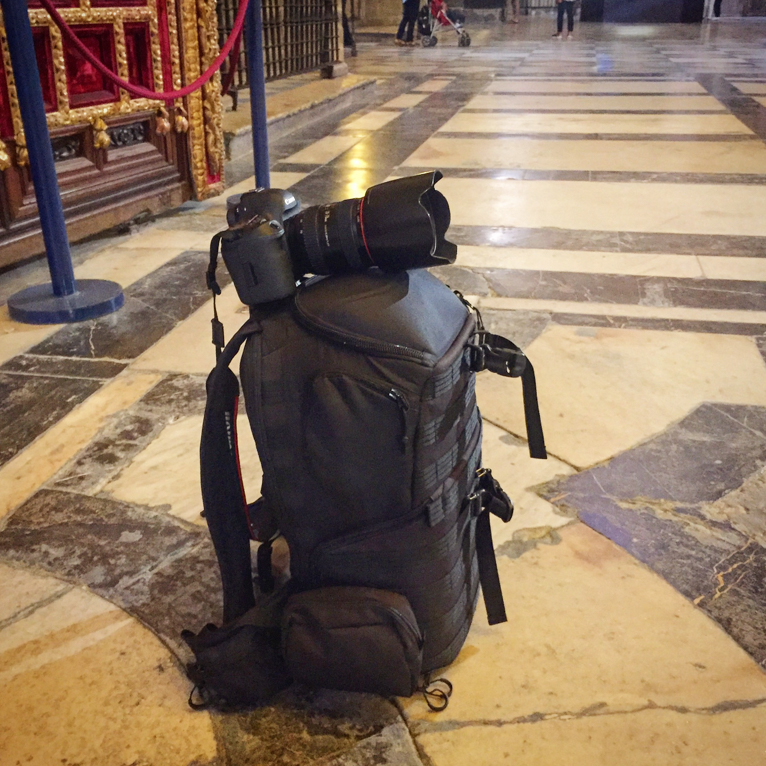
I use my camera bag to rest my camera on where tripods are not allowed.

The aperture setting also has an impact on the amount of light that is let into the image. The aperture is the opening in the lens, and its size determines the amount of light that is allowed in. The larger the aperture, the more light that enters. In cathedrals where light is low, your aperture will need to be larger to create a well-lit final image. The f/stop setting on your camera shows the size of the aperture. The smaller the f/number is, the larger the aperture. Unless you are looking to capture a grand scene of the building you can afford to select a wider aperture to help you have a faster shutter speed.

photographing_Cathedrals_churches_abbeys

Use the architecture

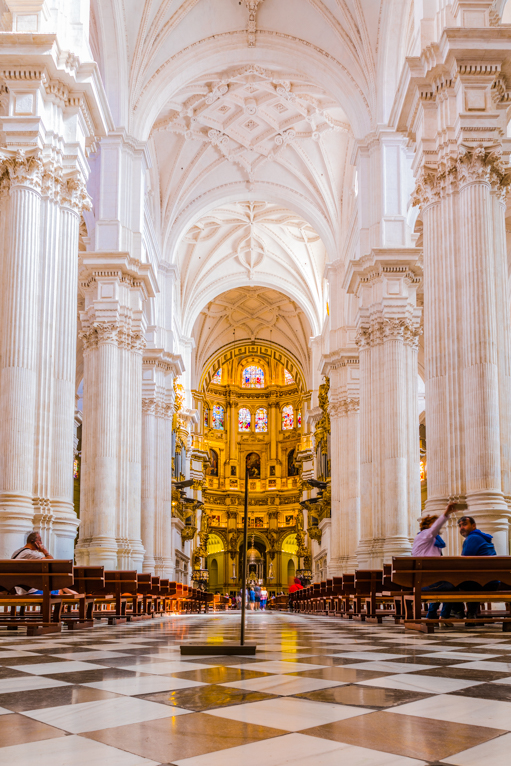
These buildings are among some of the most impressive architectural designs in history. So you should try to work with the architecture in your composition. The first way you can do this is to take your time. Just sit and admire the building and its design but also think about how to can use things like leading lines to compose your image. You will find loads of lines and patterns in cathedrals, churches and abbeys that you can use. Lines are a vital element in a good photograph and can create a sense of scale or a focal point. The symmetry in a cathedral, the pews, the archways, and the windows all give photographers lots of focal points and opportunities to create outstanding photographs.

Use the aisle, the nave, the columns, and the arches to frame shots and lead the eye to an attractive focal point like a stained-glass window or golden chalice.

photographing_Cathedrals_churches_abbeys

These historic buildings in effect, contain all the elements needed to create an exciting composition with all the lines, patterns, light, frames, and features. They indeed are an excellent place for photographers to indulge in experimentation and expand or stimulate their creativity and photographic skills. So, while there are no hard and fast rules on photographing a cathedral, church or abbey I hope that some of the ideas and information in this article will provide the inspiration you need to get out there and capture those stunning shots.

Photo credits: Kav Dadfar – All rights reserved. No usage without permission. Dreamstime.

Filed Under: Tutorials Tagged With: Abbey, Architectural Photography, Cathedral, Cathedral photography, Church, Photographing Architecture

9 Tips For Better Architectural Photography

Some of the most exciting photography projects can be centred around man-made things like buildings. Whether you are capturing the jutted angles of an old church or the modern curves of a contemporary building, photographers can give their audience a closer look into the complexities of architecture with these nine tips.

architectural-photography

1. Shoot the unexpected features and angles

If you don’t want to blend in with every other photographer out there, try the more unexpected viewpoints of looking at the building. Go to the last place you’d think to photograph and start there. Some of the best results come from questioning the habits of other photographers, and maybe even asking yourself the things you’ve done in the past that may seem a bit overdone now.

architectural-photography

2. Try a different time of day

If you’re interested in photographing a specific building, but you just feel that you can’t get the perfect shot, consider checking out the site at different times of the day. Even though your photos might not be what you expected at the beginning, you could come across something beautiful. Although it’s not the most popular time of day to shoot, the overhead lighting of a high sun around midday might be just the thing your building needs to shine. Making your way over to the site multiple and different times is a good practice since your creative mind is impressionable in different ways on any given day. You may have ideas one day that you never would’ve had the first time you visited the building.

architectural-photography

3. Try shots with people in them

Since architecture is man-made, it seems only fitting that people sometimes make it into the frame. Even though it may seem like the most aesthetically pleasing option to completely exclude the human shape from your presentation of the structure, it might just add some much-needed warmth to something lacking that dynamic feeling. But try to “control the crowd”. If there are hoards of people in front of the building if probably isn’t going to do it justice. But a few people walking, sitting or admiring the building can add to the photo.

architectural-photography

4. Try a wide-angle lens

As far as capturing the majesty of an entire building, the best way to go about it is to invest in a wide-angle lens. This type of lens will accentuate the depth provided by large buildings. The other more practical reason for using a wide-angle lens is that you may not always have enough room to step back far enough to get the entire building or even an interior room in one shot. A wide-angle lens can sort this issue out most of the time.

architectural-photography

5. Don’t forget about interiors

Photographers gravitate to the outside of buildings, but the inside has exciting views as well.  Capturing both the inside and the outside of the building could prove to be beneficial. You could compare and contrast the shapes and the feelings emitted from the two perspectives of the same building. But remember that photographing interiors will often be challenging handheld as you won’t be able to hold a camera steady enough in low light. So make sure if you are allowed to, you use a tripod.

architectural-photography

Another good tip is to take bracketed images (i.e. one image underexposed, one exposed correctly and one overexposed) and merge them together in post-processing. This is because you will often find that when you are photographing rooms, the window area will be blown out (too bright – clipped) because you have to expose for the interior of the room. By merging the photos together in post-processing (a technique called HDR) you can ensure you have good exposure across your image.

architectural-photography

The original 3 bracketed images taken which were then stacked into one photo below.

architectural-photography

6. Watch the weather

Weather affects many things about photography. Sometimes you may be looking for that perfect rainy shot as droplets sit on glass, or the sun is shining straight through a perfectly placed gap in the architecture. Whatever the case may be, you will never be pleased if you are surprised by what the weather does when you decide to go after that perfect shot. If you are anticipating colder weather, make sure you grab an extra pair of batteries for your camera, as battery life does not last as long in the chilly air. On rainy days you can get amazing shots but invest in protective gear for your camera for the longevity of your equipment.

architectural-photography

7. Wait for the best natural light

One of the essential tips for any type of photography is that everything looks better in natural light. Man-made light tends to be too stark and does not allow for a flattering photo, but natural light tends to compliment everything it touches. This is not to say that there aren’t beautiful photos taken in the glow of something other than the sun, however. If you’re not looking for a naturally lit photo, try finding buildings that are lit from spotlights on the ground at night. Lighting from this angle can be flattering to the shape of buildings, and you may find a great shot without the sun.

architectural-photography

8. Correct the issues

One of the big issues that you will no doubt find in architectural photography is a distortion in verticle lines called “converging lines”. This is when a building looks like it’s falling backwards. While sometimes this can be used in a creative way if you want the correct architectural photos you need to correct converging lines. A tilt and shift lens can help avoid this issue but they are expensive. Alternatively, you can correct these lines in editing software such as Adobe Photoshop or Lightroom.

architectural-photography

An example of converging lines in the image on the left and the corrected image using Lightroom on the right.

9. Understand and cater to your purpose

When it comes to photography, the first thing you should consider is the audience you’re photographing for. Are you being commissioned for a college admissions pamphlet? Are you trying to gain a following in photography on Instagram? Or, are you merely taking photos for your enjoyment? Knowing whom you’re taking the images for should impact some of the choices that you make during the process of photographing your building.

For example, if you are commissioned by a university to take pictures for their English department, you’ll most likely take a photo of their English building either straight on or from a slightly side angle from the front. You’ll probably want to do this during the afternoon light, with minimal editing done to the image (besides the usual colour correction, straightening and a little bit of brightness and contrast). A photograph like this will exude the professionalism the university will most likely want. On the other hand, if you’re photographing for yourself, you might find graffiti on the back of the building you’d like to highlight in contrast with the lines of the building. Two pictures of the same building but with very different results.

architectural-photography

Architectural photography can be straightforward. But to capture really great shots takes planning and patience not to mention practice and experience. One of the great things about architectural photography is that you are dealing with a subject that isn’t going to move. So focusing and ensuring sharpness in your photos isn’t going to be as difficult as say sports photography. But architectural photography does have it’s own challenges. Use the tips above and you will be on your way to capturing great photos of architecture.

Photo credits: Kav Dadfar – All rights reserved. No usage without permission.

Filed Under: Tutorials Tagged With: Architectural Photography, interior photography, Photographing Architecture, Photographing Buildings

Blog Topics

  • Tutorials
  • Inspiration
  • Locations
  • Gear
  • News
  • Other/Misc

What our customers say:

Life Pixel has been a life-changer for me. Continue reading
Eric GConnecticut
Read more reviews
I am more than satisfied with the service I received Continue reading
Christopher JCanada
Read more reviews
I am more than pleased with the conversion job that you did Continue reading
LOUIS MWaco, Texas
Read more reviews
I am VERY impressed with his knowledge of your products and his patience in explaining it to a novice like me. Continue reading
Lynn FEssex, Maryland
Read more reviews
Things will only get better from here thanks to all of you. Continue reading
Phillip FRedding, California
Read more reviews
The Lifepixel newsletter reminds me of not having expressed my gratitude for the excellent job you made. Continue reading
Michael GGermany
Read more reviews
Your staff went above and beyond the call of duty to make sure everything was handled in an excellent manner. Continue reading
Paige RPearland, Texas
Read more reviews
It has given my old camera a new life, I will enjoy using it again. Continue reading
William PAustralia
Read more reviews
Excellent service and the camera works just great Continue reading
Hans FairhurstAustralia
Read more reviews
I just got my converted camera back from you guys. THANK YOU!!!! Continue reading
Anne CutlerForest Knolls, CA
Read more reviews
infrared_filter_choices_sidebar
ir_conversions_explained_sidebar
----------- Watch More Videos -----------
infrared_quick_start_guide

Ready to start shooting Infrared?

Convert My Camera

Subscribe To Our Newsletter

Receive updates, tips, cool tutorials, free stuff and special discounts.

Learn the Basics

  • Video
  • Start Here
  • Filter Choices
  • Focus Calibration
  • Lens Considerations
  • Camera Considerations
  • Place Your Conversion Order

Resources

  • Galleries
  • Lens Hot Spot Database
  • IR Tutorials
  • FAQ
  • Infrared Filter Choices
  • Infrared Photography Guide
  • Infrared DIY Tutorials

Company

  • Why Choose Us
  • Get In Contact
  • Job Openings
  • Write For Us
  • Affiliate Program
  • Terms of Use
  • Privacy Policy
  • Home
  • Start Here
  • Galleries
  • Tutorials
  • FAQ
  • Blog
  • Why Choose LifePixel?
  • Shop
  • Contact

Copyright © 2025 Life Pixel Infrared - All rights reserved - LifePixel Infrared Photography IR Conversion, Modification & Scratched Sensor Repair