• Cart
  • Checkout
  • My Account

Infrared Conversions, IR Modifications & Photography Tutorials | Life Pixel IR

The world leader in infrared conversions, modifications & DIY IR conversion tutorials. Scratched sensor replacement, UV & Full spectrum conversions.

The world leader in infrared camera conversions

866.610.1710
  • Home
  • → Start Here ←
    • 1 – Introduction
    • 2 – Filter Choices
    • 3 – Focus Calibration
    • 4 – Lens Considerations
    • 5 – Camera Considerations
    • 6 – Start Shopping
  • Galleries
    • Infrared Photography
    • Infrared Time Lapse
    • Infrared Cinematography
    • Infrared Stop Motion
    • Ultraviolet Photography
    • Forensic Photography
  • Education
    • Training Sessions
    • How To Shoot Infrared
    • AR Coated Infrared Filters
    • Lens Hot Spot Database
    • Photoshop Video Tutorials
    • Infrared Issues & Solutions
    • IR Basics in Photoshop
    • Camera Quick Start Guide
    • DIY Conversion Tutorials
    • IR Photography Primer
    • Secondhand Cameras
    • Wall Of Shame
  • Workshops
  • FAQ
  • Blog
    • Tutorials
    • Inspiration
    • Locations
    • Gear
    • News
    • Other
  • Why Choose LifePixel?
    • Submit Your Review
  • Contact
  • Shop

Photogenic Places – A Simple Guide To Photographing Yosemite NP

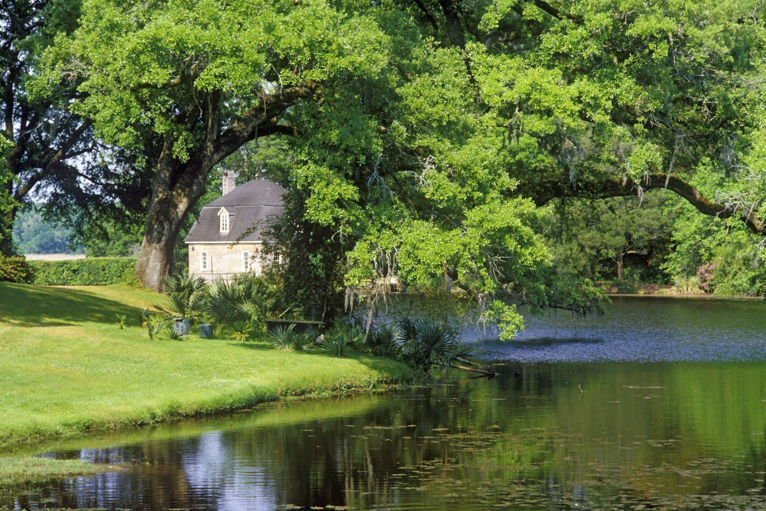
Yosemite National Park is located in California and has an area of 3,027km2. It has a large number of iconic landmarks and views which people travel from all over the world to see and photograph. As a national park, it was first protected in 1864 and became increasingly better known by photographers.

yosemite_photo_guide

A brief history of Yosemite National Park

There is a long history behind this, now massive, tourist attraction. A large and significant part of Yosemite is that it is expected that Native American tribes could have inhabited the land for around 6,000 years before it began to be explored and known by anyone outside of these tribes. The Native Americans that lived on this land lived in the Sierra Nevada, and they moved around seasonally to make the most of hunting and gathering wherever they were and whenever they could. Generally, they would move between villages at the bottom of mountains and then move to higher-elevation camps throughout summer. Some of the paths and trails made by the Native Americans can still be hiked by tourists and visitors today, and include some trading routes.

Creations made by the Native Americans in Yosemite can still be seen as they’re exhibited in museums in the national park. An example of this is the basketry and needlework made by the Miwok and Paiute tribes. Behind one of the many museums in Yosemite, there is a reconstructed version of how a tribal village would have appeared. This feature is there as a commemoration to the Ahwahneechee people, who were led by Chief Tenaya. It is known that the Ahwahneechee tribe was initially called the Yosemite Valley ‘Ahwahnee’, which can loosely translate into the phrase “Place of a Gaping Mouth.”

In 1848, there was gold discovered in the Sierra Nevada foothills. The result of this was that many gold-seekers came to the area. This sudden influx of people meant that the land began to be taken over by people outside the tribes. By 1851, much of the Native American land had been stolen away, and there was too much murder, which caused the Mariposa War. After this, the first tourists arrived in 1855. During the American Civil War, some people who had a considerable influence in California managed to convince Congress and President Lincoln to make Yosemite Valley and the Mariposa Grove the country’s first public preserve, which happened in 1864.

yosemite_photo_guide

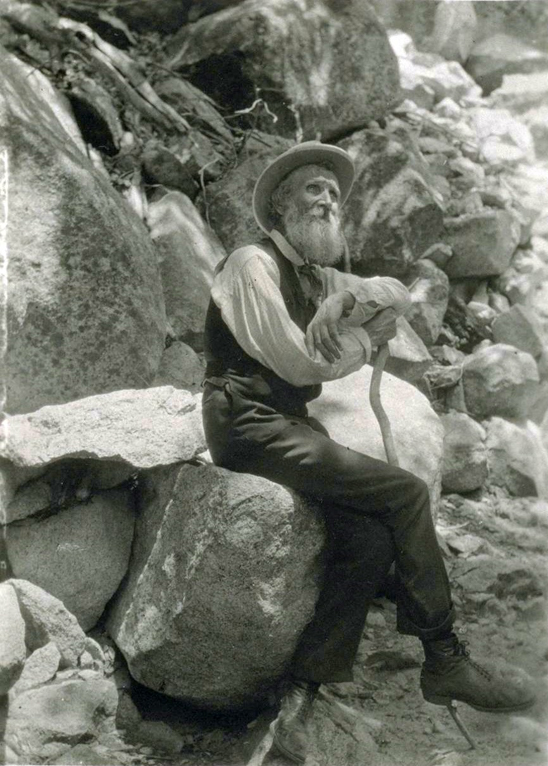
John Muir by Frances M. Fritz (creative commons)

What to photograph in Yosemite National Park

When you begin planning your trip to Yosemite National Park to take amazing photographs, there’s plenty of research you should do and things you need to consider before leaving for your trip. The first of these is that you will have different results, experiences, and scenes depending on which season you decide to visit the park. As you know, winter and summer will often be entirely different. Therefore, you need to know what sort of images you’re trying to capture. In summer, there is likely to be a much higher number of visitors, causing some problems when trying to take clear photos of the environment and surroundings.

Additionally, you may likely struggle to find accommodation close to where you want to be, especially if you don’t book early. However, in winter, there are likely to be very few tourists, and you may even get to witness a snowstorm in Yosemite, which could add to the beauty and dimension of your photographs. Despite these apparent positives, some areas may be closed until April, including Glacier Point Road and Tioga Pass Road.

The second thing you’ll want to consider is which areas of Yosemite National Park You want to photograph as this is a big park and unless you have plenty of time, trying to cram in too much will leave you disappointed. There are many beautiful areas and landmarks within the park which may appeal to you; below is a list of some of the best locations.

Vernal Falls

Vernal Falls is a waterfall that is part of the Merced River within the national park. It measures 317-feet and is best viewed from two main areas of the park. These areas are Glacier Point, which is if you want to get a photo with a bit of distance and more surroundings in it. However, if you want to get a closer photograph with more detail, then visit it from the Mist Trail. This waterfall cannot be seen from the floor of the valley while in your car, unlike Yosemite Fall or Bridalveil Fall, meaning it is necessary to walk a trail to see it.

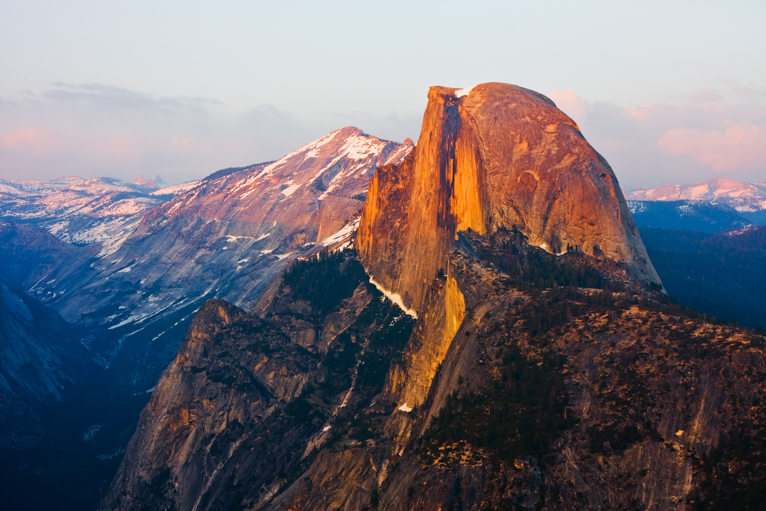
Half Dome & Glacier Point

If you mention Yosemite NP to someone, the chances are that this is the image they will have in their mind. The dome is part of the east end of Yosemite Valley in the park, and it is made of granite, and it appears to look like a dome cut in half as it has one flat side while the other is smooth and round. Half Dome rises to nearly 5,000 feet above the Yosemite Valley, and the most common way to hike up it is to use the cable route at the top, which can aid hikers with the final 400 feet to the summit. From a photography perspective, there are many places you can view the Half Dome from; the best of these is Glacier Point, as the view is unobstructed.

Other places you can view it from are; Cook’s Meadow, Washburn Point, or Mirror Lake.

yosemite_photo_guide

Yosemite Falls

Another of the famous features is Yosemite Falls which can be seen from much of the valley. There are three waterfalls that make up the falls with the middle one not visible from the ground. The best places to photograph the falls are from the Lower Yosemite Trail and Swinging Bridge. Be sure to pack your tripod so that you can capture slow exposure shots. To avoid the crowds head to the falls early in the morning when you may also be able to see a rainbow in the spray of the water.

Eagle Peak

Eagle Peak is one of the Three Brothers, a rock formation above the Yosemite Valley, and the peak is the highest out of the three rocks in the formation. The other rocks which make up this formation are known as the Middle and Lower Brothers. Once you’ve climbed the 3,500 feet to the summit, the view was described as the “most comprehensive of all the views” available from the north wall by John Muir, who was known as “Father of the National Parks”. This is a good enough reason to climb to the peak to capture the best photographic view you get at the top.

But if the hike to the top seems too strenuous you can also capture a shot of Three Brothers instead from Merced River. Head to Cathedral Beach picnic area and walk east for 5 minutes for an unobstructed view of the Three Brothers. If you get a calm day and a beautiful sunrise or sunset, the three peaks and the colourful sky will be perfectly reflected in the water.
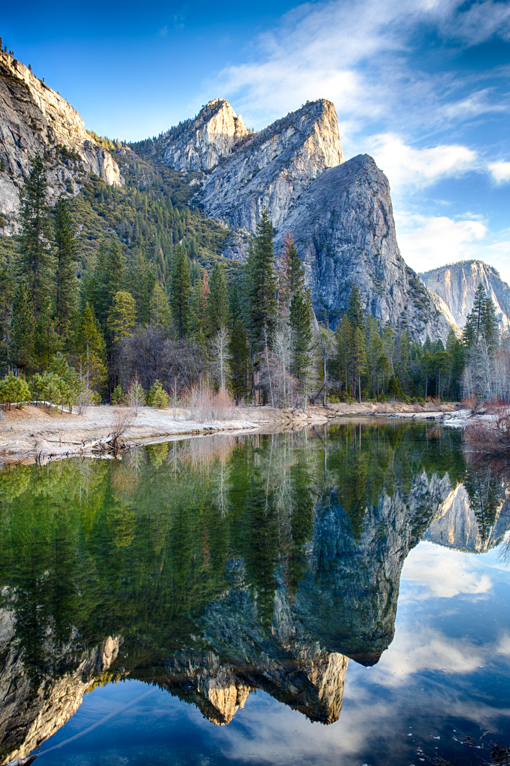
yosemite_photo_guide

Mirror Lake

This lake is a relatively small one, located on Tenaya Creek, but it provides some of the most beautiful views and opportunities for photography. The Mirror Lake is the last left of the massive glacial lake, which used to fill a large majority of the Yosemite Valley at the end of the last Ice Age. It is possible to swim in Mirror Lake, and as a result of this, if you don’t want to have many people in your photographs, it is best to either visit outside of the peak season in summer or to go early in the morning around sunrise.
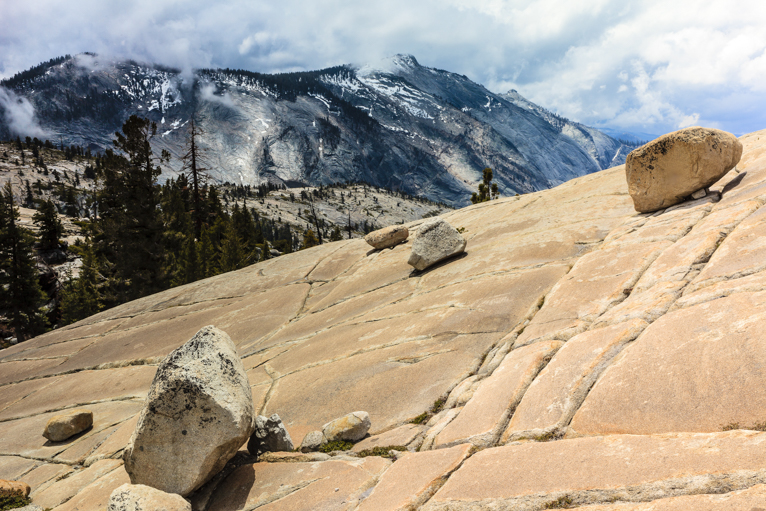
Olmsted Point

Olmsted Point is a place within Yosemite, which gives some of the best views with minimal effort as it is only elevated by 100 feet. This point is just off the Tioga Pass Road, and it allows you to see multiple notable places around Yosemite. Being able to see these is great for photography as it gives you the chance to take a picture of these areas in the broader context of nature and Yosemite National Park itself. Some key places you can see from Olmsted Point are; Tenaya Canyon and Tenaya Lake, in addition to the northern side of Half Dome and Clouds Rest.

yosemite_photo_guide

Taft Point

This is another spectacular view that should be a must on your Yosemite shot list. It is a pretty easy 2 mile round trip to the unfenced cliff edge. If you suffer from vertigo head over to the railed lookout which gives a stunning view. The best time for photos is at sunset but be prepared for big crowds even in the low season. If you want a quieter visit, then sunrise will be a better option.

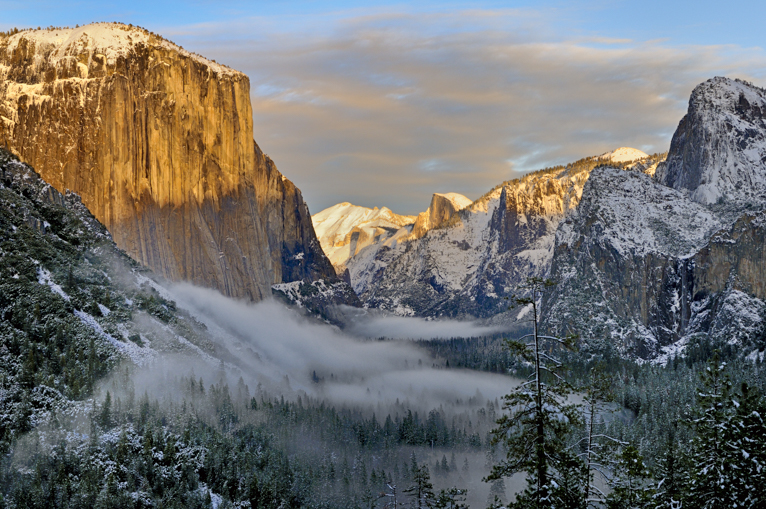
Tunnel View (Inspiration Point)

One of the most popular views in Yosemite NP and due to the easy access to this viewpoint don’t expect to have the place to yourself. The view is spectacular (possibly the best in the whole park) and you can see the entire valley including El Capitan, Half Dome and Bridalveil Falls all in the same shot. In the right conditions, sunrise or sunset are both great times for photography. The added benefit of early morning is that you may also get some low fog in the valley which will enhance the scene even more.

For an alternative view walk the 2.5 miles (1,000 ft elevation) round trip to Inspiration Point and you will get a similar view as Tunnel View but without the crowds. The view is slightly more obstructed but you will find very few people there.
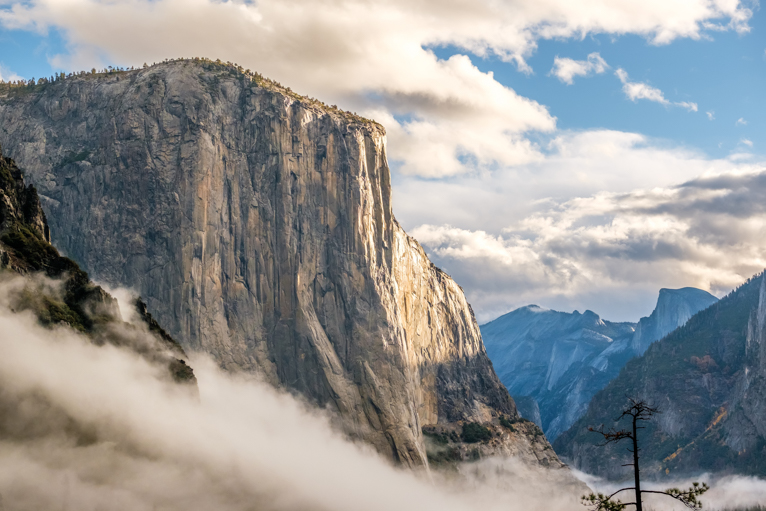
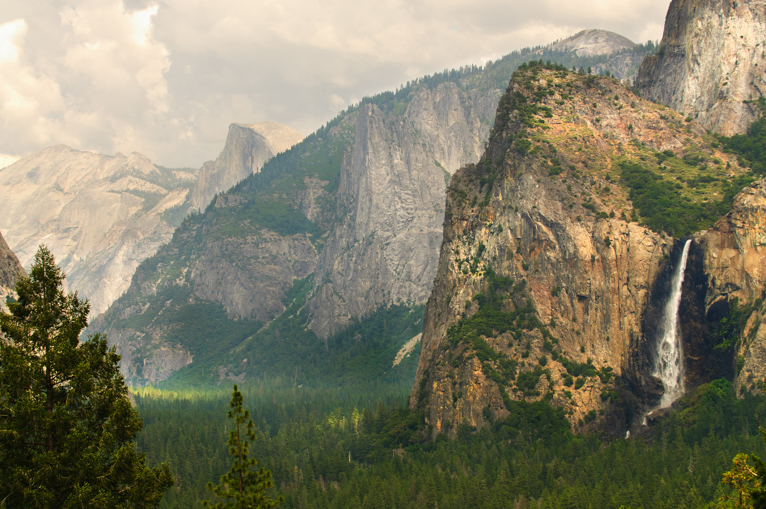
yosemite_photo_guide

El Capitan

The huge granite face of El Capitan is as iconic as it is beautiful. The best spot for the grand photo of El Cap is from Tunnel View. But also try to get up close and capture some photos of the fearless climbers who scale this immense mountain face on a daily basis (in the summer). From El Capitan Meadow on the road into the valley, you can get great views (just make sure you pack a telephoto lens). But for the real close-up shots of the climbers head to the Yosemite Valley Loop.

Bridalveil Falls

This is one of the most beautiful waterfalls in the park. Again for the grand view, Tunnel View will offer a good shot. For more of a close-up make the short and easy walk to the falls. But this will bring you right up to the falls which might be too close. There are several other good spots around the valley floor which offer good views of the falls. These include Sentinel Beach picnic area, the fields near Bridalveil Creek and arguably the best, from El Capital viewpoint on the Merced River.

yosemite_photo_guide

Keep in mind that these are just some of the amazing locations on offer. You should try to set some time aside to explore the park and find some of your own unique locations. This is one of the world’s great photography locations and if you give yourself the time to explore it fully you won’t be disappointed.

Photo credits: Dreamstime – All rights reserved. No usage without permission.

Filed Under: Tutorials Tagged With: landscape photography, Photo guides, Photography Guides, US National Parks, Yosemite NP

Photogenic Places – A Simple Guide To Photographing Yellowstone NP

Whether you plan on scrapbooking your family vacation, you’re a nature lover looking to share your experiences with others, or you’re trying to get amazing travel and landscape photos, Yellowstone is always a great place to go to. There are hundreds of opportunities to take incredible photos if you’re quick enough, patient enough or plan hard enough. Although we won’t be able to cover every location this amazing national park has to offer, this guide will show you where to find and photograph some of the many natural wonders that Yellowstone offers. The first five locations are typically areas that are easy to locate from the Grand Loop Road. The second half includes places that may be more difficult to get to but will undoubtedly yield incredible chances at unique photos.

Yellowstone_NP_photography_guide

Mammoth Hot Springs

Depending on the time you arrive, you could get a wide variety of pictures. Early in the morning, you can capture photos of the light shining off the steam of the springs. During the day, there are several chances to get spectacular images of erupting geysers and otherworldly mud pools and ultramarine pools. In the evening, you can get incredible sunset photos in Mammoth’s Lower Geyser Basin. It’s also a great place to spot some wildlife. Often the bison will gather in the grassy areas of the basin as the sun sets.

Yellowstone_NP_photography_guide

Artist Point

Artist point is a spot that overlooks a waterfall in the Grand Canyon of Yellowstone. Sunrise is the best time to capture stunning shots of the falls and the valley. The sun rises just over the valley allowing the falls to reflect the sun’s hues as it begins to increase. Be sure to pack your telephoto lens as you may want to zoom into the waterfall to capture the rainbows that sometimes show up.

Yellowstone_NP_photography_guide

Great Fountain Geyser on Firehole Lake Drive

Another fantastic geyser point, this time for sunsets. It is one of the most famous geyser photography sites thanks to its accessibility and easy to obtain wonder-shots. The sun sets directly behind the geyser each night allowing for stunning sunbursts if your aperture is stopped down to f/16 or f/22. You can also try in incorporate some foreground interest like people which will look great with the steam of geysers in the background.

Yellowstone_NP_photography_guide

Bacterial Mats

As off-putting as this sounds, they are quite gorgeous. Thanks to bacteria that thrive in Yellowstone’s geysers, there are massive buildups of encrusted microorganisms, found in most geothermal areas of the park. These mats look like small areas of exposed geodes, varying wildly in colour, depending on where the mats originated. In other cases, they look similar to the salt buildups on the sides of exposed rocks in the sea, just far more colourful.

Yellowstone_NP_photography_guide

Old Faithful

As far as easy to access photography points, we’ve saved the best for last. Most of us who know what Yellowstone National Park is, know precisely what Old Faithful is. This geyser is still the most active in the park, shooting superheated water hundreds of feet into the air for up to 5 minutes at a time. And this is every 35 to 120 minutes. With just a little patience, you won’t have any trouble capturing at least one action shot of this marvel. If you want to catch an impressive image, try to travel to the park when the temperature is lower, this allows the billowing steam to be seen even clearer in the crisp air. Anyone trying to show off the geyser’s impressive height, just add someone or something to the photo to capture its insane scale.

Yellowstone_NP_photography_guide

The following five destinations vary in difficulty to reach. However, if you are looking for a small hike and some quiet serenity, the trek to these spots will be worth it.

Blacktail Plateau Drive

We’ll start with an easier one where you’ll be able to stay in your car. Blacktail Plateau Drive is a 6 mile stretch of one-way road that compresses all that Yellowstone offers. This place includes vast meadows and dense forests. While a drive through Blacktail Plateau will always provide incredible serenity, the best times to take the drive are in the morning and evening, when the local wildlife is most active. During the day, it is a beautiful spot to capture a photo of fields of wildflowers in full bloom. However, Blacktail Plateau Drive is often closed for one of many reasons at any given time, including an increased number of bears entering the area, so be sure to check with the park before planning on taking this drive. Otherwise, you may be disappointed.

Yellowstone_NP_photography_guide

Lone Star Geyser

You know we had to add one more geyser to our list. However, Lone Star offers something that most others cannot; it’s an isolated location. Located two miles off of the Grand Loop Road, Lone Star is another predictable geyser. The big advantage of this one is that it isn’t visited by as many tourists so you’ll have fewer people to have content with.

Yellowstone_NP_photography_guide

Trout Lake

Now we start getting into more challenging to reach places. Trout lake is one of the most scenic lakes in the park. The clear water is framed by mountains reflected off the water on calm days. Unfortunately, to make it here, you have to make a half-mile steep trek through a Douglas fir forest. The trailhead is located on Highway 212, between the Northeast entrance and Tower, 1.5 miles south of Pebble Creek Campground. But if you are willing to make the journey you will be rewarded with some amazing photo opportunities.

Yellowstone_NP_photography_guide

Dunanda Falls

Although not the most challenging hike to access, it is a little out of the way to start with. The Bechler River area of Yellowstone isn’t accessible from the Grand Loop Road. Instead, you’ll need to access it through Idaho. Taking the Boundary Creek Trail North, you’ll eventually make it to the 110-foot tall Dunanda Falls. The hike is 16 miles round trip, which may sound like a lot to handle. However, it is easy terrain with an incredible view of the Dunanda Falls flowing over dark volcanic rocks. As a bonus, as scenic as the trail is, you’ll undoubtedly see some sort of wildlife on your way.

Old Gardiner Road

This stretch of road is best saved for last. It’ll take you to the Park’s North Entrance, running parallel to the North Entrance/Mammoth road, yet it feels like you’re a world away. This one-way road is another hot spot to observe wildlife early in the morning or near dusk. It’s a wonderful chance to snap simple photos of a road to nowhere.

Yellowstone_NP_photography_guide

Some other great spots…

There are literally hundreds of great photography locations in this park. One of the great attributes of this park is that it lends itself to different times of year and conditions. So here are some other notable great photography locations:

Hayden Valley – A great place to see the winding Yellowstone River as well as an abundance of wildlife. Early morning is the best time to spot wolves, bears and bison roaming. But even if there is no wildlife, the early morning light is a great time to capture this beautiful valley.

Mount Washburn – If you are after an amazing dizzying view, then look no further than Mount Washburn. It is the highest point in Yellowstone National Park and gives you a 360-degree view. But this is a long and tough hike (4 – 5 hours round trip) so if you want to get there for sunrise or stay for sunset it will mean walking in the dark. Be sure to have some bear spray with you as black bears and grizzlies roam this area.

Lamar Valley – This is another great spot to see wildlife with the added advantage of a beautiful setting with mountains in the background. Keep in mind that you will need to be a fair distance away from wildlife so for a close-up photo you are going to need a telephoto lens (200mm +). Even without the wildlife, this is another wonderful photo spot.

Grand Prismatic overlook – One of the most famous spots in Yellowstone for photography, but also one that doesn’t offer much in terms of alternative angles. You can get a close-up view from the boardwalk that leads to the hot spring but the better view is from the overlook. Try to head there on a cold day where visibility will be better and the steam from the spring more impressive.

Yellowstone_NP_photography_guide

Lamar River, Lamar Valley

Depending on the type of photography that you enjoy, there are plenty of other locations other than this list. These are just some of the main highlights but in reality, you could spend months or even years just photographing Yellowstone national park. There is a reason why it is considered as one of the world’s best photography locations.

Photo credits: Dreamstime – All rights reserved. No usage without permission.

Filed Under: Tutorials Tagged With: landscape photography, Photo guides, wildlife photography, Yellowstone National Park, Yellowstone NP

Photogenic Places – A Simple Guide To Photographing Charleston

A port city that was founded in 1670, Charleston, South Carolina is known for cobblestones, carriages, and the waterfront. The first shots of the Civil War came from here, so it’s filled with a rich history and helps support the foundations of the nation. Aside from the historical significance, Charleston is filled with great photo opportunities.

There are historical landmarks, universities and colleges,  exquisite buildings, and so much more. To help you figure out what you want to do, here are some of the top spots that you need to visit when you go through Charleston, South Carolina.

photographing-charleston

St. Michael’s Church

As the oldest church edifice in the city, St. Michael’s is also one of the few churches in the country to keep its original design. It’s filled with history and has a wonderful presence. George Washington even spent some time here in 1791 while he was touring the South. Originally built in 1761, it’s easy to see why so many people love those particular locations for their photoshoots. It can be found at Broad and Meeting streets and is also a National Historic Landmark. The adjacent churchyard is the resting place of many famous historical people, including two people who signed the Constitution. The bells of the church were cast in 1764 (recast in 1866) and also make for some great photos if you can get the right angle. A good composition for this shot is from the street in the evening. Set your camera on a tripod and capture some light trails from passing vehicles in the foreground.

photographing-charleston

Chalmers Street

Cobblestone streets are practically works of art in Charleston, and Chalmers Street is probably one of the most photogenic. The cobblestones were actually carried to the United States as the ballasts that were inside merchant ships in the 18th century. It’s one of only eight cobblestone streets that still remain intact in Charleston. From here you can also visit the Old Slave Mart Museum, which looks at Africans forcibly brought to this country and the trials they had to undertake.

Rainbow Row

This section of the city is part of what gives it character. The thirteen most photographed homes between 79 and 107 Easy Bay Street in the Historic District of Charleston make up Rainbow Row. Its a colourful and eclectic collection of homes. These Georgian row houses are popular tourist attractions and each home has a rich backstory. Shooting these homes individually or in a series helps build out the culture of the city, the residents, and the surrounding area. Look for people walking in front of the houses for some added interest.

photographing-charleston

Unitarian Church Graveyard

Part of Charleston’s Gateway Walk, the Unitarian Church Graveyard connects King Street to Archdale Street. It’s not very large, but at dusk, this can be quite an eerie little setting for photography. If you want to learn more why not take the ghost tour, you’ll get a much better sense of the historical significance of the location. As part of the oldest Unitarian church in the South (and the second oldest in Charleston), it is filled with history and has been declared a National Historic Landmark.

The Battery

A defensive seawall, this location is also a promenade in Charleston. It was named for the coastal defensive artillery battery that used to be at the site, stretching the lower shoreline. Now it’s common to see dolphins swimming nearby, so make sure to bring a tripod and the right lens for getting a few far away shots. The general atmosphere of the battery is also quite relaxing, and perfect for taking portraits of any residents. Additionally, the antebellum homes lining the Battery are fairly grand in scope and are absolutely worth checking out. One of the good things about this location is that the promenade along the river is higher than the street. This allows you to see over the parked cars. This is another location which is ideal for blue hour photography to capture the light trails of passing cars against the grand houses.

photographing-charleston

The Hayward-Washington House

Located on Church Street, this historic house was built in 1772 and belonged to one of the signers of the Declaration of Independence. George Washington was known to have stayed here during his visit to Charleston in 1791. It’s not owned by the Charleston Museum and has been furnished to look like life in the 18th century. In fact, the furniture is made up largely of Charleston-made pieces, which means you can get a great sense of local culture and craftmanship just by stepping inside and looking around. The grounds also have formal gardens that are filled with local fauna that were commonly used in the Lowcountry in the 18th century.

Waterfront Park

This favourite local spot has become a year-round centre for fun and relaxation for families and tourists. It’s set right on the banks of the Cooper River and is also adjacent to several historical homes that used to house Naval officers stationed at the nearby Charleston Naval Base. The lush oak trees make this a nicely shaded setting in certain spots. It’s a great place to click off a few frames to catch the lifestyles of the local residents. A must-see attraction is the Pineapple Fountain, which opened in 1990. Pineapples represent hospitality, which is one trait that Charleston is known for offering to visitors in spades. If you are lucky enough to have a beautiful sunset the fountain, it’ll make for quite a shot.

photographing-charleston

Colonial Dorchester State Historic Site

The amazing history behind this location really brings out what the South has to offer. Old trees brimming with character, waterfront spectacles along the Ashley River, and even an oyster-shell wall from the Revolutionary War. This is a favourite spot for photographers thanks to the various textures and backgrounds that are all in one spot. The site was actually donated to the State Park Service in 1969 and has since been added to the National Register of Historic Places. It’s placed where the town Dorchester once sat and you can see the remnants still there today, giving a good photographer a gateway to yesteryear.

Magnolia Plantation and Gardens

Iconic bridges, stunning landscapes, luscious flowerbeds, and historic structures. Magnolia has it all and it’s absolutely worth revisiting at different points in the year. Even novice photographers will find that they are taking world-class pictures here. The beauty of the plantation makes it difficult to take a bad picture, with the wild colour springing up all around you and the intricate composite of the various foliage. Located on the Ashley River, it is one o the oldest plantations in the South. It began in 1676 when the owners built a small house and garden on the site. It became a rice plantation, but these days it is known for its horticulture. There’s a maze, a lake, ponds, footbridges, swamp garden, and so much more to explore.

photographing-charleston

Patriot’s Point Naval & Maritime Museum

This location is actually in Mount Pleasant, just alongside Charleston, but it’s a stone’s throw away and absolutely worth the short drive to the mouth of the Cooper River on the Charleston Harbor. Here you’ll find three gigantic sea vessels: the Yorktown, the Laffey, and the Clamagore (which is a submarine). Most major port cities don’t have this kind of access to decommissioned military vessels, so definitely take advantage of some of the unique shots you can get while on board.

Middleton Place

This plantation built during the 18th and 19th century sits across the Ashley River in Dorchester County. The grounds and gardens are a photographer’s dream especially if you are lucky enough to encounter some early morning mist on the lake. The combination of the gardens and the old-style buildings are a wonderful combination. It is a National Historic Landmark and a must on your shot list for Charleston.

photographing-charleston

Charleston is a beautiful place to explore with your camera. From historic houses to plantations, you’ll be sure to come back with amazing photos. Use this handy guide to make sure that you cover the main spots.

Photo credits: Dreamstime – All rights reserved. No usage without permission.

Filed Under: Tutorials Tagged With: Charleston photography guide, Photo guides, Photogenic places

Photogenic Places – A Simple Guide To Photographing Havana

The Cuban capital is a melting pot of culture. This is a place where lives are lived in the open. Not inside houses, but in the lanes of Old Havana and beyond. This country has certainly had its hard times and is still under an embargo that results in crippling shortages. But instead of woe, you’ll find people beaming with smiles with the sounds of music seemingly coming from every corner. You could spend years photographing in Havana and still find new photos every day. So, here is a simple photography guide to Havana.

Photographing-Havana

Street Photography

If there is one reason only for visiting Havana, it would be for street photography. The crumbling facades of old houses play backdrop to street scenes that come alive minute after minute. Most people will naturally start in Old Havana. The redeveloped Plaza Vieja is a gentle introduction into this city. But start wandering further away and you will begin to see more of the authentic side of Havana. Go further away and into Central Havana and you might just believe that you have reached street photography paradise.

The best way to approach street photography in Havana is on foot. You just need to wear some comfortable shoes and walk the streets. You will come across picturesque street corners and graffiti that will be the perfect backdrop for your street photography. You just need to be patient and wait for the right moment.

Photographing-Havana

The Malecon

Just the mention of its name conjures up exotic images of travel. There are two great times to take a walk along the Malecon for photography.

Early morning will provide a great location for sunrise photos looking towards the fort across the bay (El Morro). You won’t see many people around at that time of the morning – just the odd person finishing. But the combination of water and coastline will be great for some slow exposure photography. If the conditions are right, you may even get some waves crashing over the barrier and onto the street. This can provide you with some dramatic photos but be very careful where you stand. The waves can drench you and your camera and the salty seawater can cause serious damage to your camera gear.

The other best time for photography along the Malecon is late afternoon. During this time the Malecon becomes the world’s longest sofa. You’ll find everything from people fishing and kids jumping in the water to canoodling couples. You can also try to capture some sunset photos of the skyline in the distance.

Photographing-Havana

Classic cars

Nothing says Cuba more than classic cars. You won’t have to look long or hard to spot one. Your first glimpse will be the moment you walk out of the airport. These cars are all over Havana and are wonderful subjects to photograph. You can of course capture some parked around the city. But often these cars will look great when they are parked or driving on one of the narrow roads of Old Havana. So, find the right street or background and wait for the car to arrive. Often you won’t have to wait long.

Another good place to photograph classic cars is on the Malecon. You will see car after car driving along and you can either capture them with the backdrop of the ocean or the buildings.

By far the biggest number of classic cars are parked around Parque Central. Here you will find every colour, style and make. This is a good place to capture some close-up shots of the details of these cars including the insides.

Lastly, if you do decide to do a classic car tour around the city (highly recommended) then make sure you also take some photos from the inside of the car whilst it is driving as well as it can give a completely different perspective.

Photographing-Havana

El Morro

The actual fort itself isn’t very photogenic from inside. But it does provide a great location for sunset photos of Havana and the Malecon. Head up to near the lighthouse and be sure to bring a telephoto lens as you may find that the skyline is too far away. With something like a 70-200mm lens, you will be able to zoom into a section for some stunning photos. Just be sure that your tripod will be able to take the weight of your camera.

Photographing-Havana

El Capitolo

The grand building in the centre of Old Havana has recently finished its renovation. The latest addition has been the gold plates added to the roof that was donated by Russia. The building is rumoured to be bigger than the state capitol in Washington and is equally as impressive. Find your spot on the paved area in the middle of the road and wait for the right opportunity when that classic car zooms past (you can also photograph the cars with the backdrop of the old building opposite El Capitolo as well). This is also a good area for some Blue Hour and night-time photography as well.

Photographing-Havana

Revolution Square

This vast open area is hard to miss. In the centre is a gigantic monument to national hero Jose Marti. You won’t miss the iconic Che Guevera and Camilo Cienfuego outlines on the buildings opposite. But arguably the most impressive feature in this place are the views from the top of the monument. A lift will take you to the top of one of the highest building in Havana. You will see as far as the ocean and classic cars parked downstairs will look like toy cars.

Photographing-Havana

Callejon de Hamel

Take a narrow lane in Central Havana and paint it throughout with various paintings. Created by Salvador Gonzáles Escalona, this hip place is great to visit at any time, but its highlight occurs every Sunday with an outdoor afro Caribbean music and dance concert. You will find various costumed dancers performing from 12 – 3 pm and it makes for fantastic photos. But you will need to arrive early to get a good spot as it gets incredibly busy. Also, be very aware of pickpockets and thieves. It’s best to only take a small camera bag and have it hanging in front of you.

Photographing-Havana

These are just some of the highlights that Havana has to offer. This is one of those places that you will need to spend considerable time in to really get under the skin of. But for now, these places should provide a good range of photography opportunities.

Photo credits: Kav Dadfar – All rights reserved. No usage without permission. Dreamstime.

Filed Under: Tutorials Tagged With: Havana, Photo guides, Photographing Havana

Blog Topics

  • Tutorials
  • Inspiration
  • Locations
  • Gear
  • News
  • Other/Misc

What our customers say:

Life Pixel has been a life-changer for me. Continue reading
Eric GConnecticut
Read more reviews
I am more than satisfied with the service I received Continue reading
Christopher JCanada
Read more reviews
I am more than pleased with the conversion job that you did Continue reading
LOUIS MWaco, Texas
Read more reviews
I am VERY impressed with his knowledge of your products and his patience in explaining it to a novice like me. Continue reading
Lynn FEssex, Maryland
Read more reviews
Things will only get better from here thanks to all of you. Continue reading
Phillip FRedding, California
Read more reviews
The Lifepixel newsletter reminds me of not having expressed my gratitude for the excellent job you made. Continue reading
Michael GGermany
Read more reviews
Your staff went above and beyond the call of duty to make sure everything was handled in an excellent manner. Continue reading
Paige RPearland, Texas
Read more reviews
It has given my old camera a new life, I will enjoy using it again. Continue reading
William PAustralia
Read more reviews
Excellent service and the camera works just great Continue reading
Hans FairhurstAustralia
Read more reviews
I just got my converted camera back from you guys. THANK YOU!!!! Continue reading
Anne CutlerForest Knolls, CA
Read more reviews
infrared_filter_choices_sidebar
ir_conversions_explained_sidebar
----------- Watch More Videos -----------
infrared_quick_start_guide

Ready to start shooting Infrared?

Convert My Camera

Subscribe To Our Newsletter

Receive updates, tips, cool tutorials, free stuff and special discounts.

Learn the Basics

  • Video
  • Start Here
  • Filter Choices
  • Focus Calibration
  • Lens Considerations
  • Camera Considerations
  • Place Your Conversion Order

Resources

  • Galleries
  • Lens Hot Spot Database
  • IR Tutorials
  • FAQ
  • Infrared Filter Choices
  • Infrared Photography Guide
  • Infrared DIY Tutorials

Company

  • Why Choose Us
  • Get In Contact
  • Job Openings
  • Write For Us
  • Affiliate Program
  • Terms of Use
  • Privacy Policy
  • Home
  • Start Here
  • Galleries
  • Tutorials
  • FAQ
  • Blog
  • Why Choose LifePixel?
  • Shop
  • Contact

Copyright © 2025 Life Pixel Infrared - All rights reserved - LifePixel Infrared Photography IR Conversion, Modification & Scratched Sensor Repair