• Cart
  • Checkout
  • My Account

Infrared Conversions, IR Modifications & Photography Tutorials | Life Pixel IR

The world leader in infrared conversions, modifications & DIY IR conversion tutorials. Scratched sensor replacement, UV & Full spectrum conversions.

The world leader in infrared camera conversions

866.610.1710
  • Home
  • → Start Here ←
    • 1 – Introduction
    • 2 – Filter Choices
    • 3 – Focus Calibration
    • 4 – Lens Considerations
    • 5 – Camera Considerations
    • 6 – Start Shopping
  • Galleries
    • Infrared Photography
    • Infrared Time Lapse
    • Infrared Cinematography
    • Infrared Stop Motion
    • Ultraviolet Photography
    • Forensic Photography
  • Education
    • Training Sessions
    • How To Shoot Infrared
    • AR Coated Infrared Filters
    • Lens Hot Spot Database
    • Photoshop Video Tutorials
    • Infrared Issues & Solutions
    • IR Basics in Photoshop
    • Camera Quick Start Guide
    • DIY Conversion Tutorials
    • IR Photography Primer
    • Secondhand Cameras
    • Wall Of Shame
  • Workshops
  • FAQ
  • Blog
    • Tutorials
    • Inspiration
    • Locations
    • Gear
    • News
    • Other
  • Why Choose LifePixel?
    • Submit Your Review
  • Contact
  • Shop

Solar Photography

Share
Pin
Tweet
Email
Share

The purpose of this article is to provide a brief overview of solar photography. Additionally, two solar filters will be compared.


Equipment Used:

  • Equipment used: Canon 100 – 400mm 4.5-5.6 L IS II lens with the Canon Extender EF 2X III, yielding 800mm.
  • Canon 5DSr body was used for all the photographs.
  • All photographs were taken with a tripod.
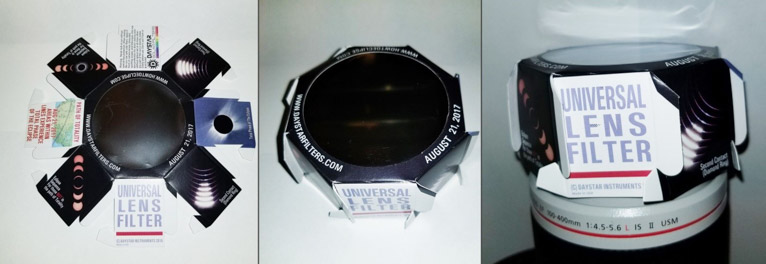
  • Baader solar film 70mm. Photo below, top.
  • DayStar Filters Universal Lens Filter 70mm. Photo below, bottom.

Methodology:

  • At least ten photographs were taken of each subject. Autofocusing was performed for every shot. The best photograph from each sequence was selected for this article.

First Safety!!!

  • Never looked directly into the sun as this can lead to permanent eye injury including blindness. Always wear certified solar viewing glasses to observe the sun.
  • Never looked directly into the sun through your camera, telescope or binoculars, as this can lead to permanent eye injury including blindness as well as permanent damage to the equipment.
  • Only use filters approved for solar viewing. Neutral density filters, will not block UV and/or IR wavelengths and will result in permanent eye injury as well as damaging your equipment.
  • DO NOT point a camera at the sun unless the optics are fitted with a properly certified solar filter. The filter must go in front of your optics, i.e. it is the first thing the sunlight will hit prior to your lens.
  • Filters must be secured properly, if they fall off your equipment will be damaged and/or permanent eye injury may result. It is recommended that you tape the edge of the filter to a secure nonmoving part on the side of your lens.
  • It is recommended to use live view rather than the cameras viewfinder.

Setup:

  • First secure your approved solar filter to the front of your lens, as per the manufacturer’s instructions.
  • Check that the filter is not allowing light to leak directly into the lens.
  • Mount your camera to a sturdy tripod.
  • Using live view acquire the sun. The widest setting on a zoom lens will make this easy, zoom in after target acquisition.
  • Autofocus may not work well through a solar filter. If this is the case you will have to use manual focus. Do NOT remove the solar filter to focus or for any other reason whatsoever.
  • Given that you will be in bright sun light you may want to bring a towel to cover your head and the rear of the camera. This will make it easier to see the live view screen.
  • Take some bracketed exposures, review your results and adjust accordingly. My exposures were in the range of 1/30sec., at f25, ISO100, with the equipment / solar filters listed above.


Results:

Left – Baader solar film 70mm. 1/30sec., f25, ISO100 

Right – DayStar Filters Universal Lens Filter 70mm. 1/25sec., f25, ISO100

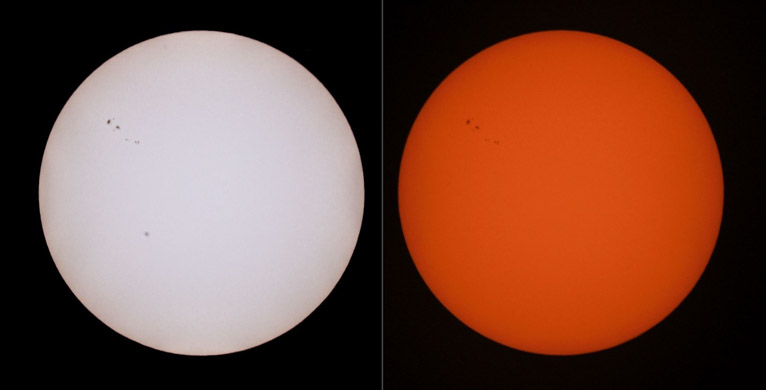
Analysis: The Baader solar film filter produced a slightly sharper image with better detail in the sunspots when compared to the DayStar Filters Universal Lens Filter.

Conclusion: It is fairly easy to produce aesthetically pleasing photographs of the sun provided that you take the proper precautions and use an approved solar filter.

Take care, and keep experimenting.

  • Latest Articles
  • Author Bio
Irv Schlanger

Latest articles by Irv Schlanger (see all articles)

  • Review of the IDAS LPS-D1 Light Pollution Suppression Filter - November 11, 2017
  • Stacking to Increase Depth of Field - September 26, 2017
  • Diffraction of Light – Creating an Artificial Rainbow - September 1, 2017
Irv Schlanger

Irv Schlanger

Irv Schlanger worked as a professional photographer in the 80’s through the late 90s, photographing hundreds of weddings and many magazine covers. His formal training is in information systems, and security. He has a Master’s degree from Drexel University. Irv got back into photography as a way to relax, and now focuses primarily on landscapes, wildlife, and portrait photography.


See All Articles by Irv Schlanger
Share
Pin
Tweet
Email
Share

Related Posts

  • Infrared Photoshop Tutorials & Videos
    Infrared Photoshop Tutorials & Videos
  • Basic Infrared Photoshop Techniques Tutorial
    Basic Infrared Photoshop Techniques Tutorial
  • Life Pixel Modified Camera Quick Start Guide
    Life Pixel Modified Camera Quick Start Guide
  • The Wall Of Shame
    The Wall Of Shame

Filed Under: Gear, Tutorials

Comments

  1. Michael T Shue says

    May 6, 2022 at 3:40 pm

    Nice article. Rainy day thoughts. I have a full spectrum converted Fujifilm and have taken solar images with the XC50-230mm using an ND100000 filter. I also have IR filters from 680-950nm. Have you ever tried using an IR filter either alone or with a ND filter?

    I may have to try the next sunny day.

    Reply
    • Dan Wampler says

      May 9, 2022 at 10:36 am

      Michael,
      If you are referring to using an ND filter to shoot things other than the sun, I enjoy shooting IR with an ND filter and the results are good. Here, are some examples. https://www.lifepixel.com/photo-tutorials/long-exposure-infrared-photography

      Reply

Leave a Reply Cancel reply

Your email address will not be published. Required fields are marked *

Blog Topics

  • Tutorials
  • Inspiration
  • Locations
  • Gear
  • News
  • Other/Misc

What our customers say:

Life Pixel has been a life-changer for me. Continue reading
Eric GConnecticut
Read more reviews
I am more than satisfied with the service I received Continue reading
Christopher JCanada
Read more reviews
I am more than pleased with the conversion job that you did Continue reading
LOUIS MWaco, Texas
Read more reviews
I am VERY impressed with his knowledge of your products and his patience in explaining it to a novice like me. Continue reading
Lynn FEssex, Maryland
Read more reviews
Things will only get better from here thanks to all of you. Continue reading
Phillip FRedding, California
Read more reviews
The Lifepixel newsletter reminds me of not having expressed my gratitude for the excellent job you made. Continue reading
Michael GGermany
Read more reviews
Your staff went above and beyond the call of duty to make sure everything was handled in an excellent manner. Continue reading
Paige RPearland, Texas
Read more reviews
It has given my old camera a new life, I will enjoy using it again. Continue reading
William PAustralia
Read more reviews
Excellent service and the camera works just great Continue reading
Hans FairhurstAustralia
Read more reviews
I just got my converted camera back from you guys. THANK YOU!!!! Continue reading
Anne CutlerForest Knolls, CA
Read more reviews
infrared_filter_choices_sidebar
ir_conversions_explained_sidebar
----------- Watch More Videos -----------
infrared_quick_start_guide

Ready to start shooting Infrared?

Convert My Camera

Subscribe To Our Newsletter

Receive updates, tips, cool tutorials, free stuff and special discounts.

Learn the Basics

  • Video
  • Start Here
  • Filter Choices
  • Focus Calibration
  • Lens Considerations
  • Camera Considerations
  • Place Your Conversion Order

Resources

  • Galleries
  • Lens Hot Spot Database
  • IR Tutorials
  • FAQ
  • Infrared Filter Choices
  • Infrared Photography Guide
  • Infrared DIY Tutorials

Company

  • Why Choose Us
  • Get In Contact
  • Job Openings
  • Write For Us
  • Affiliate Program
  • Terms of Use
  • Privacy Policy
  • Home
  • Start Here
  • Galleries
  • Tutorials
  • FAQ
  • Blog
  • Why Choose LifePixel?
  • Shop
  • Contact

Copyright © 2025 Life Pixel Infrared - All rights reserved - LifePixel Infrared Photography IR Conversion, Modification & Scratched Sensor Repair