• Cart
  • Checkout
  • My Account

Infrared Conversions, IR Modifications & Photography Tutorials | Life Pixel IR

The world leader in infrared conversions, modifications & DIY IR conversion tutorials. Scratched sensor replacement, UV & Full spectrum conversions.

The world leader in infrared camera conversions

866.610.1710
  • Home
  • → Start Here ←
    • 1 – Introduction
    • 2 – Filter Choices
    • 3 – Focus Calibration
    • 4 – Lens Considerations
    • 5 – Camera Considerations
    • 6 – Start Shopping
  • Galleries
    • Infrared Photography
    • Infrared Time Lapse
    • Infrared Cinematography
    • Infrared Stop Motion
    • Ultraviolet Photography
    • Forensic Photography
  • Education
    • Training Sessions
    • How To Shoot Infrared
    • AR Coated Infrared Filters
    • Lens Hot Spot Database
    • Photoshop Video Tutorials
    • Infrared Issues & Solutions
    • IR Basics in Photoshop
    • Camera Quick Start Guide
    • DIY Conversion Tutorials
    • IR Photography Primer
    • Secondhand Cameras
    • Wall Of Shame
  • Workshops
  • FAQ
  • Blog
    • Tutorials
    • Inspiration
    • Locations
    • Gear
    • News
    • Other
  • Why Choose LifePixel?
    • Submit Your Review
  • Contact
  • Shop

Stacking to Increase Depth of Field

Share
Pin
Tweet
Email
Share

In this article we will look at a technique to increase depth of field, also known as depth of focus. The technique will “stack” several images of the subject taken at different focal points.

Methodology & Equipment:

  • A camera & lens which allow for manual focus.
  • A tripod.
  • A software program which allows for alignment and stacking of images. Photoshop CS4 and above has these features.

Step 1:

Place the camera on the tripod so that it will not move during the exposures.

Step 2:

Position the subject to be photographed in front of the camera and compose the photograph. It is important that the subject not move during the sequence of photographs as this will throw off the alignment and create ghosting around the subject.

Step 3:

Meter the subject and set your shutter speed and f-stop accordingly. Note: it is important that you do not change the f-stop during the sequence of photographs.

Step 4:

Set the camera for manual focus, and focused on the first part of the subject you want to be sharp. Take the photograph.

Refocus a bit further into the subject and take another photograph.

Repeat this process until the entire subject will appear sharp from front to back. While three photographs is typical, this could take anywhere from two to six photographs. Note: the greater the number of photographs you take, the greater the chance of alignment errors. Less is more!

Step 5:

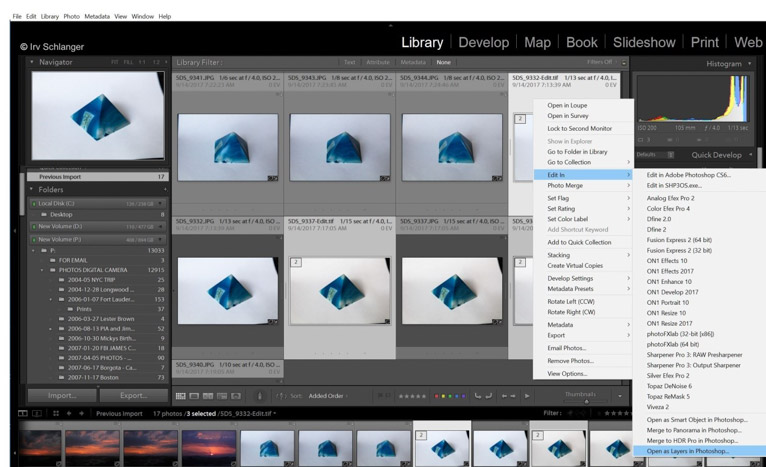
Open the sequence of photographs in your chosen stacking program. For this article Photoshop CS6 will be used. From Lightroom select the images you want to stack then hold down CTRL (CMD in MAC), right click on one of the selected images, “Edit In” > “Open As Layers in Photoshop…”

Step 6:

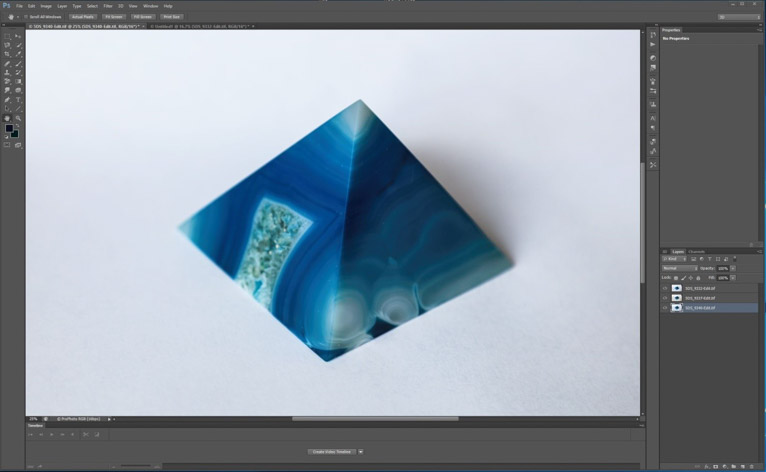
Select the layers in Photoshop by holding down CTRL (CMD in MAC), right click on each of the layers to select them.

Step 7:

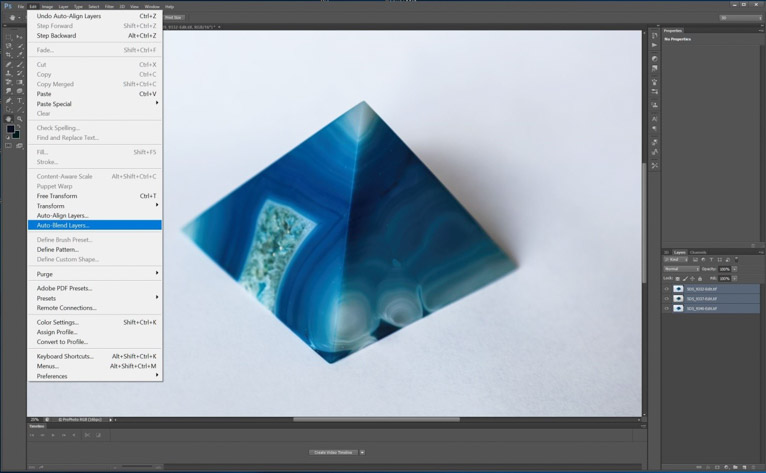
“Edit” > “Auto-align Layers…” then click “Auto.”

Step 8:

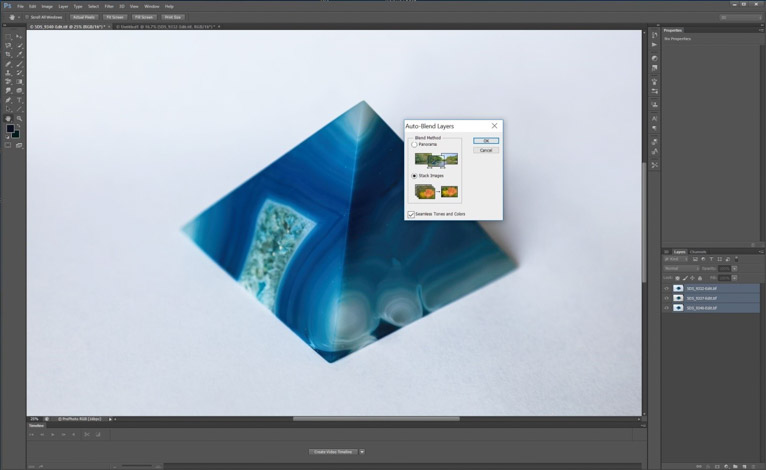
“Edit” > “Auto-Blend Layers…” then select the “Stack Images” button.

Note: This can take some time to complete.

Additional Tips:

If you have enough light use an f stop around f8, f11, or f16. The photographs in this article were shot at 1/8sec., f4, ISO 200.

Results:

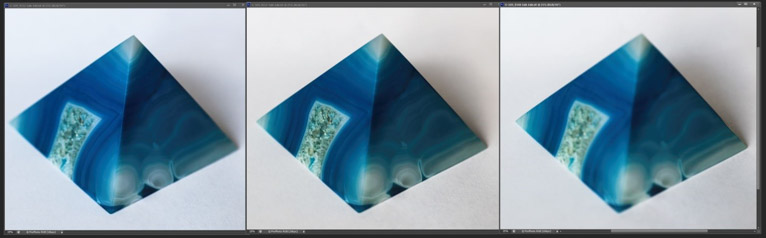
Above: the three photographs to be merged. From left to right: front focus, middle focus, far focus.


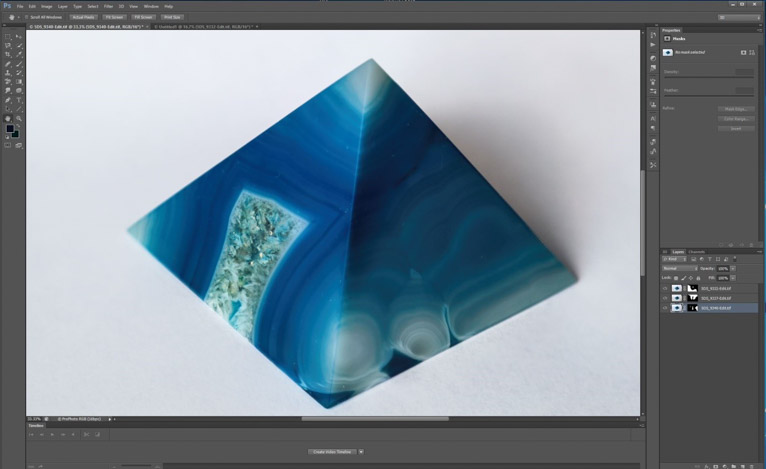
Above: the completed merger of the three photographs.


Conclusion: The technique of alignment and stacking can provide excellent results when you need increased depth of field.

  • Latest Articles
  • Author Bio
Irv Schlanger

Latest articles by Irv Schlanger (see all articles)

  • Review of the IDAS LPS-D1 Light Pollution Suppression Filter - November 11, 2017
  • Stacking to Increase Depth of Field - September 26, 2017
  • Diffraction of Light – Creating an Artificial Rainbow - September 1, 2017
Irv Schlanger

Irv Schlanger

Irv Schlanger worked as a professional photographer in the 80’s through the late 90s, photographing hundreds of weddings and many magazine covers. His formal training is in information systems, and security. He has a Master’s degree from Drexel University. Irv got back into photography as a way to relax, and now focuses primarily on landscapes, wildlife, and portrait photography.


See All Articles by Irv Schlanger
Share
Pin
Tweet
Email
Share

Related Posts

  • Infrared Photoshop Tutorials & Videos
    Infrared Photoshop Tutorials & Videos
  • Basic Infrared Photoshop Techniques Tutorial
    Basic Infrared Photoshop Techniques Tutorial
  • Life Pixel Modified Camera Quick Start Guide
    Life Pixel Modified Camera Quick Start Guide
  • The Wall Of Shame
    The Wall Of Shame

Filed Under: Tutorials

Leave a Reply Cancel reply

You have to agree to the comment policy.

Blog Topics

  • Tutorials
  • Inspiration
  • Locations
  • Gear
  • News
  • Other/Misc

What our customers say:

Life Pixel has been a life-changer for me. Continue reading
Eric GConnecticut
Read more reviews
I am more than satisfied with the service I received Continue reading
Christopher JCanada
Read more reviews
I am more than pleased with the conversion job that you did Continue reading
LOUIS MWaco, Texas
Read more reviews
I am VERY impressed with his knowledge of your products and his patience in explaining it to a novice like me. Continue reading
Lynn FEssex, Maryland
Read more reviews
Things will only get better from here thanks to all of you. Continue reading
Phillip FRedding, California
Read more reviews
The Lifepixel newsletter reminds me of not having expressed my gratitude for the excellent job you made. Continue reading
Michael GGermany
Read more reviews
Your staff went above and beyond the call of duty to make sure everything was handled in an excellent manner. Continue reading
Paige RPearland, Texas
Read more reviews
It has given my old camera a new life, I will enjoy using it again. Continue reading
William PAustralia
Read more reviews
Excellent service and the camera works just great Continue reading
Hans FairhurstAustralia
Read more reviews
I just got my converted camera back from you guys. THANK YOU!!!! Continue reading
Anne CutlerForest Knolls, CA
Read more reviews
infrared_filter_choices_sidebar
ir_conversions_explained_sidebar
----------- Watch More Videos -----------
infrared_quick_start_guide

Ready to start shooting Infrared?

Convert My Camera

Subscribe To Our Newsletter

Receive updates, tips, cool tutorials, free stuff and special discounts.

Learn the Basics

  • Video
  • Start Here
  • Filter Choices
  • Focus Calibration
  • Lens Considerations
  • Camera Considerations
  • Place Your Conversion Order

Resources

  • Galleries
  • Lens Hot Spot Database
  • IR Tutorials
  • FAQ
  • Infrared Filter Choices
  • Infrared Photography Guide
  • Infrared DIY Tutorials

Company

  • Why Choose Us
  • Get In Contact
  • Job Openings
  • Write For Us
  • Affiliate Program
  • Terms of Use
  • Privacy Policy
  • Home
  • Start Here
  • Galleries
  • Tutorials
  • FAQ
  • Blog
  • Why Choose LifePixel?
  • Shop
  • Contact

Copyright © 2023 Life Pixel Infrared - All rights reserved - LifePixel Infrared Photography IR Conversion, Modification & Scratched Sensor Repair