• Cart
  • Checkout
  • My Account

Infrared Conversions, IR Modifications & Photography Tutorials | Life Pixel IR

The world leader in infrared conversions, modifications & DIY IR conversion tutorials. Scratched sensor replacement, UV & Full spectrum conversions.

The world leader in infrared camera conversions

866.610.1710
  • Home
  • → Start Here ←
    • 1 – Introduction
    • 2 – Filter Choices
    • 3 – Focus Calibration
    • 4 – Lens Considerations
    • 5 – Camera Considerations
    • 6 – Start Shopping
  • Galleries
    • Infrared Photography
    • Infrared Time Lapse
    • Infrared Cinematography
    • Infrared Stop Motion
    • Ultraviolet Photography
    • Forensic Photography
  • Education
    • Training Sessions
    • How To Shoot Infrared
    • AR Coated Infrared Filters
    • Lens Hot Spot Database
    • Photoshop Video Tutorials
    • Infrared Issues & Solutions
    • IR Basics in Photoshop
    • Camera Quick Start Guide
    • DIY Conversion Tutorials
    • IR Photography Primer
    • Secondhand Cameras
    • Wall Of Shame
  • Workshops
  • FAQ
  • Blog
    • Tutorials
    • Inspiration
    • Locations
    • Gear
    • News
    • Other
  • Why Choose LifePixel?
    • Submit Your Review
  • Contact
  • Shop

Processing Photo Files – Aurora HDR

Share
Pin
Tweet
Email
Share

“The negative is comparable to the composer’s score and the print to its performance. Each performance differs in subtle ways.” – Ansel Adams

Some Thoughts on Digital vs. Film Processing

I will update Ansel’s quote just a bit for today’s digital age. The original file is now equivalent to Ansel’s negative. The post-processing is the performance of the file which leads to the print or other use. Instead of heading to a dark room full of chemicals and diminished red light we can work in a lighted environment. We now create changes that are repeatable to an exacting standard. In the past to pull a print in the darkroom you had to dodge and burn using your hands or other objects to interrupt or extend the lighting time on the paper. You could spend hours trying to get an image printed just as you would like it.  And good luck with being able to create the same image again.

Now that we are in the digital age we can create repeatable results and can tickle every pixel in the file to do our bidding. Photography software has been improving at an incredible rate to help us in developing our imagery. I’d like to talk about revisiting older RAW files to see how the new processing tools can breath new life into them. This can be done using jpegs also, but you will not have near the latitude as RAW files. When jpegs are saved a relatively large portion of non-visible information is tossed to the side never to be seen again.

There are wonderful reasons to use jpegs. I capture them all the time. Benefits include having the image look great right out of the camera for instant sharing on social media. Or, if you tell the camera to give you a black and white or another photo style the information is baked right into the file. But those same benefits of jpegs become liabilities when you want to make larger images and dig down into the data to pull out all the detail and color that is available in the RAW.

Best of Both Worlds

Here’s the best part. You don’t have to do one or the other. Today’s cameras can capture RAW plus jpeg giving you the options with the best of both worlds. Camera cards and storage memory have come down in price to a point where storage of the extra files is not a price decision. This is especially important when it comes to making better images from older files as new software solutions are formulated.

Aurora HDR *

I haven’t been a great fan of a lot of the HDR programs in the past as they ‘looked’ like HDR. Many of the effects included way too much saturation, ghosting in high contrast areas, and noise. MAC users now have a new option from MacPhun called Aurora HDR. It has very precise controls that can help you show the detail you wish along with the density range you need to cover with relative ease. Let’s take a look at an exposure sequence I created in 2014 that I was not happy with the final result I was able to achieve at that time.

image exposure sequence

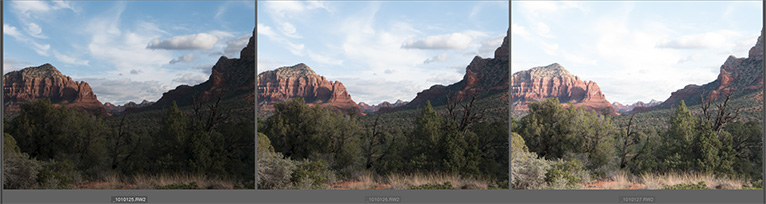
Three image bracket of landscape scene in Sedona, Arizona

As you can see in the first image, the sky is exposed correctly, and shadow areas are blocked up. The middle image has the red rocks looking just about right. The last exposure has a place to add lots of detail to what will be the shadow areas of the image.
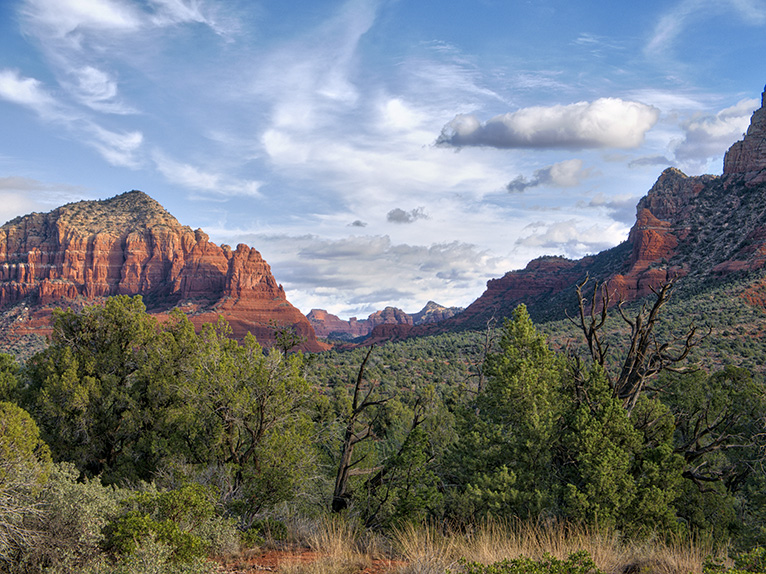

Win a FREE Camera Conversion!

_1010126_HDR_red_rocks_clouds_766p

Processed image

Working with various settings makes it possible to pull up detail in the shadows while still controlling highlights in a believable fashion. As I study this I may have added a bit of saturation and a bit more ‘grit’ to the scene, but that was an artistic choice. Not one forced on me by the limitations of previous versions of HDR software. When processing there is a significant number of presets to get you close to your final result. Then you have the opportunity tweak many settings to your taste.

red_rocks_clouds_aurora_hdr_window_766p

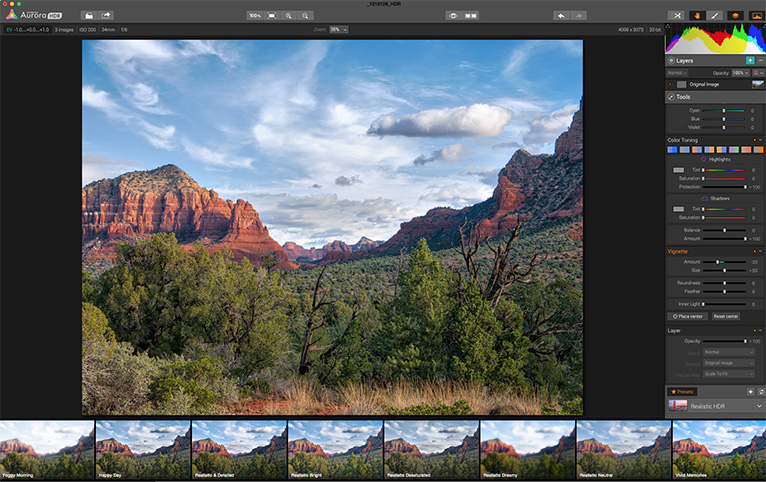
Presets across the bottom of the navigation processing window. There are different sets of presets from which to choose or you can build and save your recipes. The right-hand side of the window shows just a few of the possible tool adjustment settings available. Scrolling reveals many more possibilities.

Black and White – Nik Silver FX Pro 2

I can take the image to a whole other look by working with my favorite black and white conversion software from Google. Nik Silver FX Pro 2 * is a solid way to move the image to monochrome. There are options for micro-sharpening, tweaking various tones with complete control.

bob coates photography bw image

Black and white processed image starting with the Aurora HDR from above

Remember we talked about darkroom dodging and burning. After the photo was converted with Nik a blank layer was created in Adobe’s Photoshop. The Blend Mode was changed to Soft Light. By ‘painting’ on this layer with a black or white brush set to a low opacity, you can dodge and burn in a non-destructive fashion. If it is going to be an involved process with lots of dark and light adjustments, you can add two blank layers. Then paint on one layer with black for burning and the other with white for dodging.

Final Thoughts

I have bee accused of ‘cheating’ because of my use of the new software tools available. One of the greats of our time would have been right there beside me. I’ll share with you another quote from Ansel that will indicate that he would have been one of the first photographers to move into digital processing. He was also a bit of a sage predicting the time when digital processing would become of use to photographers. Below find the quote from his autobiography published in 1984.

“In the electronic age, I am sure that scanning techniques will be able to achieve prints of extraordinary subtlety from the original negative scores. If I could return in 20 years or so I would hope to see astounding interpretations of my most expressive images. It is true no one could print my negatives as I did, but they might well get more out of them by electronic means. Image quality is not the product of a machine, but of the person who directs the machine, and there are no limits to imagination and expression.” Ansel Adams

Yours in creative Photography,       Bob

** The Google Nik Suite of software is now free

  • Latest Articles
  • Author Bio
Bob Coates

Latest articles by Bob Coates (see all articles)

  • Lumix GH4 upgrade to infrared - July 2, 2021
  • Bosque del Apache Wildlife Refuge - December 21, 2016
  • Pre-visualization & Post Production - October 18, 2016
Bob Coates

Bob Coates

Bob Coates, M.Photog.M.Artist.Cr., CPP

Based in Sedona, Arizona Bob is a professional photographer, author, speaker & educator.

Coates started taking photographs with an SLR borrowed from a friend for a vacation back in 1983. After successfully managing other peoples businesses for fourteen years while photographing on the side, Bob decided to follow the quote "Do what you love and you will become a success."

In March of 1994 he left the restaurant biz and took the leap to become a professional image maker. "In this business the variety never ceases to amaze me," says Bob. "One day shooting jewelry in the studio, the next day creating images for a brochure and yet another standing in the middle of the desert waiting for the light to get "just so." The changes in software and digital imaging continue to inspire me to create new and exciting imagery."

Bob Coates Photography "Specializes in not Specializing" this allows Bob come up with interesting new ways of photographing subjects. Combining the techniques of different types of photography leads to new ways capturing images. People who hire Bob Coates Photography do it not just for the expertise but, for the experience brought to the job.

Certified by Professional Photographers of America, Master, Artist & Craftsman Photographer. Member Arizona Professional Photographers Association & American Society of Photographers.

Published Magazine Articles and Books: Professional Photographer, Rangefinder, Shutterbug, AfterCapture, Photo Electronic Imaging, Caribbean Travel and Life, Cruise Travel, Scouting, Porthole, Realtor, New York Daily News Caribbeat, SignCraft, Sailing World, Pro-Lighting Series: Nightshots, Pro-Lighting Series: Beauty Shots, Portrait Photographers Handbook, and others…

Books published by Amherst Media - Photographer's Guide to Wedding Album Design & Sales, Photographer's Guide to Wedding Album Design & Sales Second Edition and Strategies & Techniques for the Digital Photographer.

Bob is also a photographer coach and writes a blog called Successful-Photographer with information to help photographers in the art, science, business and marketing of photographic services. Questions or ideas about things you'd like me to address here at LifePixel? bob@bcphotography.com


See All Articles by Bob Coates
Share
Pin
Tweet
Email
Share

Related Posts

  • 8 Tips to Improve Your Mountain Photos
    8 Tips to Improve Your Mountain Photos
  • 6 Tips For Photographing Waterfalls
    6 Tips For Photographing Waterfalls
  • The Dynamic Range In Landscape Photography
    The Dynamic Range In Landscape Photography
  • Profiled Photographers – Oscar Simon Navarrete
    Profiled Photographers – Oscar Simon Navarrete

Filed Under: Tutorials Tagged With: landscape photography

Leave a Reply Cancel reply

Your email address will not be published. Required fields are marked *

Blog Topics

  • Tutorials
  • Inspiration
  • Locations
  • Gear
  • News
  • Other/Misc

What our customers say:

Life Pixel has been a life-changer for me. Continue reading
Eric GConnecticut
Read more reviews
I am more than satisfied with the service I received Continue reading
Christopher JCanada
Read more reviews
I am more than pleased with the conversion job that you did Continue reading
LOUIS MWaco, Texas
Read more reviews
I am VERY impressed with his knowledge of your products and his patience in explaining it to a novice like me. Continue reading
Lynn FEssex, Maryland
Read more reviews
Things will only get better from here thanks to all of you. Continue reading
Phillip FRedding, California
Read more reviews
The Lifepixel newsletter reminds me of not having expressed my gratitude for the excellent job you made. Continue reading
Michael GGermany
Read more reviews
Your staff went above and beyond the call of duty to make sure everything was handled in an excellent manner. Continue reading
Paige RPearland, Texas
Read more reviews
It has given my old camera a new life, I will enjoy using it again. Continue reading
William PAustralia
Read more reviews
Excellent service and the camera works just great Continue reading
Hans FairhurstAustralia
Read more reviews
I just got my converted camera back from you guys. THANK YOU!!!! Continue reading
Anne CutlerForest Knolls, CA
Read more reviews
infrared_filter_choices_sidebar
ir_conversions_explained_sidebar
----------- Watch More Videos -----------
infrared_quick_start_guide

Ready to start shooting Infrared?

Convert My Camera

Subscribe To Our Newsletter

Receive updates, tips, cool tutorials, free stuff and special discounts.

Learn the Basics

  • Video
  • Start Here
  • Filter Choices
  • Focus Calibration
  • Lens Considerations
  • Camera Considerations
  • Place Your Conversion Order

Resources

  • Galleries
  • Lens Hot Spot Database
  • IR Tutorials
  • FAQ
  • Infrared Filter Choices
  • Infrared Photography Guide
  • Infrared DIY Tutorials

Company

  • Why Choose Us
  • Get In Contact
  • Job Openings
  • Write For Us
  • Affiliate Program
  • Terms of Use
  • Privacy Policy
  • Home
  • Start Here
  • Galleries
  • Tutorials
  • FAQ
  • Blog
  • Why Choose LifePixel?
  • Shop
  • Contact

Copyright © 2025 Life Pixel Infrared - All rights reserved - LifePixel Infrared Photography IR Conversion, Modification & Scratched Sensor Repair