• Cart
  • Checkout
  • My Account

Infrared Conversions, IR Modifications & Photography Tutorials | Life Pixel IR

The world leader in infrared conversions, modifications & DIY IR conversion tutorials. Scratched sensor replacement, UV & Full spectrum conversions.

The world leader in infrared camera conversions

866.610.1710
  • Home
  • → Start Here ←
    • 1 – Introduction
    • 2 – Filter Choices
    • 3 – Focus Calibration
    • 4 – Lens Considerations
    • 5 – Camera Considerations
    • 6 – Start Shopping
  • Galleries
    • Infrared Photography
    • Infrared Time Lapse
    • Infrared Cinematography
    • Infrared Stop Motion
    • Ultraviolet Photography
    • Forensic Photography
  • Education
    • Training Sessions
    • How To Shoot Infrared
    • AR Coated Infrared Filters
    • Lens Hot Spot Database
    • Photoshop Video Tutorials
    • Infrared Issues & Solutions
    • IR Basics in Photoshop
    • Camera Quick Start Guide
    • DIY Conversion Tutorials
    • IR Photography Primer
    • Secondhand Cameras
    • Wall Of Shame
  • Workshops
  • FAQ
  • Blog
    • Tutorials
    • Inspiration
    • Locations
    • Gear
    • News
    • Other
  • Why Choose LifePixel?
    • Submit Your Review
  • Contact
  • Shop

How To Capture Light Trails From Cars

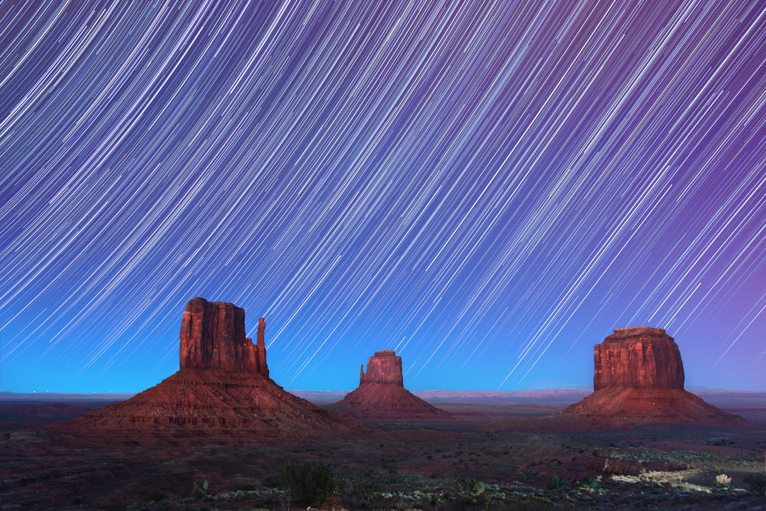
Light trail photography can be aesthetically pleasing on the eyes. It falls under long exposure photography which is about making a photo that shows the effect of passing time. For this reason, long exposure is sometimes called time exposure and even slow exposure photography. As the name suggests, this type of photography involves the shutter on a camera being open for a longer duration than normal to capture an object and blurring it in the process. The blur shows the movement of the object and in the case of light trails with a streaking light effect. It can produce some wonderful results in photography, so here is a quick guide on how to capture light trails from cars.

how_to_capture_light_trails

What is a light trail?

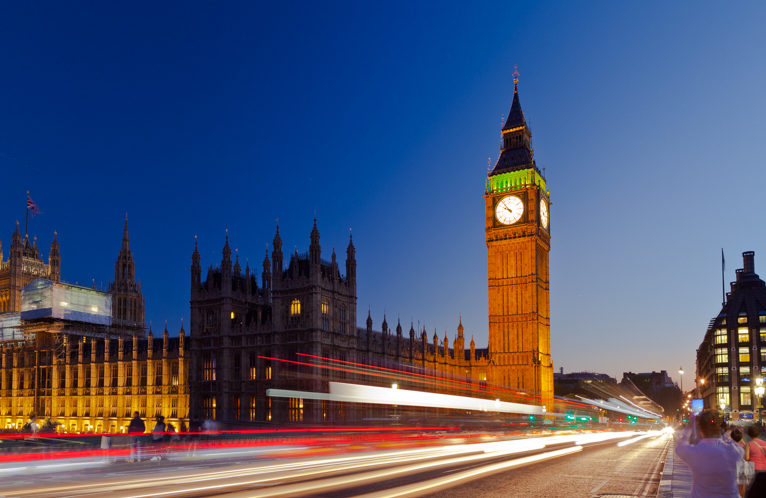
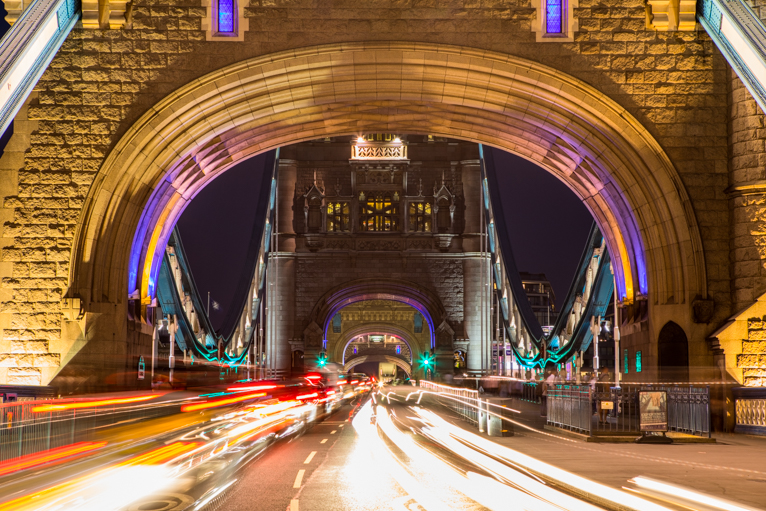
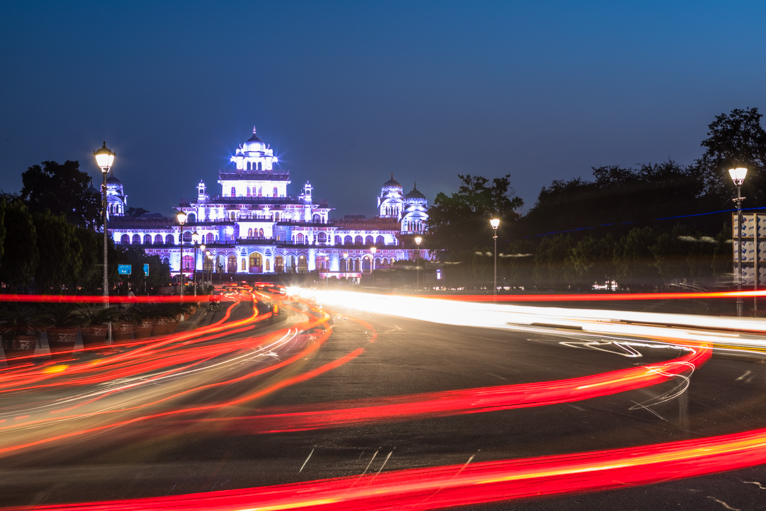
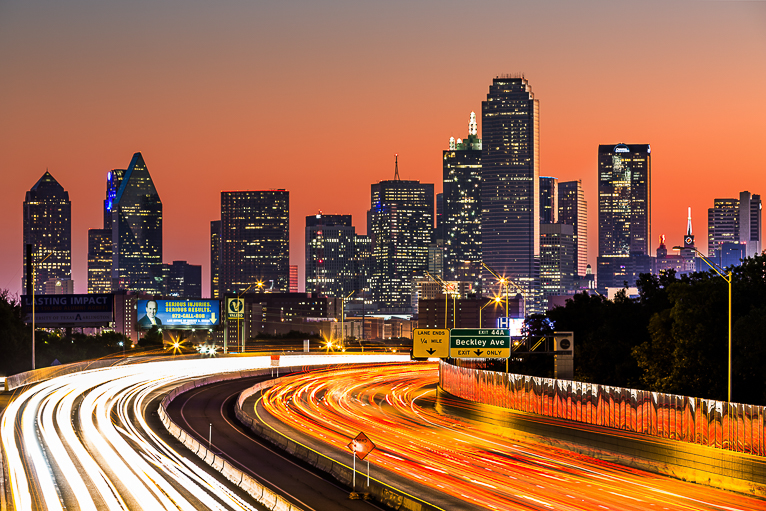
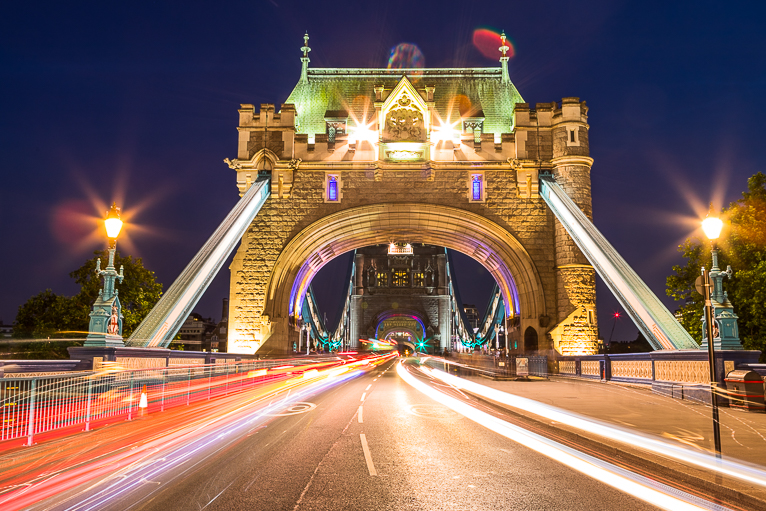
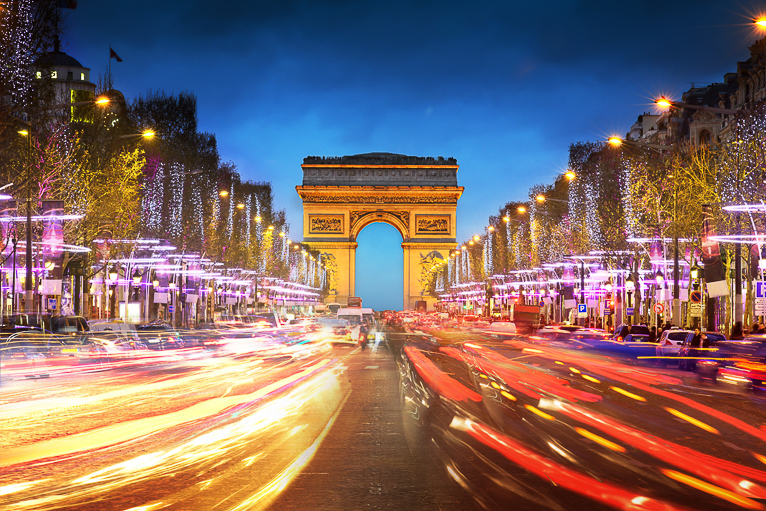
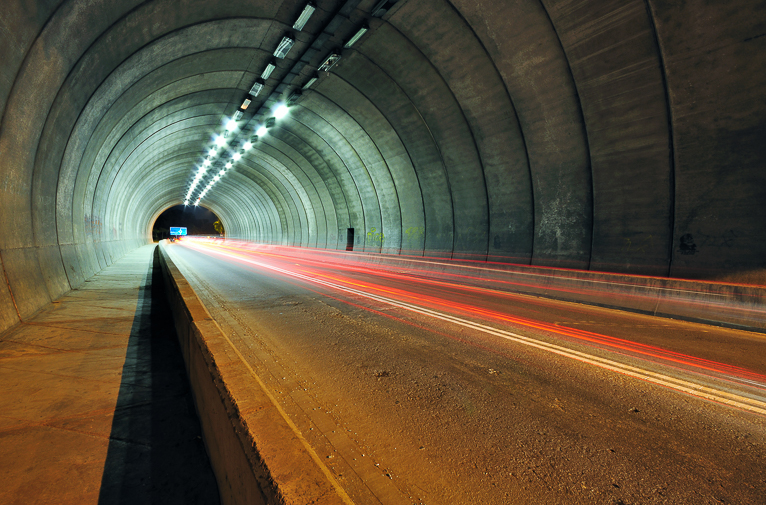
Light trails are simply creative colourful effects that photographers use to capture images by employing a long-exposure shooting technique. It is often used to capture the trail of lights from cars or to make urban photography more pleasing to see. The result is the glowing lines of light which would appear in the photo when a car with its headlights or taillights passes through the scene. This not only adds a dynamic element to the photo but can help bring to life evening or night scenes that might otherwise seem dark and uninteresting.

how_to_capture_light_trails

What kind of camera do I need for light trail photography?

When it comes to light trail photography even a smartphone is capable of pulling it off as long as it has long exposure settings. All you need is a camera or a phone with a tripod then use its self-timer feature to trigger the shutter. This is done by setting the camera shutter speed to be very low. This enables light to get captured by the sensor over a period of time. This may only be a few seconds. By doing so, as the shutter is open, any passing lights are captured until the shutter is closed. Hence the streaking lines that you see.

how_to_capture_light_trails

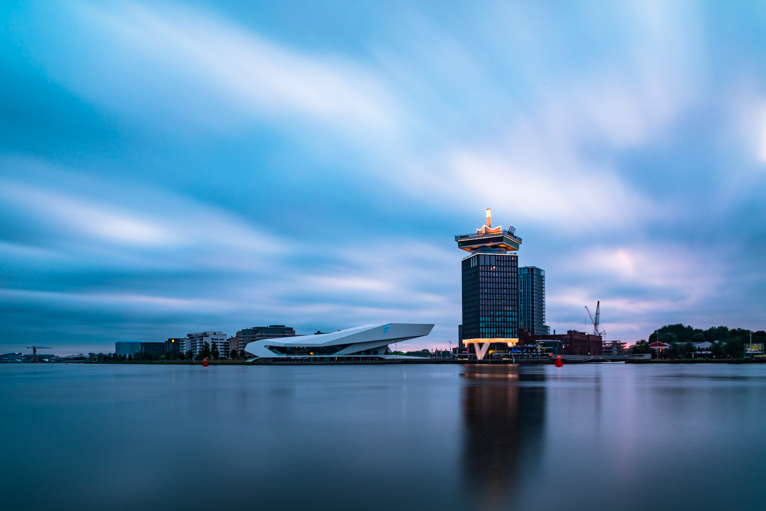
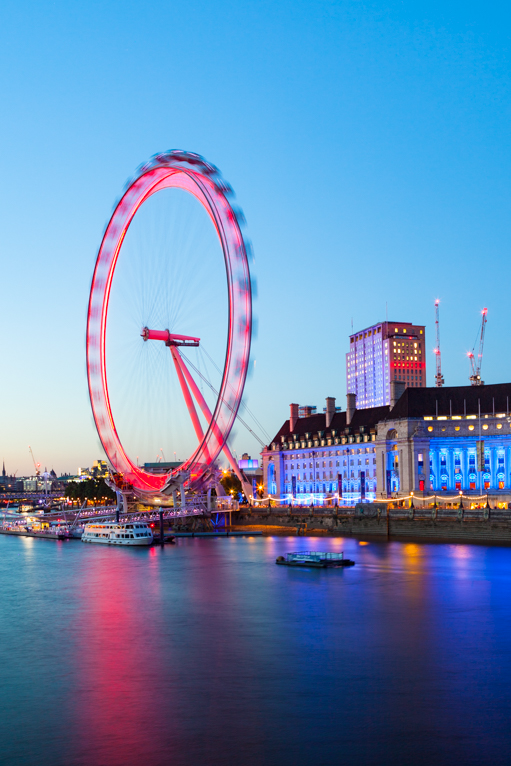
Your location is important

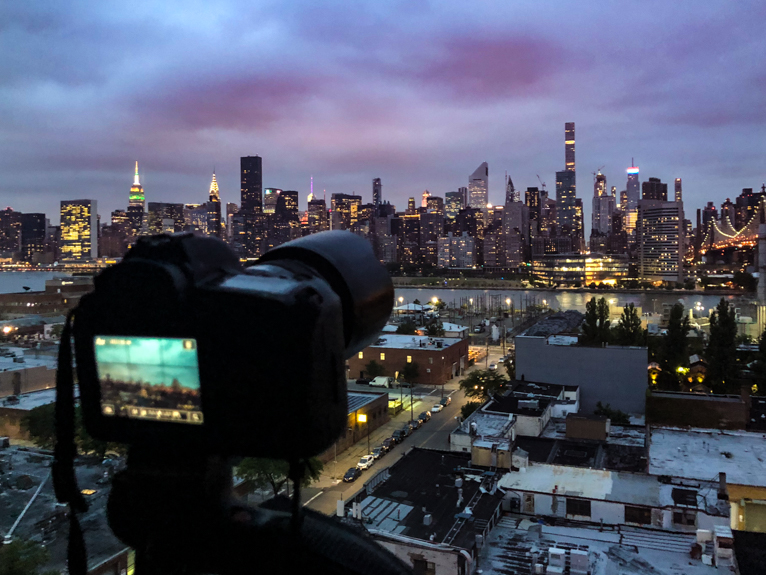
Places with high traffic or moving vehicles such as urban centres are best. Higher vantage points are also great for capturing light trails. Ensure you find a good spot before you set up your camera. Look for bridges, parking lofts, especially the top or high rise buildings. If you live in the city or you are in a hotel on a higher floor with a view of the streets then you are in luck for a perfect light trail shot. But don’t worry if you can’t find an elevated view. You can also capture great light trail shots at street level. Try to find somewhere where there is a point of interest in the background that can give your photo some context.

how_to_capture_light_trails

What do you need for light trail photography?

Besides a camera, the most important tool you need for light trails is a tripod. You will not be able to capture slow exposure shots without one. The key to this type of photography is that you need to ensure there are perfectly sharp parts of your photo to counter the blurred motion effects of cars and lights. Without this, your whole photo will look blurred. A remote release can also be useful but not a necessity as you can just set your camera on a timer.

how_to_capture_light_trails

What’s the best time to capture light trails?

It is all about timing. The twilight period or at night would give you the best result as the light trails pop out against the dark colours. But you can try it during the day if there are cars with lights on but it won’t have the same effect. To capture light trails during the day you will need to use a neutral density filter to be able to slow your shutter speed.

how_to_capture_light_trails

Recommended camera settings

Take into consideration the lighting and also the speed of the traffic. This will determine the shutter speed to use. These settings do not apply to every situation, however, this should help you get started on light trail photography.

Here are some recommended settings to try out:

  • Turn off the flash
  • Position your camera on the tripod securely
  • If your lens has image stabilization, turn it off
  • Set your camera to manual mode
  • Select a fairly narrow aperture depending on how much depth of field you need (f/8 – f/16)
  • Aim for the shutter speed to be at least a few seconds (if it is too fast select a smaller aperture. If too slow select a wider aperture)
  • ISO should be as low as possible (ideally ISO 100)
  • “Lock up” the mirror in your settings or choose “Live view” mode
  • For best results select manual focus and focus on exactly where you want to
  • Set your camera on a 2-second timer or use a shutter release cable.

Remember to find a good location to get a good image of the traffic with an interesting background. You can also play around your shutter speed until you are happy with the result you get. Remember that if you are using a timer, the camera will take 2 seconds before it starts taking the photo. So take the shot before the vehicles get to where you want them to be.

how_to_capture_light_trails

Light trails can provide wonderful photos and they are also great fun. It will take a little bit of trial and error in any scene to get the perfect timing. But a nice photo of light trails can really help bring to life a city or even a road. Try it out next time you are out photographing and you might end up with some great photos.

Photo credits: Kav Dadfar – All rights reserved. No usage without permission. Dreamstime.

Filed Under: Tutorials Tagged With: light trail photography, Light trails, long ex, long exposure photography, Slow exposure

6 Ideas For Long Exposure Photography

Long exposure photography is a wonderful area of photography to try out. If you have never done it, you will quickly learn how to do it and will probably love it. The great thing about long exposure photography is that you can take your time both in composing a shot and capturing it. Often for long exposure photography, you will be photographing when the light is low. So that means you will get places to yourself without the crowds. So here are 6 ideas for scenarios where you can utilise long exposure photography.

long exposure photography

What is long exposure photography?

As the name suggests long exposure photography requires you to expose the camera’s sensor for a considerable amount of time. This is when your shutter is open and your sensor is exposed for multiple seconds or even minutes! There are two reasons that you may want to use a long exposure.

The first is out of necessity. This is when there isn’t enough light in a scene and so you need to keep the shutter open to allow enough light to pass through to allow your image to be exposed correctly. If you ever tried taking a photo at night with a fast shutter speed (without raising the ISO) you will notice that your image will be very dark. So you need that extra time to allow the sensor to pick up more light from the scene.

There are also times when you would be able to capture a photo at a faster shutter speed but you deliberately want a longer exposure. A longer exposure will allow any movement to be blurred which can give your photo a more dynamic look. When combined with static objects this blurred effect have stunning results. So the second reason is because of your artistic vision.

long exposure photography

What do you need for long exposure photography?

Naturally, there are certain pieces of equipment that you will need for long exposure photography. A tripod is a must and without one, you will not be able to capture sharp enough photos. There is no way that you would be able to handhold a camera steady enough for 1 second let alone multiple seconds or minutes. Other than a tripod the other accessory that you might need from time to time is a neutral density filter.

In the intro to this article, I wrote that “often for long exposure photography, you will be photographing when the light is low”. Well, there are also opportunities to capture long exposure shots when it is not low light (i.e. during the day). But to do so will require you to manipulate the available light in a scene. In other words, you need to make it darker so that your shutter will be open for longer. That is the purpose of neutral density filters. Depending on how bright a scene is, you can use one or more filters to darken the scene. This will allow you to have a longer exposure during the day.

long exposure photography

Some ideas for scenarios for long exposure photography

Traffic – roads with cars driving along might look pretty dull and uninteresting during the day. But when photographed at night using a long exposure, they suddenly transform to a plethora of colour and movement. This is because car lights produce wonderful lines in long exposure photos. It’s a term that is called car trails (or light trails). Take a photo of a scene with some buildings illuminated and car trails will compliment the scene perfectly. Play around with different shutter speeds to see the effect it has on the car trails.

long exposure photography

Clouds – capturing moving clouds can look very dramatic in photos. Unlike car trails, you will often need to allow far more exposure time to be able to capture the movement. Depending on how fast the clouds are moving, don’t be surprised if you need 30 seconds or more before you see any movement in the clouds. Sometimes even in low light conditions like early morning or late afternoon, you may still have to use a neutral density filter (or graduated one) to darken the scene enough for longer exposures. Try it out during landscape shot but also when capturing cityscapes. The moving clouds against a skyline will look great.

long exposure photography

Water – probably the most well known and easiest subject to capture long exposure photos of is water. This gives the effect of silky smooth water which looks fantastic against contrasting rocks or even buildings. Again your exposure time will be determined by how fast the water is moving. A thundering waterfall might only require 1/60th sec to blur whilst a gentle stream might need seconds. Experiment with different shutter speeds to try to get a balance between the silky smooth water and the static sharp objects around it.

long exposure photography

People – it might seem strange to not want to have a person focused sharply in your image, but sometimes even people could be photographed with long exposure. For example, if you want to show the movement of someone dancing or running. Or it could be that you want to show the chaos of a street scene. Try it out next time you are photographing a street scene. You may be surprised by the results.

long exposure photography

Fairgrounds – the thing about fairgrounds is that pretty much everything moves. They are usually also bright and colourful and lit beautifully at night. So all of the ingredients needed for a great long exposure shot are there. In fact, you will probably find that fairgrounds look better in the evenings than during the day.

long exposure photography

Star trails – A more advanced scenario for long exposure photography is star trails. The reason that this is a little more difficult is because of the time needed to capture the shot. But also the post-processing involved. For this sort of photography, you will need an intervalometer. Unless you have plenty of time to spare and the discipline to accurately take photos every few minutes for hours, then this piece of equipment will save you a lot of hassle. It is a wired cable release with a timer, but it allows you to capture hundreds of images over a certain period of time at set intervals. In the end, you will end up with a whole load of photos that need to be stacked together into one image. You can take on the manual painstaking task of doing it yourself or get specialized software for this. The end result will be a stunning photo that would be worth the effort.

long exposure photography

These are just some ideas on how and where you can use long exposure photography. Try it out for yourself and you never know you may actually fall in love with the process and the results.

Photo credits: Kav Dadfar – All rights reserved. No usage without permission. Dreamstime.

Filed Under: Tutorials Tagged With: long exposure photography, slow shutter speed photography

Blog Topics

  • Tutorials
  • Inspiration
  • Locations
  • Gear
  • News
  • Other/Misc

What our customers say:

Life Pixel has been a life-changer for me. Continue reading
Eric GConnecticut
Read more reviews
I am more than satisfied with the service I received Continue reading
Christopher JCanada
Read more reviews
I am more than pleased with the conversion job that you did Continue reading
LOUIS MWaco, Texas
Read more reviews
I am VERY impressed with his knowledge of your products and his patience in explaining it to a novice like me. Continue reading
Lynn FEssex, Maryland
Read more reviews
Things will only get better from here thanks to all of you. Continue reading
Phillip FRedding, California
Read more reviews
The Lifepixel newsletter reminds me of not having expressed my gratitude for the excellent job you made. Continue reading
Michael GGermany
Read more reviews
Your staff went above and beyond the call of duty to make sure everything was handled in an excellent manner. Continue reading
Paige RPearland, Texas
Read more reviews
It has given my old camera a new life, I will enjoy using it again. Continue reading
William PAustralia
Read more reviews
Excellent service and the camera works just great Continue reading
Hans FairhurstAustralia
Read more reviews
I just got my converted camera back from you guys. THANK YOU!!!! Continue reading
Anne CutlerForest Knolls, CA
Read more reviews
infrared_filter_choices_sidebar
ir_conversions_explained_sidebar
----------- Watch More Videos -----------
infrared_quick_start_guide

Ready to start shooting Infrared?

Convert My Camera

Subscribe To Our Newsletter

Receive updates, tips, cool tutorials, free stuff and special discounts.

Learn the Basics

  • Video
  • Start Here
  • Filter Choices
  • Focus Calibration
  • Lens Considerations
  • Camera Considerations
  • Place Your Conversion Order

Resources

  • Galleries
  • Lens Hot Spot Database
  • IR Tutorials
  • FAQ
  • Infrared Filter Choices
  • Infrared Photography Guide
  • Infrared DIY Tutorials

Company

  • Why Choose Us
  • Get In Contact
  • Job Openings
  • Write For Us
  • Affiliate Program
  • Terms of Use
  • Privacy Policy
  • Home
  • Start Here
  • Galleries
  • Tutorials
  • FAQ
  • Blog
  • Why Choose LifePixel?
  • Shop
  • Contact

Copyright © 2025 Life Pixel Infrared - All rights reserved - LifePixel Infrared Photography IR Conversion, Modification & Scratched Sensor Repair