Have you ever seen an episode of CSI where they just zoom and zoom and zoom into a photo, and it just didn’t seem to affect its resolution? Unfortunately, we live in the real world where zooming in so close to an image or enlarging it to bigger proportions isn’t as straightforward.
Correctly increasing the size of an image is likely to involve a few more steps, especially if you are looking to get them printed. If you are not careful, what was once a beautiful photo could end up looking like nothing more than a pixelated mess. If you are looking to enlarge and print some photos but somehow are unsure how to do so, this post should help.
Resolution is key
Resolution is the most critical element of being able to print a better-quality image. Always remember that megapixels are your best friends. The more of these in your camera sensor and your image, the better-quality photos and prints you will have. This is especially imperative for larger prints. If you want your large prints to be of the best quality, then you need to make sure it contains a resolution of at least 300 dots per inch (DPI). Anything less than that is likely to result in poor printing quality.
But in addition to the resolution, you also need to understand how the size of an image impacts the resolution. For example in the left image below you can see that dots are closely clustered together (i.e. there are more dots in a smaller space) which will mean a better quality image. On the right, while there is the same number of dots, the area they are in is bigger. This translates to a lower quality image.
In other words, if you have taken a photo at 300 dpi but the size of the image is small if you enlarge that image, the resolution drops to less than 300 dpi. The best solution is to always take photos at the largest size that your camera allows at the highest resolution possible. If you are enlarging always check with your printer if the bigger size of the photo still provides a good resolution for prints.
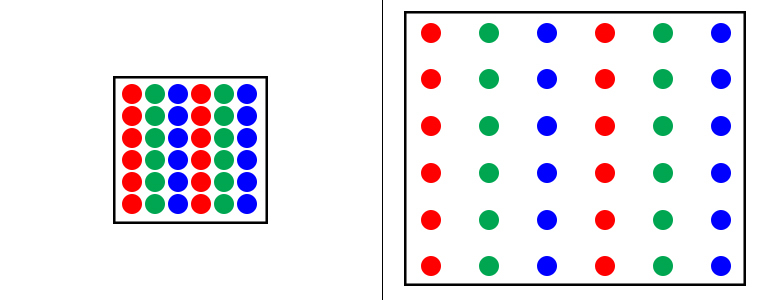
Notice how the same number of dots in the larger area are spaced out? That translates to a poorer image.
Avoid Taking Photos In JPEG
This isn’t a vendetta against the JPEG file format, as it has its uses and advantages. But one of the big issues of using JPEG file format when taking a photo is that it creates permanent changes to your photo that you can’t reverse. So whatever post-production your camera manufacturer has programmed into your camera is added to your photo for good. You should try to take photos in RAW file format which you can then save as JPEG of any size further down the line. But doing so will mean you have the best quality original photo possible.
Make sure your photos are sharp
Post-processing software can work wonders on a photo. But unfortunately, it cannot sharpen a blurred photo. Unless you are a skilled retoucher and have hours and hour to spare that is. But even then there is only a certain point where you can rescue an image from being blurred. If your image is slightly on the blurred side you may be able to sharpen it in Lightroom or Photoshop but ideally, you should work on being able to capture sharp photos. Never ever over sharpen an image as it actually looks worse than if it’s slightly blurred.
Pay attention to colour
Another key element of being able to produce great prints is understanding colour. Digital cameras and your computer screen are set up to use a colour format known as RGB light (red, green and blue) to display colour. So when you are viewing an image on your screen it is often as an RGB image. Commercial printing presses use CMYK ink (cyan, magenta, yellow and black) not light to produce different colours. This means that they produce slightly different colours to what you see on your screen. Some colours such as bright blues, greens and reds are not even possible using CMYK colours. So this means that if you send a file to print that has been set up in RGB you will most likely see a difference in colour on the printed version.
To manage this problem you should always save files for printing in a CMYK format. This is easy to do in Adobe Photoshop by simply clicking Image => Mode => CMYK Color. You will then be able to review then images as CMYK and make any tweaks to colours as necessary before sending to print.
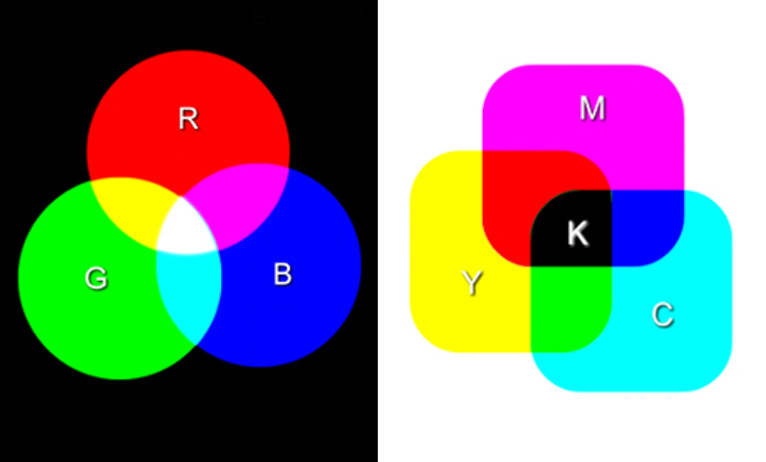
By Kuba-Dis (own work available on Public Domain)
Enlarging photos to ensure the best quality for printing isn’t always easy, but it is also not impossible. You may have to tweak the image on your part, but the results will be well worth it. You need to make sure you invest in the right tools and learn the proper techniques beforehand. Remember that most surefire way to ensure your prints are the best quality is to have sharp, high res images to begin with.
Photo credits: Kav Dadfar – All rights reserved. No usage without permission. Dreamstime.
