• Cart
  • Checkout
  • My Account

Infrared Conversions, IR Modifications & Photography Tutorials | Life Pixel IR

The world leader in infrared conversions, modifications & DIY IR conversion tutorials. Scratched sensor replacement, UV & Full spectrum conversions.

The world leader in infrared camera conversions

866.610.1710
  • Home
  • → Start Here ←
    • 1 – Introduction
    • 2 – Filter Choices
    • 3 – Focus Calibration
    • 4 – Lens Considerations
    • 5 – Camera Considerations
    • 6 – Start Shopping
  • Galleries
    • Infrared Photography
    • Infrared Time Lapse
    • Infrared Cinematography
    • Infrared Stop Motion
    • Ultraviolet Photography
    • Forensic Photography
  • Education
    • Training Sessions
    • How To Shoot Infrared
    • AR Coated Infrared Filters
    • Lens Hot Spot Database
    • Photoshop Video Tutorials
    • Infrared Issues & Solutions
    • IR Basics in Photoshop
    • Camera Quick Start Guide
    • DIY Conversion Tutorials
    • IR Photography Primer
    • Secondhand Cameras
    • Wall Of Shame
  • Workshops
  • FAQ
  • Blog
    • Tutorials
    • Inspiration
    • Locations
    • Gear
    • News
    • Other
  • Why Choose LifePixel?
    • Submit Your Review
  • Contact
  • Shop

Use Colors to Get Better Black & Whites

Share
Pin
Tweet
Email
Share

As many people know, the Super Color conversion is the most popular Infrared conversion Life Pixel offers, and is even selected by photographers wanting to create only monochrome images.  However, I’ve learned that quite often Photographers don’t make full use of their Super Color images to create their Black & Whites.  To get the best Monochrome Infrared images from a Super Color image you want to take full advantage of what you are capturing.

Back during the film days, many Photographers found that they could create better Black & Whites by shooting color film and then printing it as a Black & White.  The emulsion layers in color film captured more variations in tones, which became different shades of grey.

We need to look at our digital images the same way, except that they are computer files,  data.  When you make an Infrared image in Super Color, you are capturing 4 color tones, Red, Yellow, Blue & Cyan.  Each of these color tones can become different shades of Grey, the combination of Black and White, when converted to Monochrome.  It’s all in how you handle the Super Color image.

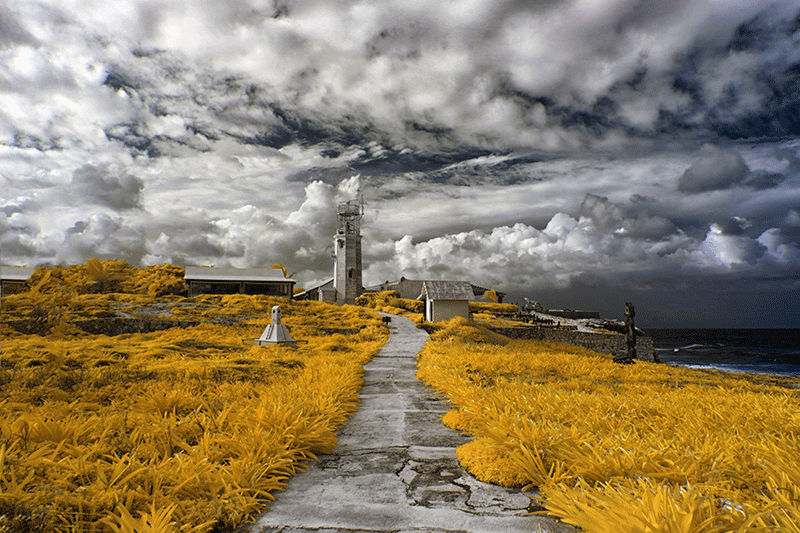
Let’s take a look at this example.  Here’s an image I recently made on Isla Mujeres in Super Color.

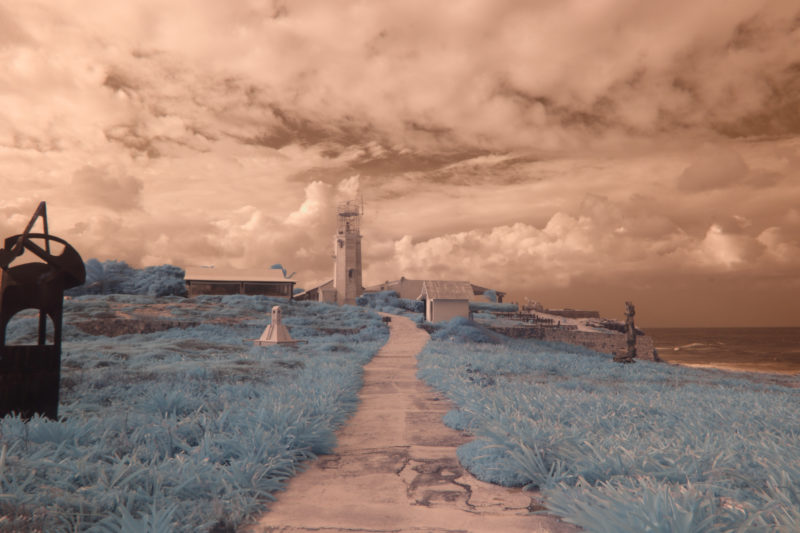
It has a decent exposure, nice composition, and should make a good monochrome.  We have the 4 color tones that we get from Super Color Infrared; Red, Yellow, Blue & Cyan.   If we go straight from this version though, we will not get a very impressive Black & White Infrared image.

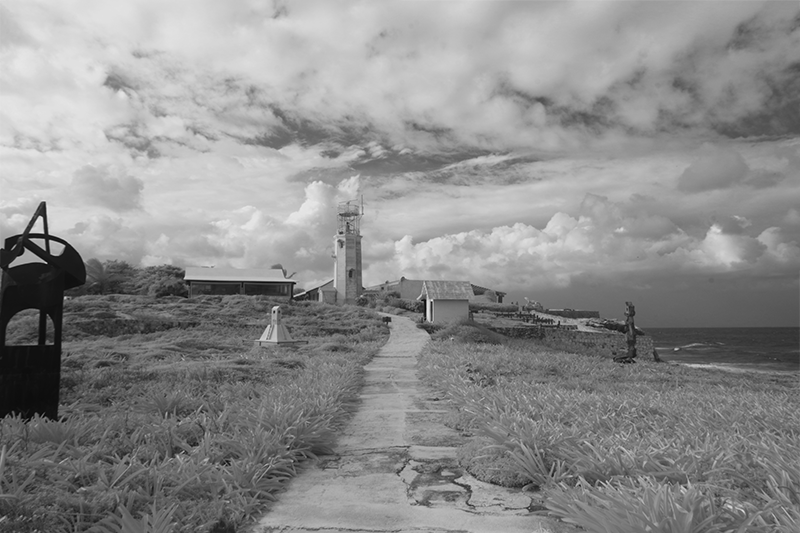
This image has a very flat feel to it.  Even if I try and work with the levels and contrast, it still remains rather flat.  So instead I’m going to use what I have, my 4 colors.


Now I’d like to tell you there is one magic way to process every image, but that is just not the case.

With this image I first did the standard Red/Blue channel swap.  Then I choose  take the Red channel and make it Yellow.

So, I went into Image, Hue/Saturation.

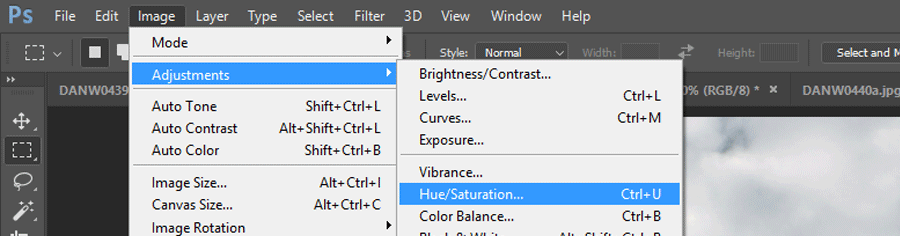
From there, I selected the Red and slide the Hue slider slightly to the blue (right from center) to make the red tones look yellow.

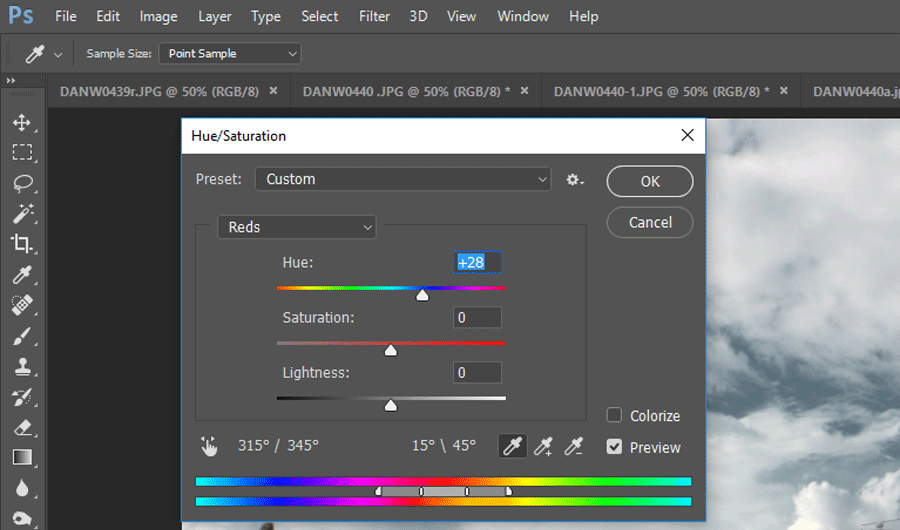
I then selected the Cyan, and did the same thing, which makes the color of the sky a stronger Blue in appearance.

From there I adjusted the levels and contrast to get as much out of my image.  This was the what it looked like.

Now if you are someone like myself who enjoys False Color Infrared, this image has  quite a pop to it.  However, the goal is to create monochrome, so let’s continue.  There are many different techniques and Filters/Plugins for Photoshop for creating Monochrome; I use NIK Silver Efex, or the White Photo Filter in Filter Forge.  Doing my Monochrome conversion, the end product was this.

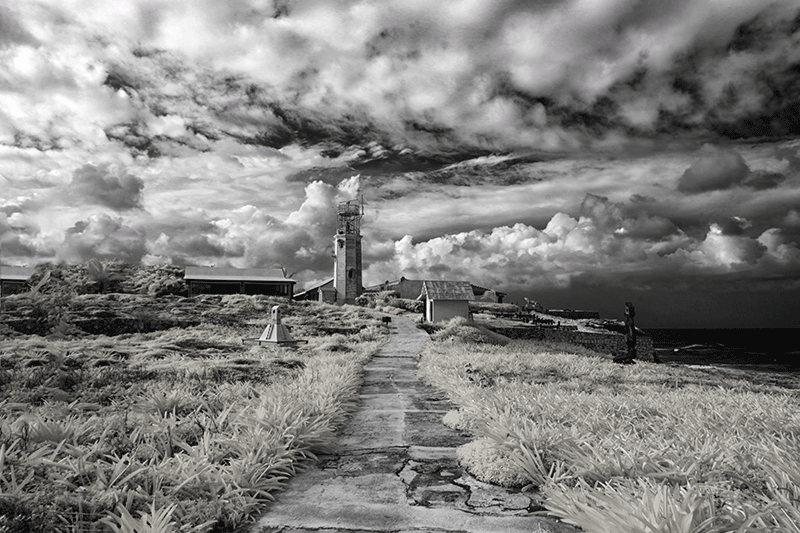
This monochrome has more intensity and depth to it.  Let’s compare.

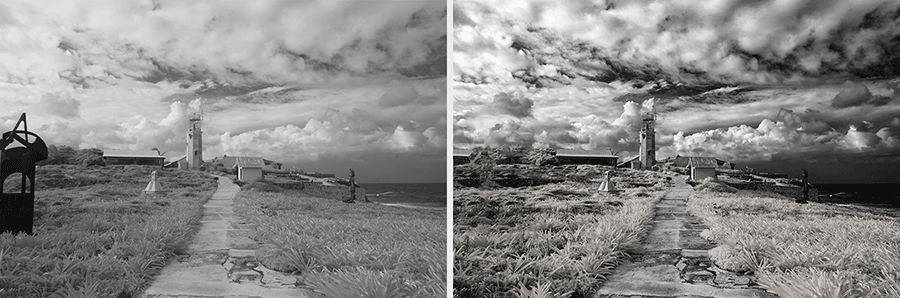
As I said, there is no one system I can tell you will work for every image, but I can tell you that working the color tones that you have available will make a difference.  What you want to do is work your image until you feel you’ve pulled the most from your colors, then try a conversion.  If you don’t like the Monochrome version, go back to the color image and adjust the color tones in a different way.  Once you get the hang of it, you will notice a positive difference in your Monochrome images.


  • Latest Articles
  • Author Bio
Dan Wampler

Latest articles by Dan Wampler (see all articles)

  • Seal Bay photoshoot - March 7, 2023
  • Major Copyright Infringement site Scroller.com - March 6, 2023
  • Kangaroo Island Wallabies and Roos - March 1, 2023
Dan Wampler

Dan Wampler

Dan Wampler is a digital artist from St Louis, MO. Having been interested in art and photography since childhood, he spent most of adult life working for Kodak and in the portrait photography industry. A student of the works of Ansel Adams, Any Warhol, and David Hamilton, Dan attempted to keep a wide range of artistic style.

As an early adopter of digital imaging, he found it gave him a way to completely incorporate art and photography. Began shooting Digital Infrared in 2004, and had first camera converted in 2006. His work has been seen in numerous gallery shows, is featured in an iTunes app. He produces Infrared and natural color digital art for sale and teaches his post-production techniques online.

Dan is LifePixel's Creative Director,  social media manager, lead blog author, main workshops and training sessions instructor. His images appear in this gallery and throughout the website.

If you have a topic suggestion or request feel free to shoot him an email at danwampler@lifepixel.com

Otherwise all LifePixel customer service inquires should be directed to service@lifepixel.com or by phone at 866-610-1710.

View more of Dan's work on his Website | Facebook


See All Articles by Dan Wampler
Share
Pin
Tweet
Email
Share

Related Posts

  • Infrared Photoshop Tutorials & Videos
    Infrared Photoshop Tutorials & Videos
  • Basic Infrared Photoshop Techniques Tutorial
    Basic Infrared Photoshop Techniques Tutorial
  • Life Pixel Modified Camera Quick Start Guide
    Life Pixel Modified Camera Quick Start Guide
  • The Wall Of Shame
    The Wall Of Shame

Filed Under: Tutorials

Comments

  1. Laurie says

    January 6, 2017 at 11:04 pm

    Any chance you could create a Photoshop .atn file for us to use your action above?

    Reply
    • Dan Wampler says

      January 7, 2017 at 8:06 am

      Hi Laurie, The process changes from image to image. In some cases you will want to alter the red more than the yellow, and perhaps the cyan more than the blue.

      Reply
  2. Dan Wampler says

    December 29, 2016 at 6:39 am

    Hi Luis,
    When using Nik Silver Efex Pro2 the only time I experience any color casting is when I select a filter choice that contains color tones, like Sepia or one of the Antique Plates. For the most part, the others do not produce anything other monochrome.

    Reply
    • Luis Filipe Cunha says

      December 29, 2016 at 9:09 am

      Hi Dan, thank you.
      So, you did not feel the need to turn your imagens to greyscale?

      Reply
      • Dan Wampler says

        December 29, 2016 at 10:25 am

        Luis,
        Since we are dealing with art, everything we do is about choices, and there is no wrong answer. You try different things until you get what you like. I have found that this process gives me the results I am looking for. Silver Efex does a monochrome conversion I like.

        Reply
        • Luis Filipe Cunha says

          December 29, 2016 at 10:48 am

          Thank you.

          Reply
  3. Luis Filipe Cunha says

    December 29, 2016 at 5:16 am

    Hello Dan, thanks for sharing your workflow.

    I´m searching exactly for the opposite: make B&W images without any kind of colour cast.
    I use NIK Silver Effects also, but I find green or magenta cast, etc; in my images.
    This is solved only if I change my colour mode to greyscale 16Bits at the end of the editing process.
    I´ve a huge doubts at this point:
    greyscale 16 Bits are ok for viewing images on a screen. What about sending it to Offset/CMYK print? Should I keep the colours and just convertert them to CMYK?
    And what about sending my image to digital print? Should I keep the image in RGB mode or Greyscale?
    Thanks for your time.

    P.s. my camera is not a IR camera.

    Reply

Leave a Reply Cancel reply

Your email address will not be published. Required fields are marked *

Blog Topics

  • Tutorials
  • Inspiration
  • Locations
  • Gear
  • News
  • Other/Misc

What our customers say:

Life Pixel has been a life-changer for me. Continue reading
Eric GConnecticut
Read more reviews
I am more than satisfied with the service I received Continue reading
Christopher JCanada
Read more reviews
I am more than pleased with the conversion job that you did Continue reading
LOUIS MWaco, Texas
Read more reviews
I am VERY impressed with his knowledge of your products and his patience in explaining it to a novice like me. Continue reading
Lynn FEssex, Maryland
Read more reviews
Things will only get better from here thanks to all of you. Continue reading
Phillip FRedding, California
Read more reviews
The Lifepixel newsletter reminds me of not having expressed my gratitude for the excellent job you made. Continue reading
Michael GGermany
Read more reviews
Your staff went above and beyond the call of duty to make sure everything was handled in an excellent manner. Continue reading
Paige RPearland, Texas
Read more reviews
It has given my old camera a new life, I will enjoy using it again. Continue reading
William PAustralia
Read more reviews
Excellent service and the camera works just great Continue reading
Hans FairhurstAustralia
Read more reviews
I just got my converted camera back from you guys. THANK YOU!!!! Continue reading
Anne CutlerForest Knolls, CA
Read more reviews
infrared_filter_choices_sidebar
ir_conversions_explained_sidebar
----------- Watch More Videos -----------
infrared_quick_start_guide

Ready to start shooting Infrared?

Convert My Camera

Subscribe To Our Newsletter

Receive updates, tips, cool tutorials, free stuff and special discounts.

Learn the Basics

  • Video
  • Start Here
  • Filter Choices
  • Focus Calibration
  • Lens Considerations
  • Camera Considerations
  • Place Your Conversion Order

Resources

  • Galleries
  • Lens Hot Spot Database
  • IR Tutorials
  • FAQ
  • Infrared Filter Choices
  • Infrared Photography Guide
  • Infrared DIY Tutorials

Company

  • Why Choose Us
  • Get In Contact
  • Job Openings
  • Write For Us
  • Affiliate Program
  • Terms of Use
  • Privacy Policy
  • Home
  • Start Here
  • Galleries
  • Tutorials
  • FAQ
  • Blog
  • Why Choose LifePixel?
  • Shop
  • Contact

Copyright © 2025 Life Pixel Infrared - All rights reserved - LifePixel Infrared Photography IR Conversion, Modification & Scratched Sensor Repair