• Cart
  • Checkout
  • My Account

Infrared Conversions, IR Modifications & Photography Tutorials | Life Pixel IR

The world leader in infrared conversions, modifications & DIY IR conversion tutorials. Scratched sensor replacement, UV & Full spectrum conversions.

The world leader in infrared camera conversions

866.610.1710
  • Home
  • → Start Here ←
    • 1 – Introduction
    • 2 – Filter Choices
    • 3 – Focus Calibration
    • 4 – Lens Considerations
    • 5 – Camera Considerations
    • 6 – Start Shopping
  • Galleries
    • Infrared Photography
    • Infrared Time Lapse
    • Infrared Cinematography
    • Infrared Stop Motion
    • Ultraviolet Photography
    • Forensic Photography
  • Education
    • Training Sessions
    • How To Shoot Infrared
    • AR Coated Infrared Filters
    • Lens Hot Spot Database
    • Photoshop Video Tutorials
    • Infrared Issues & Solutions
    • IR Basics in Photoshop
    • Camera Quick Start Guide
    • DIY Conversion Tutorials
    • IR Photography Primer
    • Secondhand Cameras
    • Wall Of Shame
  • Workshops
  • FAQ
  • Blog
    • Tutorials
    • Inspiration
    • Locations
    • Gear
    • News
    • Other
  • Why Choose LifePixel?
    • Submit Your Review
  • Contact
  • Shop

Quick Steps to a Moody Image

Share
Pin
Tweet
Email
Share

We’ve all seen those sharp, yet soft moody looking Monochromatic Black & White, or Sepia toned images that have that timeless look.  I have found an easy way to create that look and I want to show it to you. 

First, let me show you the look I’m referring to.

This sort of look, or something like this in Black & White

Interested?  Okay, let’s make one.

Now to complete the steps I’m about to show you, you will need Photoshop and the NIK Collection.  I am using the new NIK Collection by DXO, but it will also work with the older version.

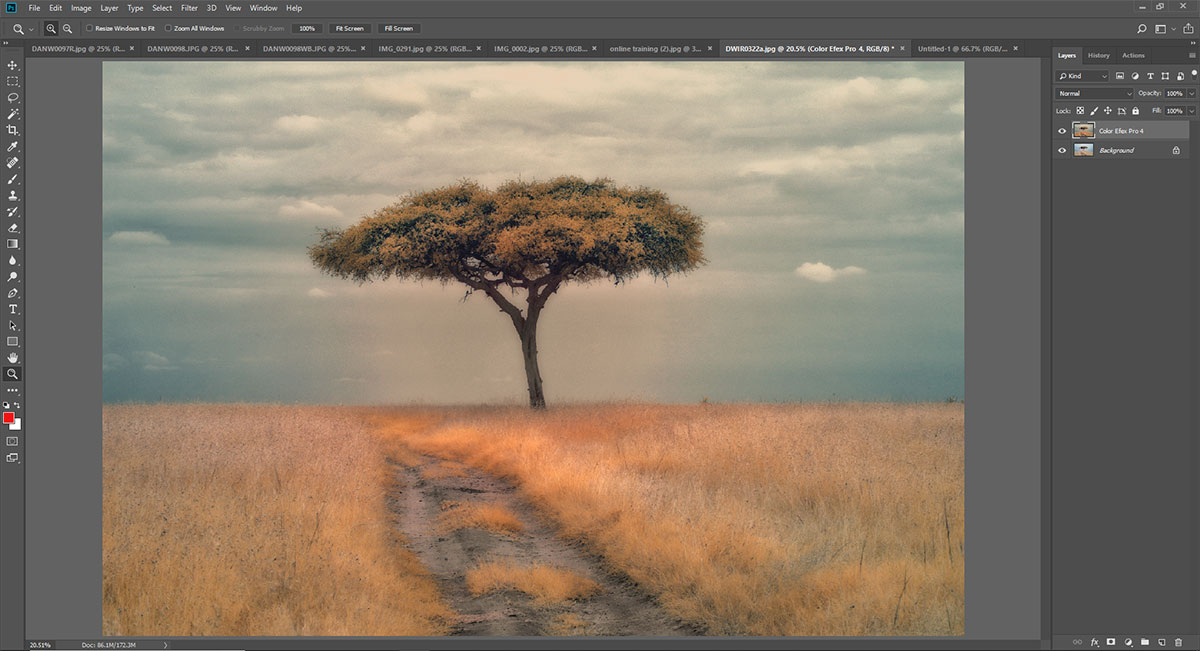
So, for our purposes, we will use a Super Color image of a lone tree in the Maasi Mara National Reserve.  This was made with a Super Color converted Canon 5DMKIV, using the Tamron 150-600mm lens.

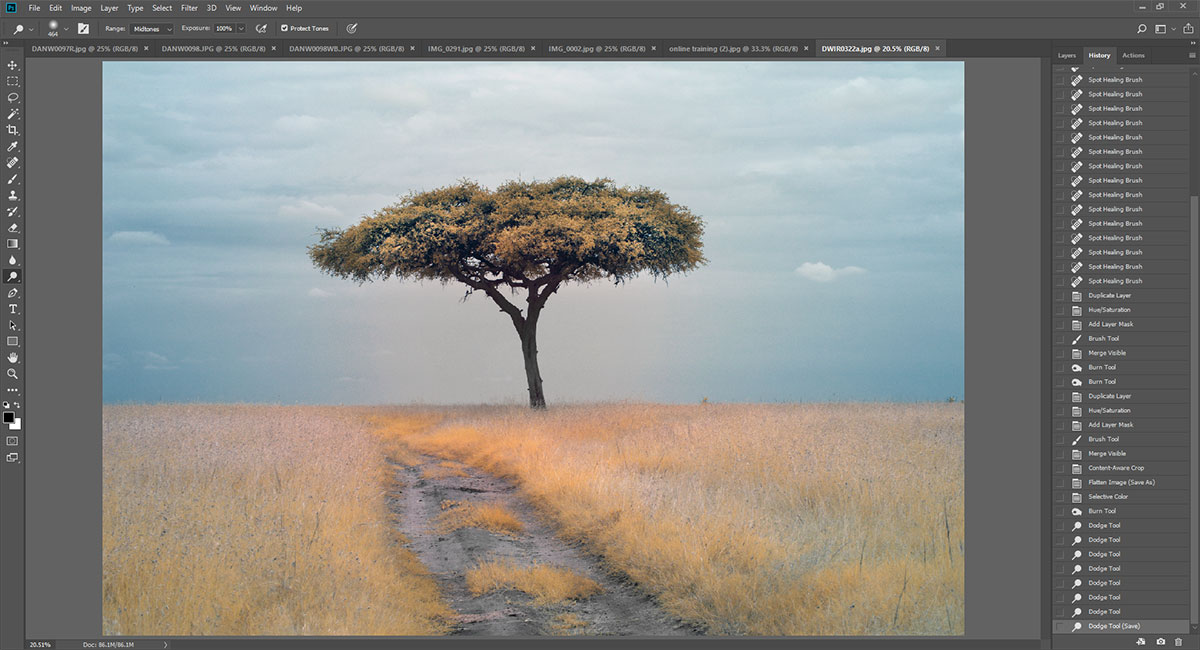
This image has already had the basic adjustments done, plus a Red/Blue Color Channel Swap.   It’s okay, but not the moody look we want.  

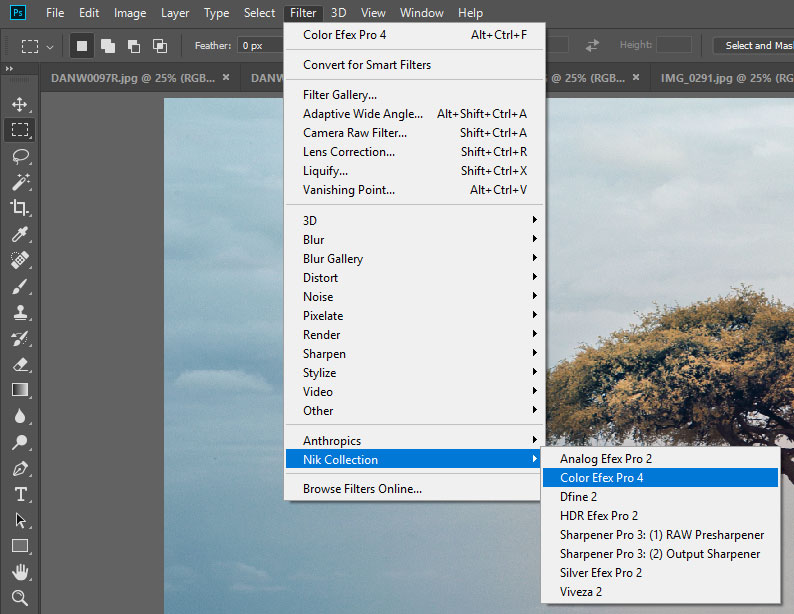
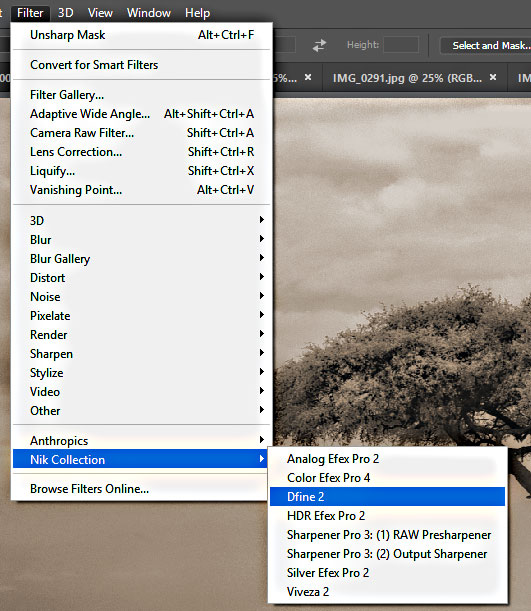
So, first let’s open the NIK Collection.  Go to Filter, then Nik Collection, then Color Efex Pro4

Now we are going to stack two filters on top of each other.  

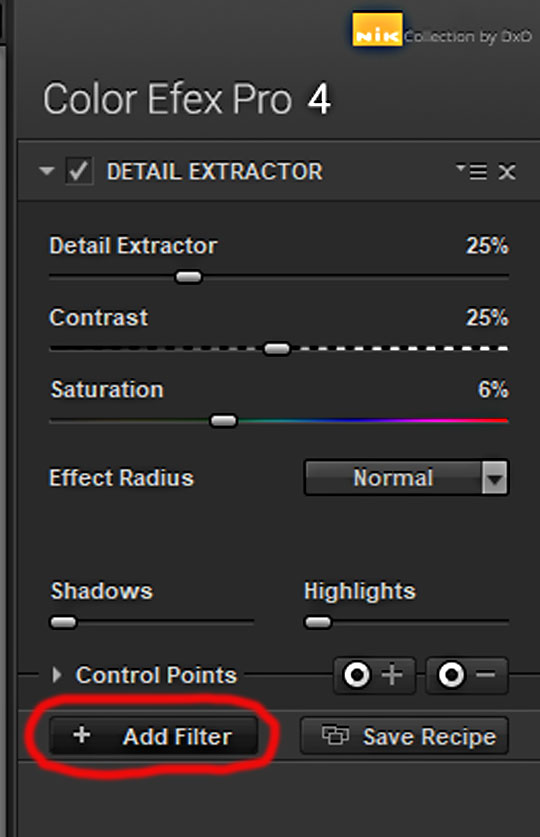
First up select  Detail Extractor.

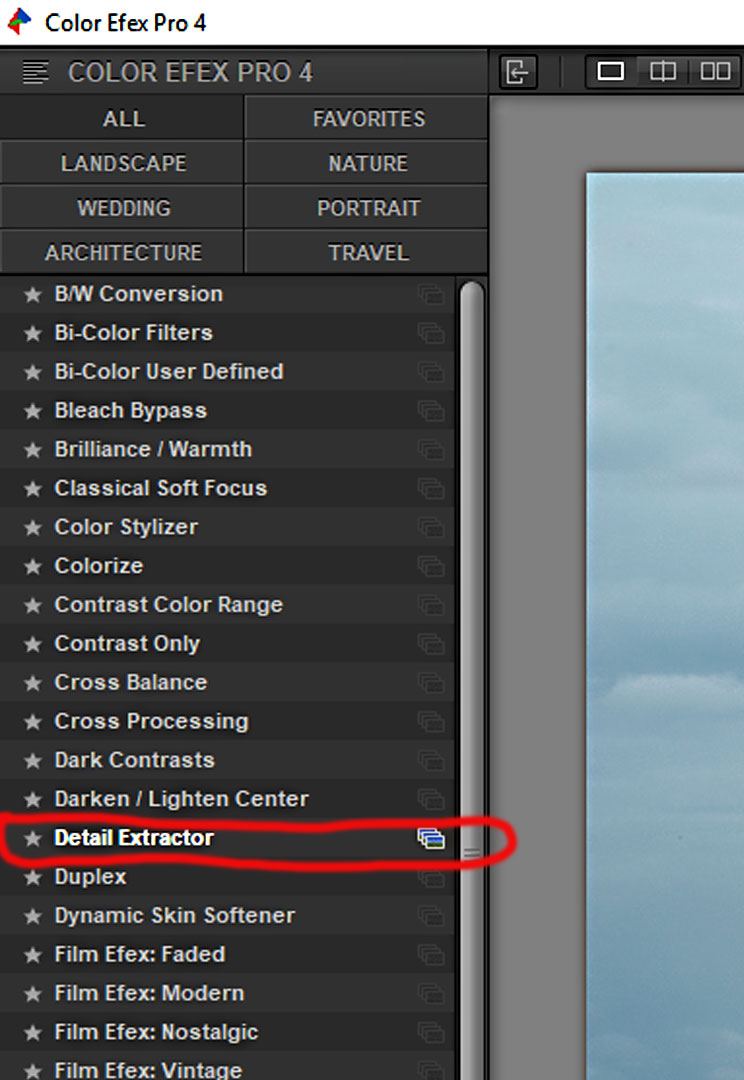
This will bring up the dialog box for Detail Extractor

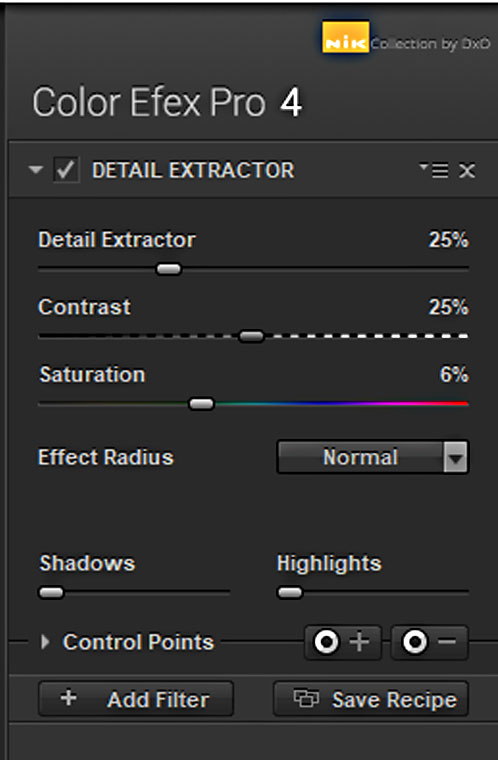
I don’t suggest moving the Detail Extractor slider past 25%.  The Contrast slide you can adjust until you like to look.  Saturation is not important for this step.

Next, click add filter 

Then select the filter Duplex

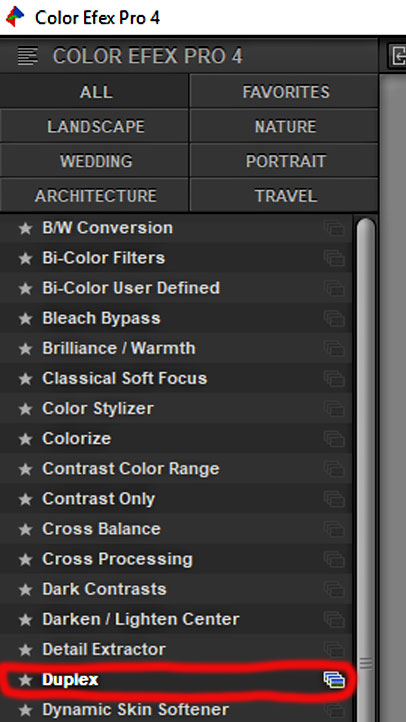
Go with the presets for that filter and then click OK

Now we have an image that is sharp and soft.


If you like the look at this point, you are done.  If you want that monochromatic look, we next move onto Image, Adjustments, Hue/Saturation.

When your dialog box opens, click the box next to Colorize.

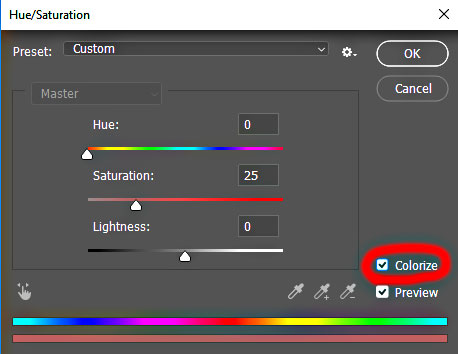
Then move the Hue slider to the right, and play with the Hue, then the Saturation to create the monochromatic color tone you like.   If you looking for a standard Black & White, adjust your saturation accordingly.

Now we have this image.

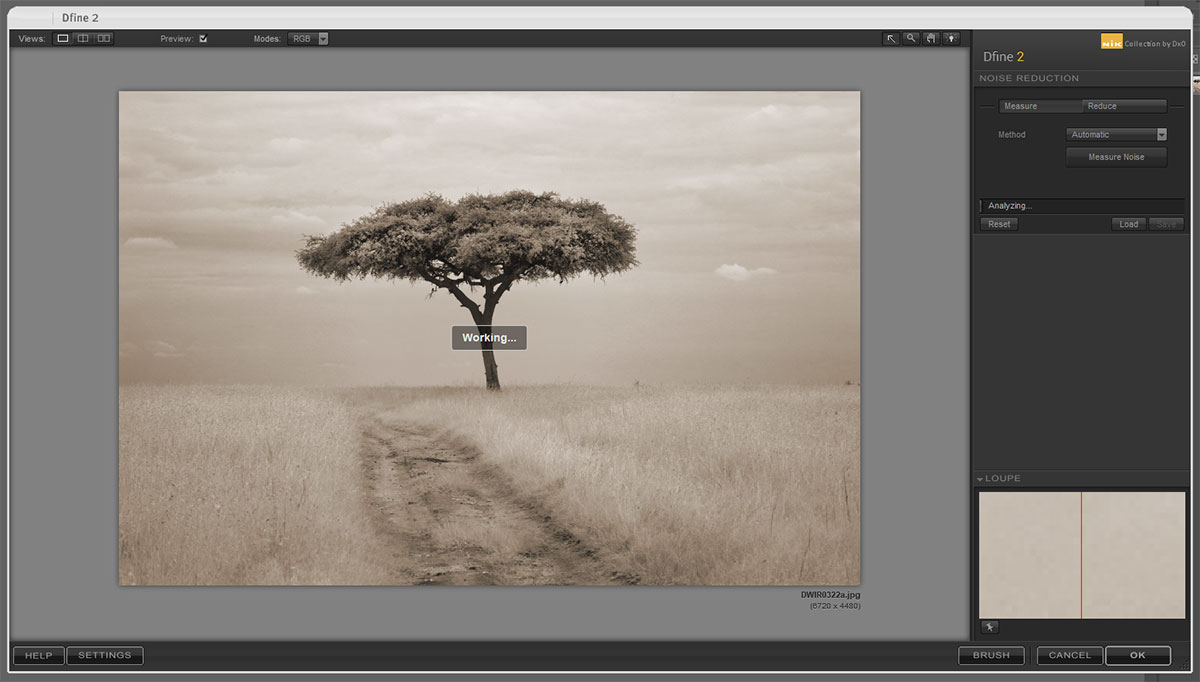
There’s one step left.  We want to make sure this image doesn’t have noise when we go to print it, so we will use Nik Define 2.

So, we’ll go to Filter, Nik Collection, Define 2


There is an automatic setting for Define 2 that will work well for this, 

So when the word “Working: goes away, click OK at the bottom right corner.


That is it, you are done.  

Here’s a couple of images I made following these steps.


Now, is this going to work with every image, every single time, . . . . No

But, if you have the right image it will work well, and you can do it in less time than you spent reading this piece.

Try it out and see what you think.

UPDATE: 

I’ve written a Photoshop Action that will complete these steps with one click.

Email me at Danwampler@lifepixel.com and I give it to you for free. 


  • Latest Articles
  • Author Bio
Dan Wampler

Latest articles by Dan Wampler (see all articles)

  • Seal Bay photoshoot - March 7, 2023
  • Major Copyright Infringement site Scroller.com - March 6, 2023
  • Kangaroo Island Wallabies and Roos - March 1, 2023
Dan Wampler

Dan Wampler

Dan Wampler is a digital artist from St Louis, MO. Having been interested in art and photography since childhood, he spent most of adult life working for Kodak and in the portrait photography industry. A student of the works of Ansel Adams, Any Warhol, and David Hamilton, Dan attempted to keep a wide range of artistic style.

As an early adopter of digital imaging, he found it gave him a way to completely incorporate art and photography. Began shooting Digital Infrared in 2004, and had first camera converted in 2006. His work has been seen in numerous gallery shows, is featured in an iTunes app. He produces Infrared and natural color digital art for sale and teaches his post-production techniques online.

Dan is LifePixel's Creative Director,  social media manager, lead blog author, main workshops and training sessions instructor. His images appear in this gallery and throughout the website.

If you have a topic suggestion or request feel free to shoot him an email at danwampler@lifepixel.com

Otherwise all LifePixel customer service inquires should be directed to service@lifepixel.com or by phone at 866-610-1710.

View more of Dan's work on his Website | Facebook


See All Articles by Dan Wampler
Share
Pin
Tweet
Email
Share

Related Posts

  • Infrared Photoshop Tutorials & Videos
    Infrared Photoshop Tutorials & Videos
  • Basic Infrared Photoshop Techniques Tutorial
    Basic Infrared Photoshop Techniques Tutorial
  • Life Pixel Modified Camera Quick Start Guide
    Life Pixel Modified Camera Quick Start Guide
  • The Wall Of Shame
    The Wall Of Shame

Filed Under: Tutorials

Comments

  1. Helen Bradshaw says

    August 9, 2018 at 9:08 am

    Dan, great post. I tried this technique with all my filters (470, 590, 720, and 850) and I was successful. The process was quick and easy. The Duplex filter is great. Thank you for the post! ☺️

    Reply

Comments

  1. Helen Bradshaw says

    August 9, 2018 at 9:08 am

    Dan, great post. I tried this technique with all my filters (470, 590, 720, and 850) and I was successful. The process was quick and easy. The Duplex filter is great. Thank you for the post! ☺️

    Reply

Leave a Reply Cancel reply

Your email address will not be published. Required fields are marked *

Blog Topics

  • Tutorials
  • Inspiration
  • Locations
  • Gear
  • News
  • Other/Misc

What our customers say:

Life Pixel has been a life-changer for me. Continue reading
Eric GConnecticut
Read more reviews
I am more than satisfied with the service I received Continue reading
Christopher JCanada
Read more reviews
I am more than pleased with the conversion job that you did Continue reading
LOUIS MWaco, Texas
Read more reviews
I am VERY impressed with his knowledge of your products and his patience in explaining it to a novice like me. Continue reading
Lynn FEssex, Maryland
Read more reviews
Things will only get better from here thanks to all of you. Continue reading
Phillip FRedding, California
Read more reviews
The Lifepixel newsletter reminds me of not having expressed my gratitude for the excellent job you made. Continue reading
Michael GGermany
Read more reviews
Your staff went above and beyond the call of duty to make sure everything was handled in an excellent manner. Continue reading
Paige RPearland, Texas
Read more reviews
It has given my old camera a new life, I will enjoy using it again. Continue reading
William PAustralia
Read more reviews
Excellent service and the camera works just great Continue reading
Hans FairhurstAustralia
Read more reviews
I just got my converted camera back from you guys. THANK YOU!!!! Continue reading
Anne CutlerForest Knolls, CA
Read more reviews
infrared_filter_choices_sidebar
ir_conversions_explained_sidebar
----------- Watch More Videos -----------
infrared_quick_start_guide

Ready to start shooting Infrared?

Convert My Camera

Subscribe To Our Newsletter

Receive updates, tips, cool tutorials, free stuff and special discounts.

Learn the Basics

  • Video
  • Start Here
  • Filter Choices
  • Focus Calibration
  • Lens Considerations
  • Camera Considerations
  • Place Your Conversion Order

Resources

  • Galleries
  • Lens Hot Spot Database
  • IR Tutorials
  • FAQ
  • Infrared Filter Choices
  • Infrared Photography Guide
  • Infrared DIY Tutorials

Company

  • Why Choose Us
  • Get In Contact
  • Job Openings
  • Write For Us
  • Affiliate Program
  • Terms of Use
  • Privacy Policy
  • Home
  • Start Here
  • Galleries
  • Tutorials
  • FAQ
  • Blog
  • Why Choose LifePixel?
  • Shop
  • Contact

Copyright © 2025 Life Pixel Infrared - All rights reserved - LifePixel Infrared Photography IR Conversion, Modification & Scratched Sensor Repair