• Cart
  • Checkout
  • My Account

Infrared Conversions, IR Modifications & Photography Tutorials | Life Pixel IR

The world leader in infrared conversions, modifications & DIY IR conversion tutorials. Scratched sensor replacement, UV & Full spectrum conversions.

The world leader in infrared camera conversions

866.610.1710
  • Home
  • → Start Here ←
    • 1 – Introduction
    • 2 – Filter Choices
    • 3 – Focus Calibration
    • 4 – Lens Considerations
    • 5 – Camera Considerations
    • 6 – Start Shopping
  • Galleries
    • Infrared Photography
    • Infrared Time Lapse
    • Infrared Cinematography
    • Infrared Stop Motion
    • Ultraviolet Photography
    • Forensic Photography
  • Education
    • Training Sessions
    • How To Shoot Infrared
    • AR Coated Infrared Filters
    • Lens Hot Spot Database
    • Photoshop Video Tutorials
    • Infrared Issues & Solutions
    • IR Basics in Photoshop
    • Camera Quick Start Guide
    • DIY Conversion Tutorials
    • IR Photography Primer
    • Secondhand Cameras
    • Wall Of Shame
  • Workshops
  • FAQ
  • Blog
    • Tutorials
    • Inspiration
    • Locations
    • Gear
    • News
    • Other
  • Why Choose LifePixel?
    • Submit Your Review
  • Contact
  • Shop

Process images for best results

Share
Pin
Tweet
Email
Share

Making the Best of a Bad Situation

Sometimes photography can be about trying to make the best of a situation that is less than stellar for what we are trying to accomplish.

We don’t always have the opportunity to set up lighting or place the subject in the best position to take advantage of natural light. When birding you can’t ask the bird to move to another branch with more favorable light. (well you can ask but I suggest you get your hopes up) In a captive situation like a zoo, the same applies. You need to capture what you can and then work it in post-processing. This is different than working your photography where you have control and saying, “I’ll fix it in Photoshop!” You are using Photoshop to correct an imperfect scene but, it is an entirely different situation.

You will be using a different set of skills that require all the knowledge you have of how light and shadow play together in any particular situation. You also need to leverage all the intricacies available in Photoshop. Let’s take a look at a tough image captured at the Phoenix Zoo.

This photograph was made of the orangutan through the thick colored glass. There was dirt. There were reflections. Of course, there was no opportunity to pose the simian in an interesting light. The best I could hope for was to capture an engaging expression and go to work.

orangutan image capture

Straight out of Camera Capture

You can see there are reflections in the glass and a very low contrast due to that plus the back-light in the scene.

phoenix zoo orangutan

Straight out of Photoshop after a bit of manipulation in Adobe Camera Raw (ACR) followed by a little cleanup of some stray grasses on his lip.

A versatile new tool has been added to ACR, which allowed some extra control in getting rid of the reflections. It’s called Dehaze and was designed to help control the blue cast off in the distance when capturing landscapes. I’ve found it can work a bit like a polarizing filter in damping reflections. I also dialed in some contrast and a little boost to clarity.

Then the real work begins.

layers palette

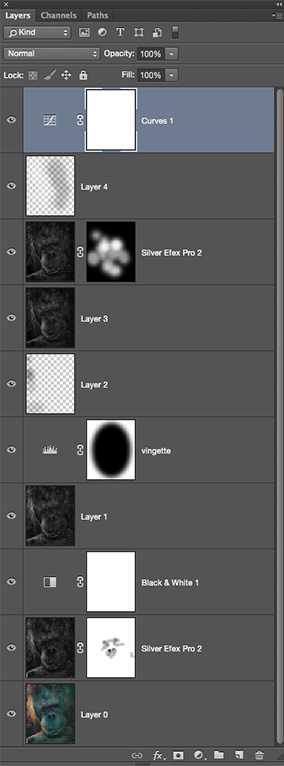
Layers Pallete for image

First up there was a conversion to Silver FX Pro 2. Extra sharpening using the structure sliders was dialed in during the conversion. Notice the mask holding out some of the detail because it was a little blocked up in those shadow areas. With the area blocked out to allow that detail to come back through the color was brought back as well. The next layer is a Black & White Adjustment layer to get back to a full monotone image.

The next layer is a Black & White Adjustment Layer to get back to a full monotone image.

All the layers below were combined to create Layer 1.

A 150-pixel vignette was added using a Levels Adjustment Layer to darken the outside edges of the image.

A blank Layer was added, and the Blend Mode changed to Soft Light. In this mode painting with pixels that are darker than middle gray darken the image and pixels brighter than middle gray lighten the picture. I’ve found this to be a way to have more control and better quality when dodging and burning.

Again the lower layers were combined into a single Layer. This layer was taken back into Silver Effects Pro 2, and structure was used quite heavily including the Fine Structure slider to accentuate the hair. This Layer was changed to the Luminance Mode, which will only change the Luminous information on the Layer. The Mask was filled with black to hide the information on the layer and sharpness was applied by painting with white. Selective sharpening is an excellent way to help lead your viewer through an image, second only to areas of high contrast.


Win a FREE Camera Conversion!

Another Layer set to Soft Light Mode was added for more density control of the backlit area.

Last but not least a Curves Layer was added to darken the entire image.

phoenix zoo image of orangutan

Final image.

Yours in creative Photography,       Bob

PS – Questions, thoughts, ideas, and comments are welcome.

PPS – The original capture was with the Panasonic Lumix FZ1000. A handy camera with a zoom range of 25-400 with an f2.8-4.0 Aperture. Handheld. Camera settings 1/40th sec f4.0 ISO 200 at 146mm (35mm equivalent 432mm) It’s possible to hand hold at this zoom range due to the incredible image stabilization built into the body.

PPPS – I am a Lumix Luminary and Panasonic sponsors me for speaking programs… Need a speaker on Photoshop? Get in touch.

  • Latest Articles
  • Author Bio
Bob Coates

Latest articles by Bob Coates (see all articles)

  • Lumix GH4 upgrade to infrared - July 2, 2021
  • Bosque del Apache Wildlife Refuge - December 21, 2016
  • Pre-visualization & Post Production - October 18, 2016
Bob Coates

Bob Coates

Bob Coates, M.Photog.M.Artist.Cr., CPP

Based in Sedona, Arizona Bob is a professional photographer, author, speaker & educator.

Coates started taking photographs with an SLR borrowed from a friend for a vacation back in 1983. After successfully managing other peoples businesses for fourteen years while photographing on the side, Bob decided to follow the quote "Do what you love and you will become a success."

In March of 1994 he left the restaurant biz and took the leap to become a professional image maker. "In this business the variety never ceases to amaze me," says Bob. "One day shooting jewelry in the studio, the next day creating images for a brochure and yet another standing in the middle of the desert waiting for the light to get "just so." The changes in software and digital imaging continue to inspire me to create new and exciting imagery."

Bob Coates Photography "Specializes in not Specializing" this allows Bob come up with interesting new ways of photographing subjects. Combining the techniques of different types of photography leads to new ways capturing images. People who hire Bob Coates Photography do it not just for the expertise but, for the experience brought to the job.

Certified by Professional Photographers of America, Master, Artist & Craftsman Photographer. Member Arizona Professional Photographers Association & American Society of Photographers.

Published Magazine Articles and Books: Professional Photographer, Rangefinder, Shutterbug, AfterCapture, Photo Electronic Imaging, Caribbean Travel and Life, Cruise Travel, Scouting, Porthole, Realtor, New York Daily News Caribbeat, SignCraft, Sailing World, Pro-Lighting Series: Nightshots, Pro-Lighting Series: Beauty Shots, Portrait Photographers Handbook, and others…

Books published by Amherst Media - Photographer's Guide to Wedding Album Design & Sales, Photographer's Guide to Wedding Album Design & Sales Second Edition and Strategies & Techniques for the Digital Photographer.

Bob is also a photographer coach and writes a blog called Successful-Photographer with information to help photographers in the art, science, business and marketing of photographic services. Questions or ideas about things you'd like me to address here at LifePixel? bob@bcphotography.com


See All Articles by Bob Coates
Share
Pin
Tweet
Email
Share

Related Posts

  • Infrared Photoshop Tutorials & Videos
    Infrared Photoshop Tutorials & Videos
  • Basic Infrared Photoshop Techniques Tutorial
    Basic Infrared Photoshop Techniques Tutorial
  • Life Pixel Modified Camera Quick Start Guide
    Life Pixel Modified Camera Quick Start Guide
  • The Wall Of Shame
    The Wall Of Shame

Filed Under: Tutorials

Leave a Reply Cancel reply

Your email address will not be published. Required fields are marked *

Blog Topics

  • Tutorials
  • Inspiration
  • Locations
  • Gear
  • News
  • Other/Misc

What our customers say:

Life Pixel has been a life-changer for me. Continue reading
Eric GConnecticut
Read more reviews
I am more than satisfied with the service I received Continue reading
Christopher JCanada
Read more reviews
I am more than pleased with the conversion job that you did Continue reading
LOUIS MWaco, Texas
Read more reviews
I am VERY impressed with his knowledge of your products and his patience in explaining it to a novice like me. Continue reading
Lynn FEssex, Maryland
Read more reviews
Things will only get better from here thanks to all of you. Continue reading
Phillip FRedding, California
Read more reviews
The Lifepixel newsletter reminds me of not having expressed my gratitude for the excellent job you made. Continue reading
Michael GGermany
Read more reviews
Your staff went above and beyond the call of duty to make sure everything was handled in an excellent manner. Continue reading
Paige RPearland, Texas
Read more reviews
It has given my old camera a new life, I will enjoy using it again. Continue reading
William PAustralia
Read more reviews
Excellent service and the camera works just great Continue reading
Hans FairhurstAustralia
Read more reviews
I just got my converted camera back from you guys. THANK YOU!!!! Continue reading
Anne CutlerForest Knolls, CA
Read more reviews
infrared_filter_choices_sidebar
ir_conversions_explained_sidebar
----------- Watch More Videos -----------
infrared_quick_start_guide

Ready to start shooting Infrared?

Convert My Camera

Subscribe To Our Newsletter

Receive updates, tips, cool tutorials, free stuff and special discounts.

Learn the Basics

  • Video
  • Start Here
  • Filter Choices
  • Focus Calibration
  • Lens Considerations
  • Camera Considerations
  • Place Your Conversion Order

Resources

  • Galleries
  • Lens Hot Spot Database
  • IR Tutorials
  • FAQ
  • Infrared Filter Choices
  • Infrared Photography Guide
  • Infrared DIY Tutorials

Company

  • Why Choose Us
  • Get In Contact
  • Job Openings
  • Write For Us
  • Affiliate Program
  • Terms of Use
  • Privacy Policy
  • Home
  • Start Here
  • Galleries
  • Tutorials
  • FAQ
  • Blog
  • Why Choose LifePixel?
  • Shop
  • Contact

Copyright © 2025 Life Pixel Infrared - All rights reserved - LifePixel Infrared Photography IR Conversion, Modification & Scratched Sensor Repair