As any photographer charged with photographing artificially low-lit indoor events knows, there are key challenges that you need to overcome to get the perfect shot. Settings like theatre productions, stage shows and award ceremonies present a particular challenge for indoor photographers. With Photoshop, you can easily correct these key issues you come across during the shoot.
Some of the many challenges photographers face include colour spills, underexposure, distractions, animated backgrounds and noise from shooting at high ISO. Luckily, industry products offer solutions to these and many other challenges. Using Photoshop and Adobe Lightroom, we’ll look at techniques such as Shake Reduction to add sharpness to small details in the photograph, and using Target Sliders for masking and advanced cloning.
This tutorial is created in Photoshop CC and Lightroom 5. However, it can also be followed in older versions of both Photoshop and Lightroom. Here are the important details to take note of for this tutorial:
Time needed to complete:
30 minutes to an hour
Software required for this tutorial:
Photoshop, Lightroom
16 Steps To Greatness – Let’s Get Started!
Step 1
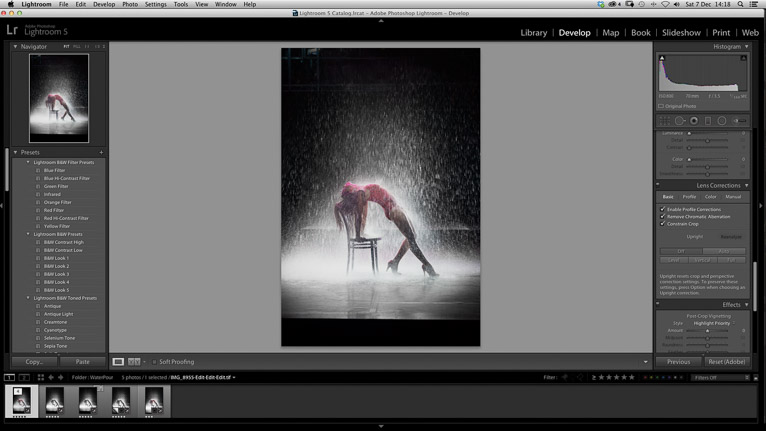
Start by importing your preferred image into Lightroom. Once there, go to the Develop Module Tab. Navigate to the Lens Correction panel, which should be on the right, and tick Remove Chromatic Aberrations and Enable Profile Corrections, in order to get rid of any known vignetting and lens distortion.

Step 2
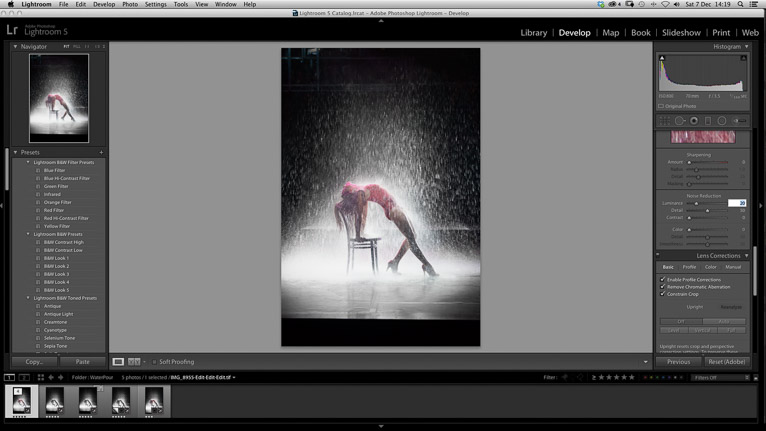
Located just above the Lens Correction tab lies Noise Reduction. Adjust the Luminance slider up as required for the amount of grain in your image. For theatre and stage, it tends to be anywhere between 20 and 40.
Step 3
Once done, navigate back to the Basic panel where you can correct exposure, contrast and white balance. Even adding only half a stop to the image can help to bring it up to a far better exposure.
Step 4
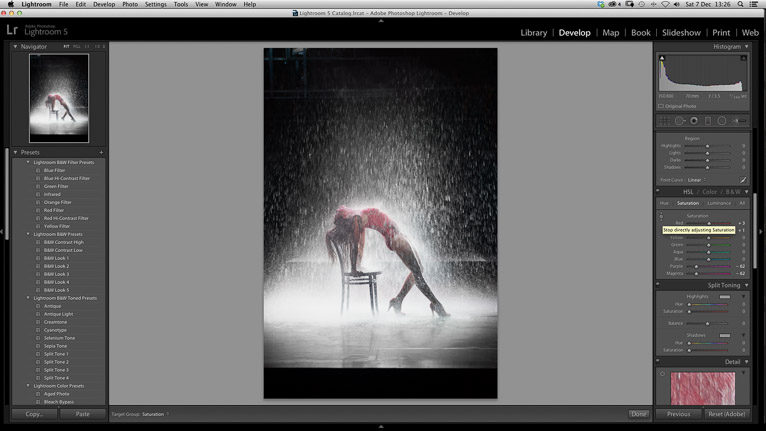
There are many times that you want to remove the effects of lights or a single source of light that disrupt the look you are after. If there is a specific section of the image you want to target, navigate to the top left of the HSL panel.
This should provide you with an up-and-down arrow, allowing you to draw around the affected area with your cursor. Click on the affected area, drag it down slowly, and you will remove some of the colour that you want gone.
Step 5
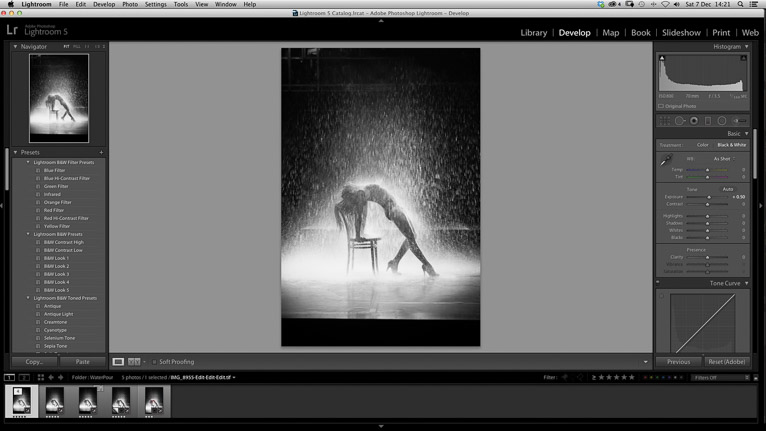
If you want to go retro black-and-white, you can convert the image easily using the develop panel’s powerful features.
Step 6
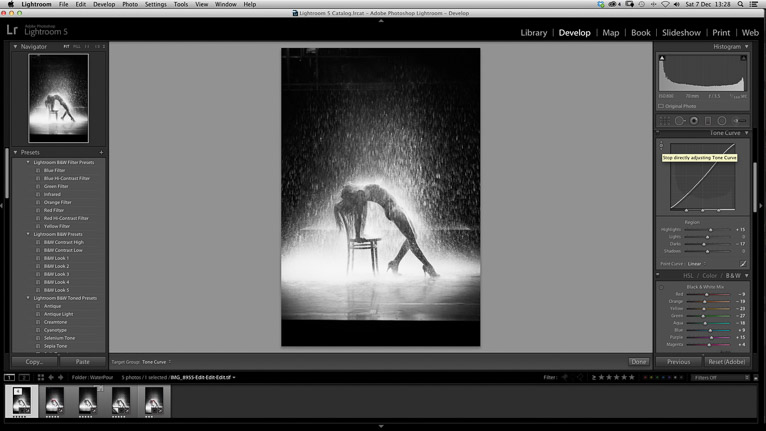
The Tone Curve panel makes it easier than ever to remove any contrast. Keep in mind that it also has a target slider option that works similarly as HSL.
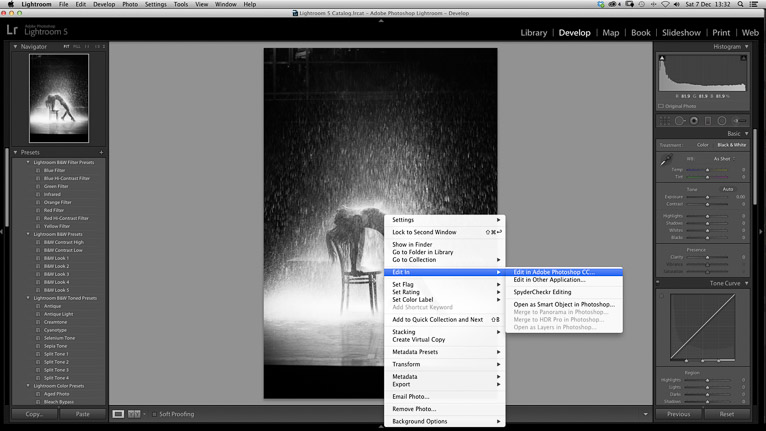
Step 7
Now that your image is correctly exposed, you need to take it over to Photoshop where you can work on fixing the background. The simplest way to achieve this is to simply right-click the image and select Edit In > Edit in Photoshop CC.
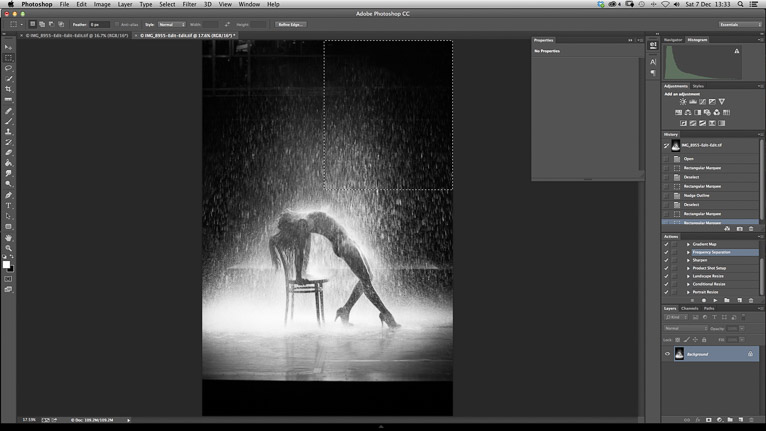
Step 8
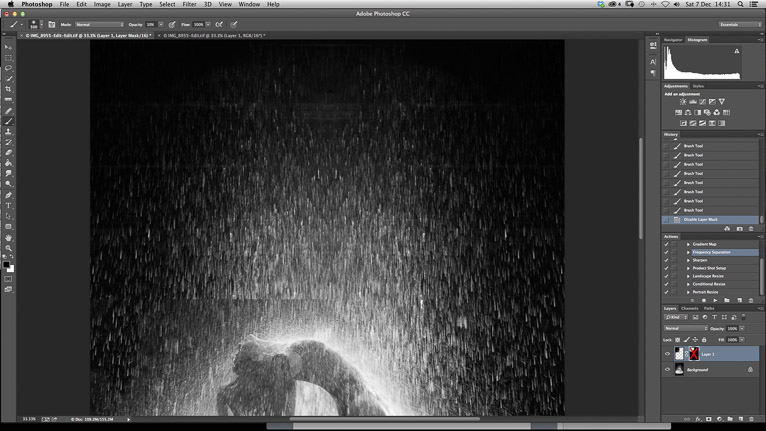
Many choose to take this process step-by-step and approach the image as a puzzle, taking it on piece-by-piece. If this approach works for you, start by correcting the extra detailing in the image’s top left corner. Use the Marquee Tool (M) and highlight the top right quarter of the image. On a Mac, hit Cmd+J to copy the area to a new layer. On a Windows PC, hit Ctrl+J to achieve the same effect.
Step 9
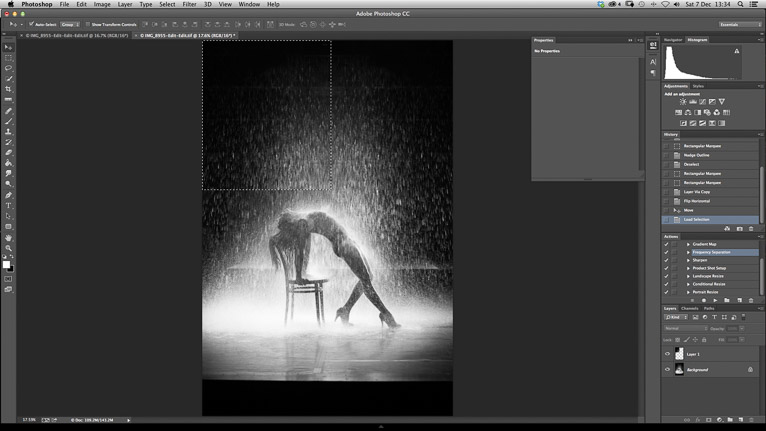
Choose Edit>Transform<Flip Horizontal and flip the artwork over, moving it to the top left corner.
Step 10
Add a vector mask to the image’s newly mirrored element. Use the soft brush with roughly 30% opacity (or personal preference) and blend in the small details along the image’s edges.
Step 11
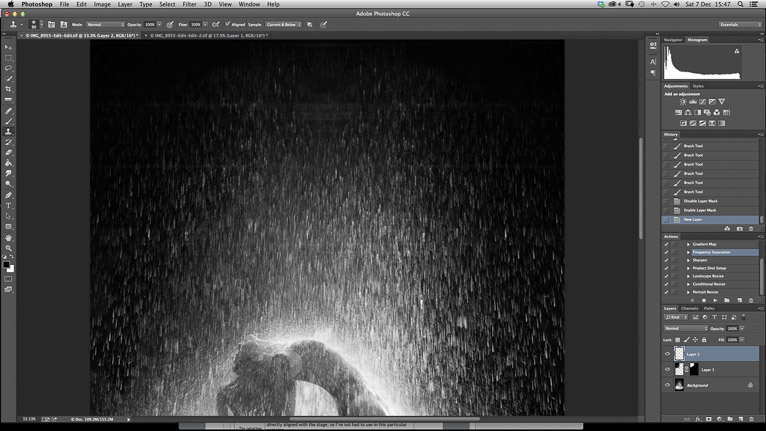
There is an easy way to remove any unwanted details that remain in an image. To do this, simply create a new blank layer. Then, make use of a mixture of the Healing and Clone brushes to achieve the desired look. Keep in mind that while doing this, you have to ensure your clone tool is set to Current and Below, while using the Alt to pick a local source area for sampling.
Step 12
Once you’re done, draw your attention to the image’s bottom half. Create a new blank layer, and make use of the same heal and clone techniques to get rid of any distracting marks.

Step 13
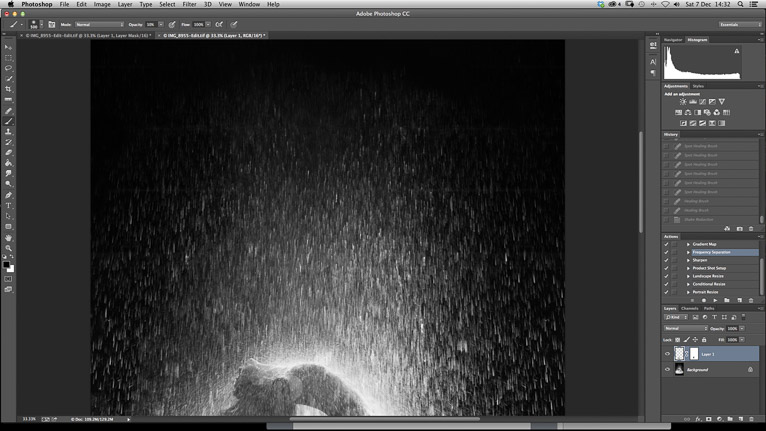
In order to take the image’s enhancement to the next level, we will work with the new and powerful Shake Reduction filter found in Photoshop CC. Navigate to Filter>Sharpen>Shake Reduction and set the target marquee over the image’s centre. Here is where you can play around with the settings until you achieve your required effect.
Step 14
After achieving the required sharpening effect, select OK. With the background now completed, hit Cmd+S on a Mac or Ctrl+S on a PC to save your image back to Lightroom. This helps to keep your edited PSD or TIFF file directly linked to the original RAW file, and also save it in the same folder.
Step 15
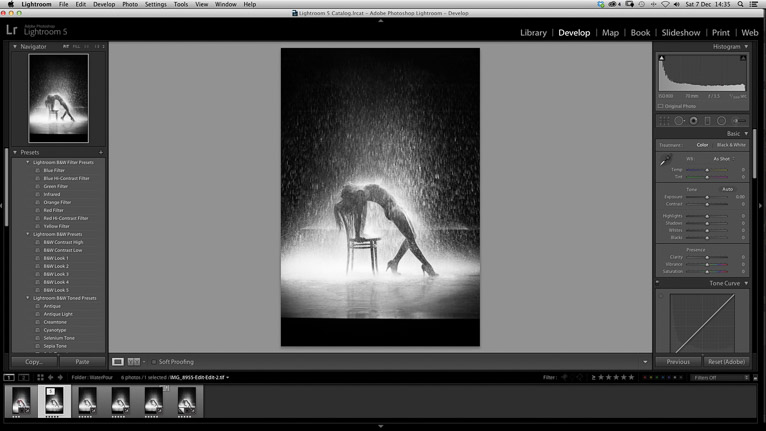
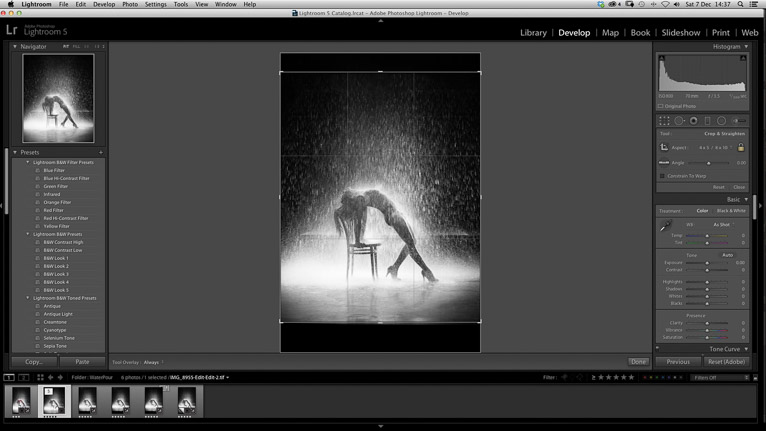
Once back in Lightroom, navigate back to Develop module and crop the image as you require it, using the handy Crop tool.
It is easier to resize and crop your image separately in Lightroom as it is a non-destructive action. It also affords you quicker access to amend a crop for different media applications.
Step 16
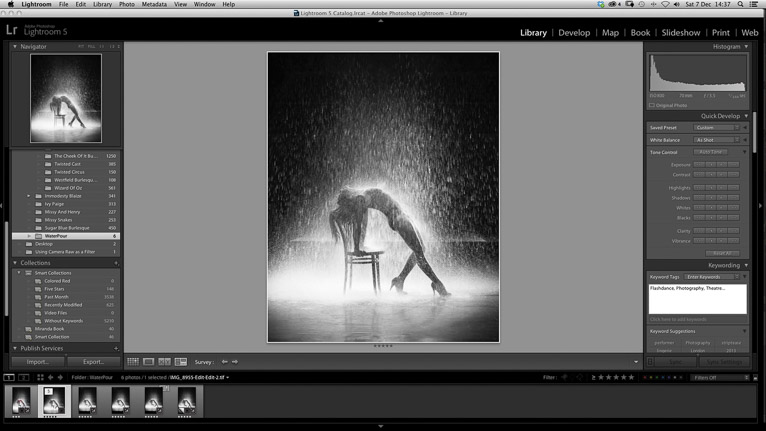
Before exporting the image, head to the Library Module and add metadata. This increases your image’s ranging in Google. Include relevant keywords that describe the image based on popular searches you’d like to target with the image.

Bring Your Live Event Photography To Life!
There are few settings as unpredictable to shoot in than dimly-lit venues. With unpredictable and artificial lighting abounding, it is the perfect storm for an extremely challenging photo shoot. There are things you can do to achieve those exceptional shots. What you need in order to succeed are the right techniques, great photo editing software like the Photoshop CC suite, a decent camera and a lot of patience.
Let’s take a closer look at some tips that will help you to bring your live event photography to life, even when shooting in low-light, non-studio settings.
RAW vs. JPEG Shooting
While it may take up more space on your memory card, shooting in RAW format instead of in JPEG offers you a far better chance of recovering an overexposed or underexposed image. This option is usually found in the image settings menu on your camera, but it differs depending on your camera.
When shooting directly into a light source, you can mix things up a bit and achieve some incredible artistic photographs. Use the lights source to create an inimitable silhouette of the dancer, and take the leap into experimenting with light flares.
How can you prevent camera shaking? A simple trick is to cup your non-trigger hand – oftentimes the left hand – underneath your lens for additional and welcomed support, and even greater distribution of weight. For additional stability, keep your elbows tucked into the side of your body. Another trick to capture a flattering shot of your subject on stage is to consider the singer’s mouth. The snap of a mouth singing vowel sounds like an aaah is always more flattering than catching the singer mid-consonant.
When trying to capture that magic shot with a moving subject, try setting the camera to Continuous Serve AF (Nikon) or Al Servo (Canon) or similar, depending on your camera. This mode makes it easy to continuously track focus, which is splendidly handy when shooting moving objects or people.
Mastering Photoshop CC’s New Photo Retouch Tools
More than anything, the modern photographer’s greatest tool – aside from the camera – is cutting edge photo editing software. Photoshop has been leading the way in this sector for decades, and it continues to set the benchmark today. With the launch of Photoshop CC, there has been an introduction of some major new features including unprecedented photo retouch tools and expanded Smart Object support.
Smart objects now make it easier than ever to achieve non-destructive editing. Some of the aptly named features of the new Photoshop suite include the new Shake Reduction, Lens Correction and Smart Sharpen filters, as well as the new Camera Raw Filter. This filter allows you to adjust photos using Adobe’s Raw processing engine, instead of merely importing images.
The Patch Tools, Spot Brush and Healing Brush have literally been turbocharged with Mercury Graphics Engine enhancements. This allows you to see your Healing Brush results in real time, and provide you with cutting edge Spot Healing Brush and Patch Tool results that are up to 120x faster than the previous version in CS6.
For photographers that use responsive and multi-screen design to help bring their live event photography to life, the Artboards offer an efficient design. Artboards let you create numerous layouts in different sizes, laying them out in a single document and view them all at once. This allows you to copy and share content between different Artboards, while exporting them individually or several at a time.
Now You Can Move And Extend Objects With More Control
The new Photoshop CC platform makes it easier than ever before for live event photographers to adjust the scale and rotation of the object you are moving, or the area you are extending. This is achieved thanks to its Content-Aware Extend and Content-Aware Move improvements. It allows you to position your final object with precision, in order to match the scale and position of the image using the Transform on Drop.
Remove and even add atmospheric haze to your images, while enjoying more precise control over the white and black levels when making local adjustments. These are all elements included in the new and sleek design of Photoshop CC. Design Space provides a designated mode with new interactions and design-focused features. This helps to reduce mouse movements, clicks and clutters for live event photographers and designers working on their websites.
There are many incredible features available in Photoshop CC for live event photographers that will actively help to make your life easier. One of these features that not only helps you to bring your images to life, but make its handling even easier is the Smart Objects feature. Here, Smart objects are reusable layers that may contain vector or raster images that you can either link or embed in your image file. The previous allows you to change a master image and have the change propagated out to all instances in any document that you used the image in.
The Blur Gallery features a window that allows you to apply popular effects like bokeh (or selective focus) and tilt-shift, for a great miniaturised look. It also applies field blur and iris blur. New in this category is the Path blur, as well as Spin blur feature, which helps you to produce cool effects that infer motion.
The Focus Mask is yet another nifty photo trick for live event photographers that allows you to simply choose Focus Area from the Select menu to create a mask of only the in-focus area in the photo. It may work best for photos that don’t have complex backgrounds, however there are tools for subtracting or adding regions with a selection tool that allows you to fine-tune the process.
Photoshop’s tools are so advanced that it figures out a photo’s contents, in order for you to remove and add objects that have been improved with colour blending. This means that there are no more colour patches around the objects moved should it contain graduated colours.
Look forward to a faster and easier image export process, with a redesigned exporting experience that lets you export a single layer, Artboard or entire document with just one click. Enjoy better compression and advanced preview options that include enhanced asset extraction and canvas size.
If you are looking for a cutting edge photo editing software suite that will help you to bring your live event images to life with breathless ease, you will be hard pressed to find another platform with similar powerful capabilities. Take your event photographs to the next level and use Photoshop CC’s state-of-the-art features to your benefit.
Latest articles by Louis Stevens (see all articles)
- Photoshop Tutorial – Enhancing Live Event Photography - December 7, 2016
Louis Stevens
Louis Stevens is a freelance writer who writes SEO content and various articles for Archetype Copywriting, particularly in the areas of event photography and videography and the digital software related to these fields of expertise.
See All Articles by Louis Stevens


Nice tutorial! Each and every step clearly explore no any confusion to follow it.. Thanks!!