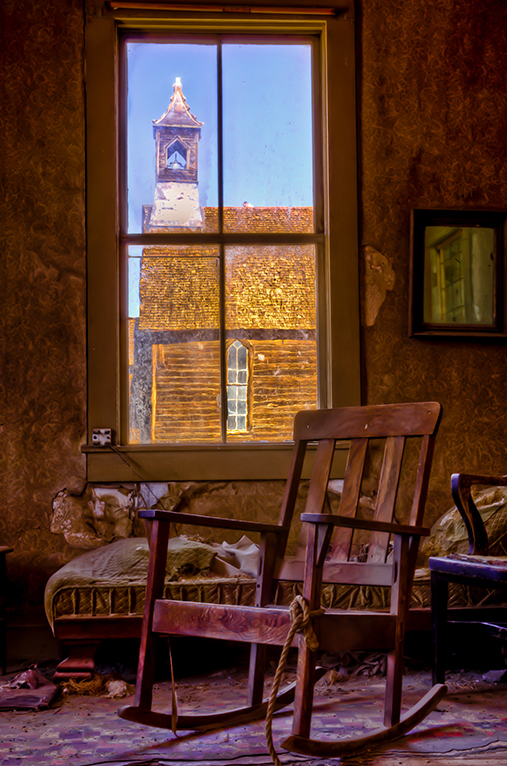
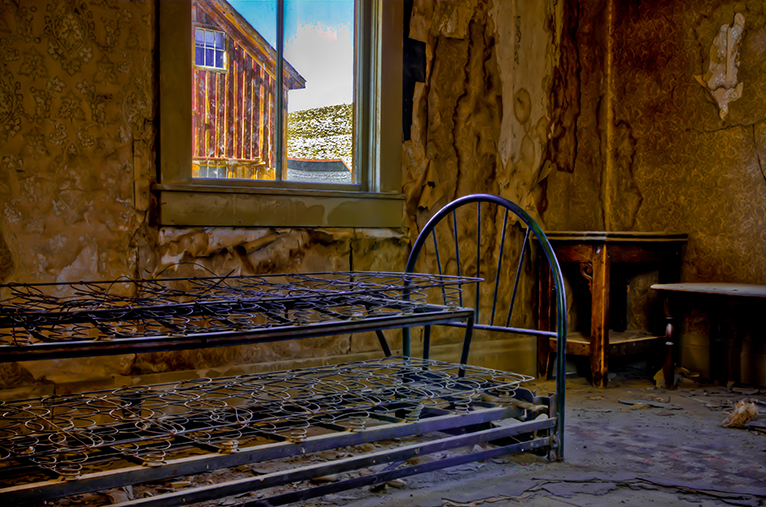
Classic use of HDR. In the old Sierra ghost town of Bodie, Ca, the bright outdoor scene was at least ten stops lighter than the dark interior. old ghost town of Bodie, CA.
Perhaps no technique since the advent of digital photography has drawn more interest and excitement than High Dynamic Range – HDR.
The sensor in your digital camera has the ability to capture a finite contrast ratio. Each camera brand and model may be different, causing the particular ratio to vary, but whatever that resolving power might be, it’s still finite. Within that ratio the brightest and darkest tones will retain some level of detail, albeit possibly a minute amount. However, extreme black, white light and dark tones beyond that ratio will be clipped, exhibiting a complete absence of detail.
While it would be nice to photograph only scenes that fall within a “normal” contrast ratio, or Dynamic Range, that is sometimes just not possible. When we encounter such higher contrast scenes, employing a method by which we can resolve that High Dynamic Range becomes the way to include those extreme tones and escape clipping in the whites, blacks or both.
To accomplish this, we need to capture several frames with very widely bracketed exposures: far enough to the right and left to record detail in the brightest and darkest areas of the scene. These images can then be stacked as layers in a single Tiff or .PSD where we can brush in the toned down whites from the otherwise underexposed image layers and opened up shadows from the overexposed image layers. In doing this, we can, to a degree, eliminate the clipping on both ends.
It’s a time tested technique and it can work on some images, but is no longer the best choice. All of the brushing is very laborious and it is hardly possible to brush each pixel individually in order to obtain the correct tonality.
Of course, there is a better answer: an HDR software solution. There are several options on the market from which to choose. Analyzing and comparing these is beyond the scope of this post, however. Suffice it to say that they fundamentally share the same operation and functionality.
At the heart of the process is Tone Mapping.
Once a series of files encompassing an adequate tonal range is gathered together and brought into the HDR program, they can be combined into a single very high (32) bit file.
HDR can enable the combining of the light and dark tones into one image in which neither highlights, nor shadows are clipped.
The next step is adjusting and fine tuning the various controls of the program to obtain the look that you want to see in the final product. And right there is where I part company from perhaps the majority of HDR users.
Encouraged by software publishers who quite naturally compete to offer more and more controls and features, many photographers have embraced the mantra of Mae West. For those of you too young to remember that legendary movie and showbiz siren, that was,
“Too much of a good thing is wonderful.” It isn’t.
A very big part of what gives HDR and by extension, digital, a bad name is the over-doing of the effects made possible by the very sliders and other controls that are designed to create a good image.
Some of the presets are even labeled Grunge! And that they are.
After initially trying hard to create the desired image by using only the controls offered by some HDR programs, I began to evolve a different strategy. After some experimentation and a bit of trial and error, my current method involves selecting the preset from among those offered that creates the most bland looking, low contrast, low saturation 16 bit Tiff on the menu. The important point to remember is that this Tiff, although admittedly flat, includes all of the tones captured on both widely separated ends of the histograms with no clipping in either the highlights or the shadows.
Once that file has been processed by the HDR software, I then open it in Photoshop and adjust it as I would any other image, adding contrast and optimizing the color. The result is a final image that looks the way I think it should, but without the harsh and sometimes garish look of too much HDR processing.
Some photographers will say that such a workflow is destructive when compared with processing the image solely or mostly in the HDR software. That is somewhat correct, at least theoretically.
However, by using only 16 bit files and making all adjustments with a strictly Layers based workflow, any destructiveness is held to an absolute minimum and really does not diminish the quality of the final product.
Two other notes:
* Photoshop can now handle 32 bit images. I feel that other programs do a better job of rendering the combined image.
* Combining several files together in any HDR exercise can result in an increased cumulative amount of noise, especially in the shadow and sky areas. Using noise reduction with your choice of ACR, Lightroom or Nik Dfine is a good way of dealing with that noise. The noise reduction in Photoshop Is not as good as that in Lightroom and ACR. DxO has excellent noise reduction , but no ability to make local adjustments. Remember, since any noise reduction involves some degree of softening, brushing that reduction locally into the affected areas, rather than globally is usually a good idea.
Happy processing!
Latest articles by Jerome Ginsberg (see all articles)
- High Dynamic Range – HDR - June 12, 2017
- The First Time - May 18, 2017
- Depth Perception - May 10, 2017
Jerome Ginsberg
Jerry Ginsberg is a freelance photographer whose landscape and travel images have graced the pages and covers of hundreds of books, magazines and travel catalogs and have been exhibited throughout North and South America. He is the only person to have photographed each and every one of America's National Parks with medium format cameras and has been a National Parks artist-in-residence.
Jerry's photographic archive spans virtually the entire Western Hemisphere.
More of his images are on display at www.JerryGinsberg.com
Or e mail him at jerry@jerryginsberg.com
See All Articles by Jerome Ginsberg


Leave a Reply