• Cart
  • Checkout
  • My Account

Infrared Conversions, IR Modifications & Photography Tutorials | Life Pixel IR

The world leader in infrared conversions, modifications & DIY IR conversion tutorials. Scratched sensor replacement, UV & Full spectrum conversions.

The world leader in infrared camera conversions

866.610.1710
  • Home
  • → Start Here ←
    • 1 – Introduction
    • 2 – Filter Choices
    • 3 – Focus Calibration
    • 4 – Lens Considerations
    • 5 – Camera Considerations
    • 6 – Start Shopping
  • Galleries
    • Infrared Photography
    • Infrared Time Lapse
    • Infrared Cinematography
    • Infrared Stop Motion
    • Ultraviolet Photography
    • Forensic Photography
  • Education
    • Training Sessions
    • How To Shoot Infrared
    • AR Coated Infrared Filters
    • Lens Hot Spot Database
    • Photoshop Video Tutorials
    • Infrared Issues & Solutions
    • IR Basics in Photoshop
    • Camera Quick Start Guide
    • DIY Conversion Tutorials
    • IR Photography Primer
    • Secondhand Cameras
    • Wall Of Shame
  • Workshops
  • FAQ
  • Blog
    • Tutorials
    • Inspiration
    • Locations
    • Gear
    • News
    • Other
  • Why Choose LifePixel?
    • Submit Your Review
  • Contact
  • Shop

Getting started basics – White balance and Shooting RAW

Share
Pin
Tweet
Email
Share
43 Shares

Since this is my first posting, I wanted to explain a few things. My intention is show you ways to become a better Infrared Photographer, and enjoy the experience of capturing IR images. The important thing to keep in mind is this is an art form, and as such there many ways to create stunning Infrared images. What I will show are the techniques that I have had success with. I welcome feedback and suggestions on future subjects to make this Blog more useful. My contact information is available on my Bio page.

White balance and Shooting RAW

The two things that I feel make the biggest impact on an IR image are white balance and shooting in RAW.

White balance is the process of removing color casts, so that objects which appear white in reality are rendered white in your image. Many digital cameras do an excellent job of white balance on color images. With your IR converted camera, you need to “tell” the camera what white is. Since most IR produces images with foliage (trees, grass) as white, they are a natural for white balance. Each camera has a different procedure for manual white balance, but most allow for you to take and image to use as a reference. That image is used to establish what white is.

RAW image capture is a method by which you have all the image data from your camera sensor with very little processing. RAW images need to be processed and save into another format for printing and most editing. The advantage is a RAW image can be adjusted before converting to whatever format you use. Most RAW convertors have the ability to manually white balance. Shooting in RAW with a manual white balance gives you two opportunities to get the color tones the way you want.

For an example, let’s look at an image shot with difference white balance settings. This is an image of the St. Louis Arch grounds. Here is the image shot with the camera on full automatic.

Fullauto

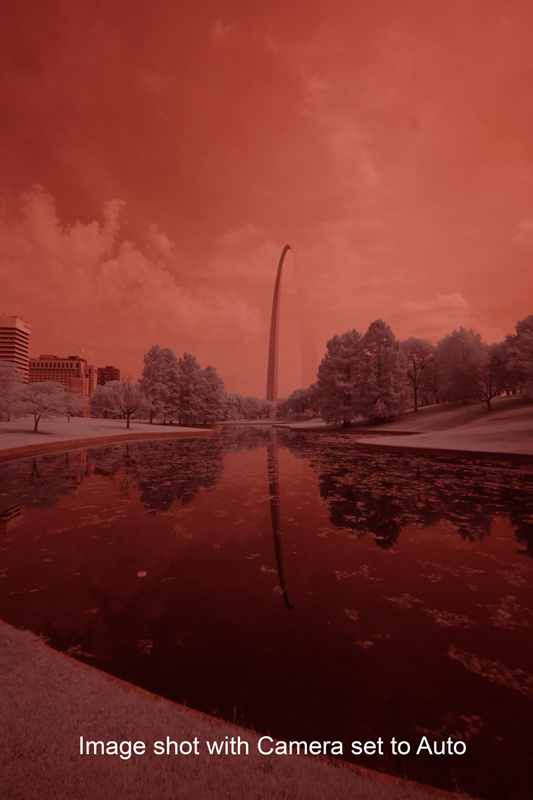
The image appears at first to be all Red, with only very slight Blue or Cyan tones. This next image is the same scene, but this time the grass was used as a reference for a manual white balance.

Win a FREE Camera Conversion!

manual

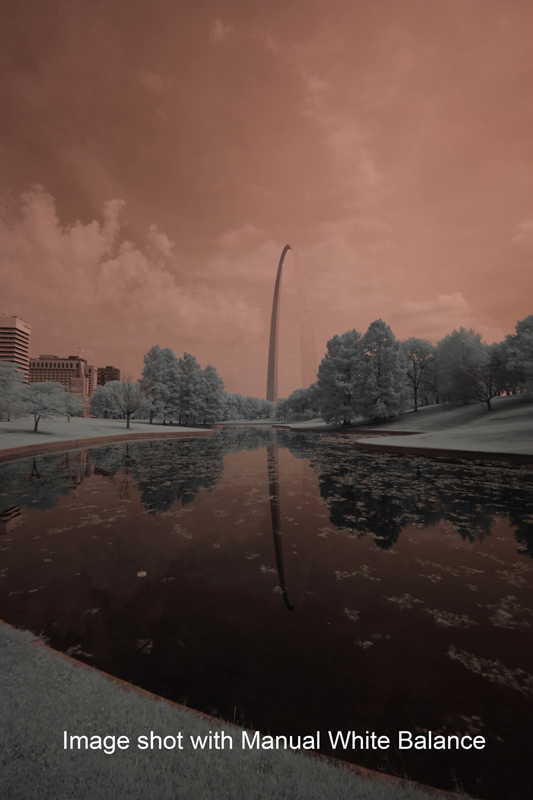
Now we start to see a bit more color separation. The foreground has much less of a red-ish tone and the image appears to have more depth. This image was shot with a manual white balance, and then the RAW image was processed with an additional white balance using the grass in the RAW image as a reference.

RAW-pro

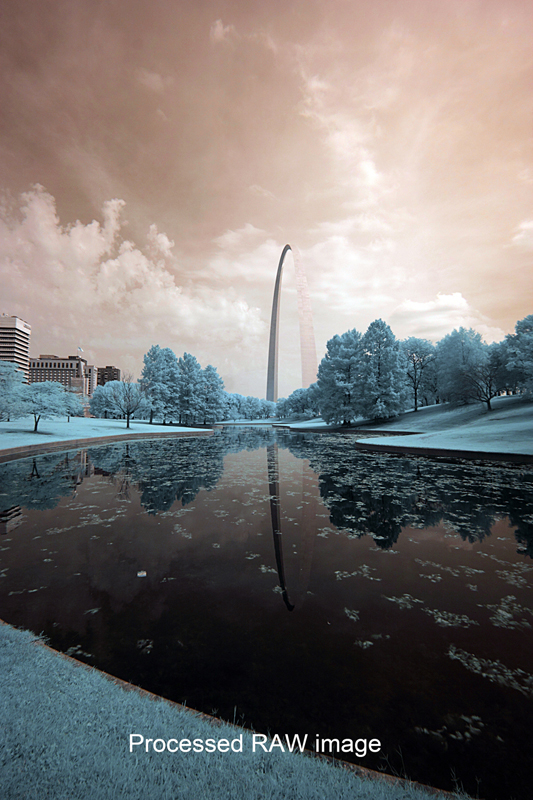
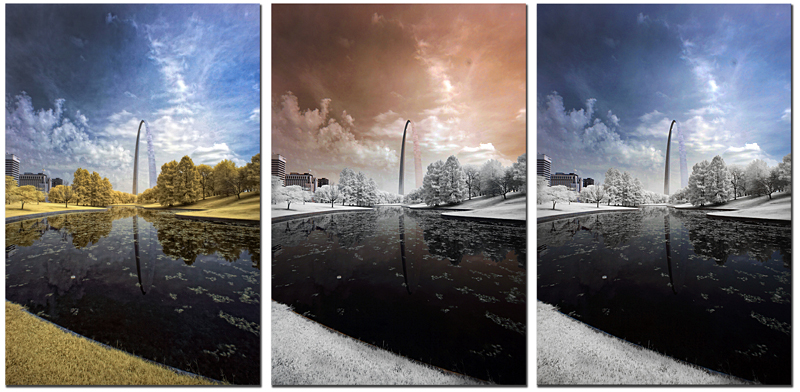
This image has more depth, and color separation. From here, the Infrared image can be processed in which way you choose. Here are some examples:

finished


  • Latest Articles
  • Author Bio
Dan Wampler

Latest articles by Dan Wampler (see all articles)

  • Seal Bay photoshoot - March 7, 2023
  • Major Copyright Infringement site Scroller.com - March 6, 2023
  • Kangaroo Island Wallabies and Roos - March 1, 2023
Dan Wampler

Dan Wampler

Dan Wampler is a digital artist from St Louis, MO. Having been interested in art and photography since childhood, he spent most of adult life working for Kodak and in the portrait photography industry. A student of the works of Ansel Adams, Any Warhol, and David Hamilton, Dan attempted to keep a wide range of artistic style.

As an early adopter of digital imaging, he found it gave him a way to completely incorporate art and photography. Began shooting Digital Infrared in 2004, and had first camera converted in 2006. His work has been seen in numerous gallery shows, is featured in an iTunes app. He produces Infrared and natural color digital art for sale and teaches his post-production techniques online.

Dan is LifePixel's Creative Director,  social media manager, lead blog author, main workshops and training sessions instructor. His images appear in this gallery and throughout the website.

If you have a topic suggestion or request feel free to shoot him an email at danwampler@lifepixel.com

Otherwise all LifePixel customer service inquires should be directed to service@lifepixel.com or by phone at 866-610-1710.

View more of Dan's work on his Website | Facebook


See All Articles by Dan Wampler
Share
Pin
Tweet
Email
Share
43 Shares
Share
Pin
Tweet
Email
Share
43 Shares

Related Posts

  • Infrared Photoshop Tutorials & Videos
    Infrared Photoshop Tutorials & Videos
  • Basic Infrared Photoshop Techniques Tutorial
    Basic Infrared Photoshop Techniques Tutorial
  • Life Pixel Modified Camera Quick Start Guide
    Life Pixel Modified Camera Quick Start Guide
  • The Wall Of Shame
    The Wall Of Shame

Filed Under: Tutorials

Comments

  1. Chan Garrett says

    June 23, 2019 at 3:46 pm

    I an currently having my Canon eos rebel t3i converted using your 830nm filter (deep b&w?). Once I create a custom white balance using brightly lit green grass, will lightroom open my raw file in the proper light balance? Will I need to use canon dpp to open the original file prior to going into lightroom or ps?

    Reply
    • Daniel Malkin says

      June 26, 2019 at 1:34 pm

      No, the only way to retain the embedded custom white balance within the RAW file is to use DPP. This is the only program that will both retain the embedded custom wb within the RAW file as well as allow you to change it easily if you need to or want to. Once you are done in DPP, simply convert to a TIFF or JPEG before going into PS or LR.

      If you want to use Adobe as your RAW converter, there is a method that works for some involving the Adobe DNG Profile Editor but this is much more complicated compared with using DPP.

      Reply
  2. Donna says

    July 20, 2016 at 10:46 am

    Thanks for your advice. I have been messing around more with raw images and have really been enjoying it. I have been wanting to learn more about how to enhance the color and balance of my photos, (I am a newbie photographer), and this post was great.
    Thanks again for your post.

    Reply
  3. andrea burke says

    October 3, 2014 at 11:13 pm

    I am looking into converting a camera and trying to decide what filter to go with. I like the idea of having options in processing to get different looks with the camera once it is converted. What filter was used in this converted camera when these RAW captures were made? All the changes in the color look were made in post processing?

    Reply
    • Daniel Malkin says

      October 6, 2014 at 10:55 am

      Hi Andrea,

      The first image is our Enhanced Color filter but the 3 images at the bottom are examples from our Super Color.

      Reply
  4. Deborah Pietrangelo says

    March 18, 2014 at 6:01 pm

    Can’t thank you enough for the outstanding information regarding white balance, why it is so important and how to adjust it. One question comes to mind, especially at this time of year, is there a decent/acceptable substitute for the green grass?

    Reply
    • Vitaly Druchinin says

      March 20, 2014 at 6:42 pm

      Absolutely Deborah, I often use cement sidewalks where available but a normal grey card or even a neutral white sheet of paper will work well in most cases. Of course you can just shoot RAW and adjust the white balance in post, there’s a couple videos on the process here: https://www.lifepixel.com/tutorials/infrared-photoshop-videos

      Reply

Leave a Reply Cancel reply

You have to agree to the comment policy.

Blog Topics

  • Tutorials
  • Inspiration
  • Locations
  • Gear
  • News
  • Other/Misc

What our customers say:

Life Pixel has been a life-changer for me. Continue reading
Eric GConnecticut
Read more reviews
I am more than satisfied with the service I received Continue reading
Christopher JCanada
Read more reviews
I am more than pleased with the conversion job that you did Continue reading
LOUIS MWaco, Texas
Read more reviews
I am VERY impressed with his knowledge of your products and his patience in explaining it to a novice like me. Continue reading
Lynn FEssex, Maryland
Read more reviews
Things will only get better from here thanks to all of you. Continue reading
Phillip FRedding, California
Read more reviews
The Lifepixel newsletter reminds me of not having expressed my gratitude for the excellent job you made. Continue reading
Michael GGermany
Read more reviews
Your staff went above and beyond the call of duty to make sure everything was handled in an excellent manner. Continue reading
Paige RPearland, Texas
Read more reviews
It has given my old camera a new life, I will enjoy using it again. Continue reading
William PAustralia
Read more reviews
Excellent service and the camera works just great Continue reading
Hans FairhurstAustralia
Read more reviews
I just got my converted camera back from you guys. THANK YOU!!!! Continue reading
Anne CutlerForest Knolls, CA
Read more reviews
infrared_filter_choices_sidebar
ir_conversions_explained_sidebar
----------- Watch More Videos -----------
infrared_quick_start_guide

Ready to start shooting Infrared?

Convert My Camera

Subscribe To Our Newsletter

Receive updates, tips, cool tutorials, free stuff and special discounts.

Learn the Basics

  • Video
  • Start Here
  • Filter Choices
  • Focus Calibration
  • Lens Considerations
  • Camera Considerations
  • Place Your Conversion Order

Resources

  • Galleries
  • Lens Hot Spot Database
  • IR Tutorials
  • FAQ
  • Infrared Filter Choices
  • Infrared Photography Guide
  • Infrared DIY Tutorials

Company

  • Why Choose Us
  • Get In Contact
  • Job Openings
  • Write For Us
  • Affiliate Program
  • Terms of Use
  • Privacy Policy
  • Home
  • Start Here
  • Galleries
  • Tutorials
  • FAQ
  • Blog
  • Why Choose LifePixel?
  • Shop
  • Contact

Copyright © 2023 Life Pixel Infrared - All rights reserved - LifePixel Infrared Photography IR Conversion, Modification & Scratched Sensor Repair