• Cart
  • Checkout
  • My Account

Infrared Conversions, IR Modifications & Photography Tutorials | Life Pixel IR

The world leader in infrared conversions, modifications & DIY IR conversion tutorials. Scratched sensor replacement, UV & Full spectrum conversions.

The world leader in infrared camera conversions

866.610.1710
  • Home
  • → Start Here ←
    • 1 – Introduction
    • 2 – Filter Choices
    • 3 – Focus Calibration
    • 4 – Lens Considerations
    • 5 – Camera Considerations
    • 6 – Start Shopping
  • Galleries
    • Infrared Photography
    • Infrared Time Lapse
    • Infrared Cinematography
    • Infrared Stop Motion
    • Ultraviolet Photography
    • Forensic Photography
  • Education
    • Training Sessions
    • How To Shoot Infrared
    • AR Coated Infrared Filters
    • Lens Hot Spot Database
    • Photoshop Video Tutorials
    • Infrared Issues & Solutions
    • IR Basics in Photoshop
    • Camera Quick Start Guide
    • DIY Conversion Tutorials
    • IR Photography Primer
    • Secondhand Cameras
    • Wall Of Shame
  • Workshops
  • FAQ
  • Blog
    • Tutorials
    • Inspiration
    • Locations
    • Gear
    • News
    • Other
  • Why Choose LifePixel?
    • Submit Your Review
  • Contact
  • Shop

Building a Custom Home Studio

Share
Pin
Tweet
Email
Share


IMG_0003

Nothing is better than having your own studio.

Recently, I had a conversation with a very talented Photographer who shares my interest in Flower Photography.

During the course of our conversation, I learned  that she had a Custom Home Studio, very similar to mine.

If you love Photography, you owe it to yourself to invest in a home studio.

It IS money well spent.

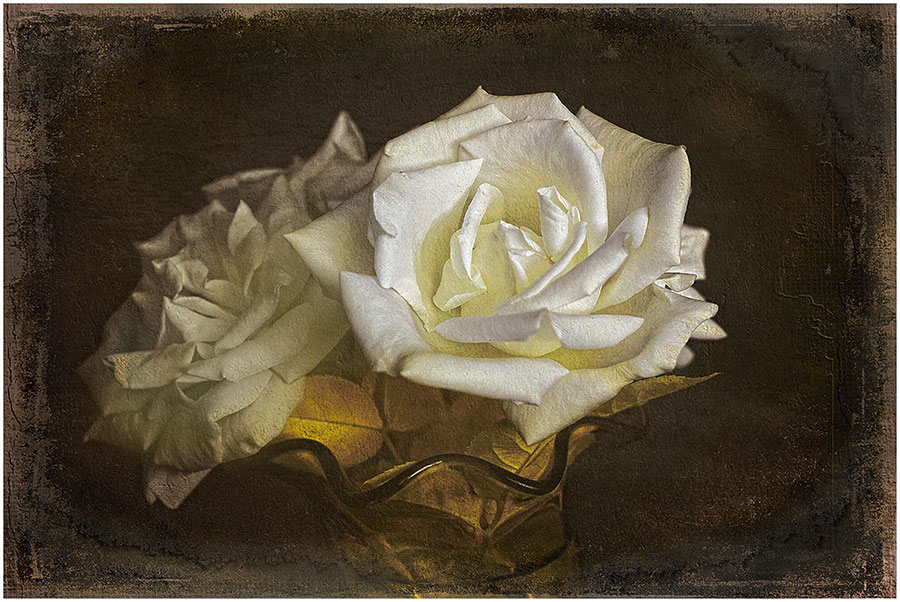
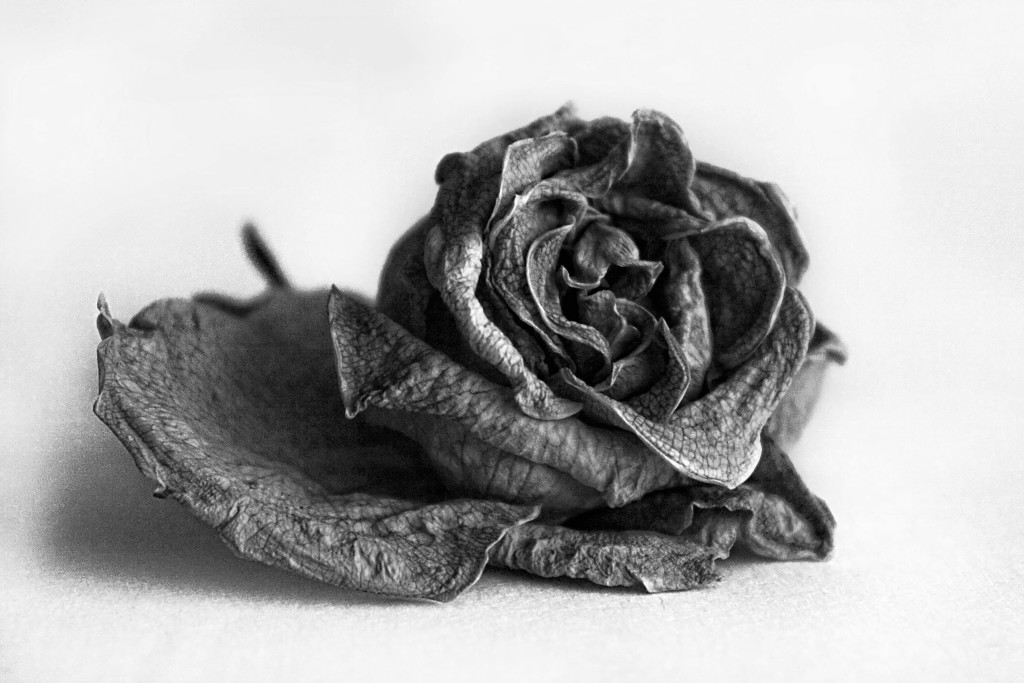
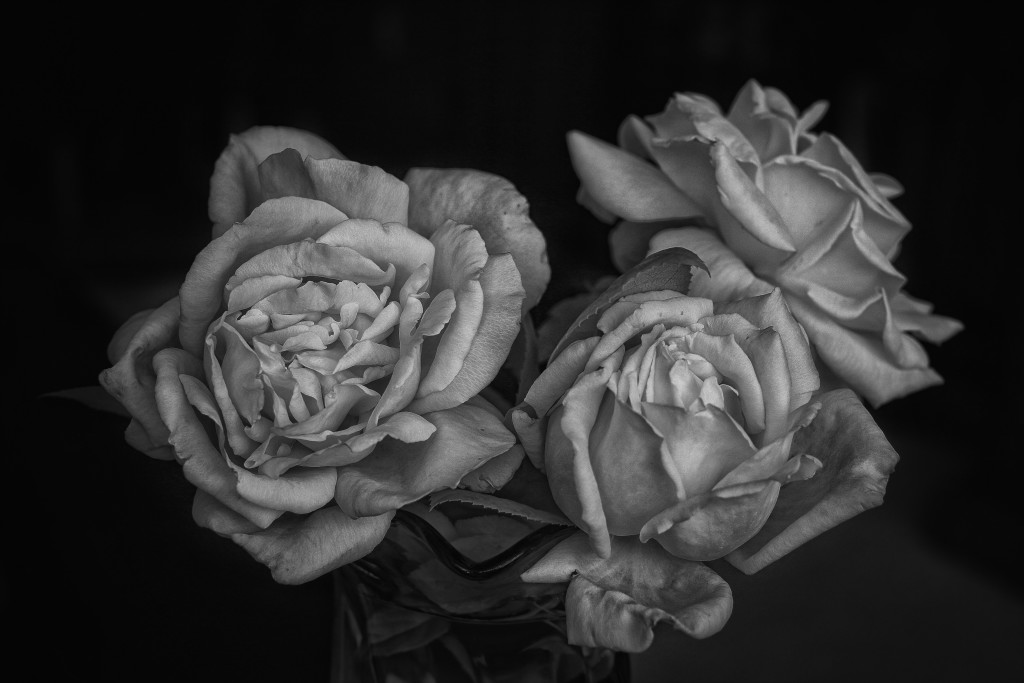
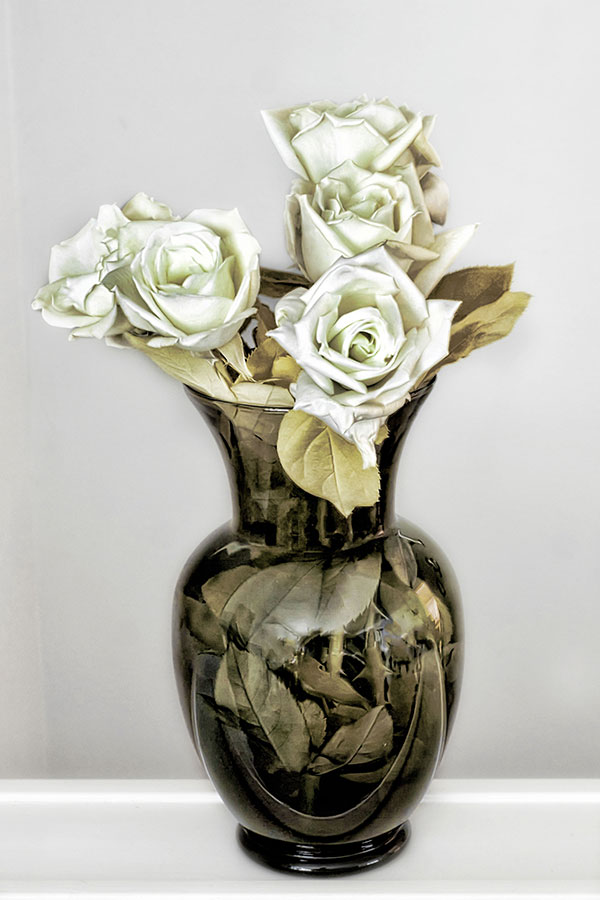
Before I show you my home studio, I would like to share some of the work I have created there.

camera

I love what I can create in my studio.

I am only limited by the amount of time I want to spend, and my imagination.

207196_202434119777672_1726897_n

Having a home studio does give you the opportunity to get your shot just right, and you can shoot no matter what the weather outside is like.

IMG_0022a1


Now, let’s take a look at my Home studio, and I will introduce you to my studio assistant.


Yes, I do have an assistant.

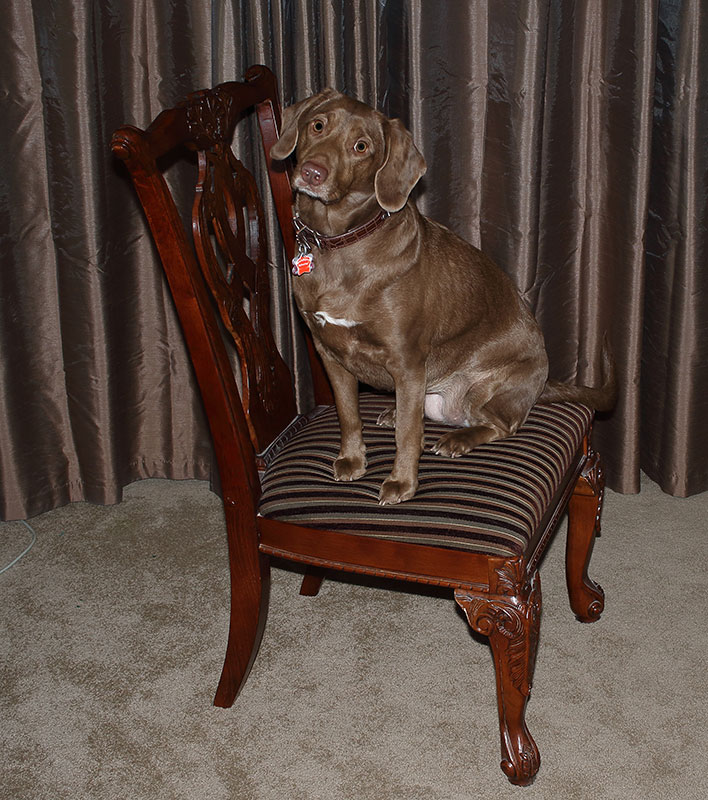
An assistant is someone who gets in your way constantly, and messes up your shot, right?

However, this IS my Home Studio.

A chair……. it’s really nice chair though.

Win a FREE Camera Conversion!

Seriously, you can get some great finished works with very little investment and minimal set up time.

This is what makes up most of my home studio.

20160321_091922


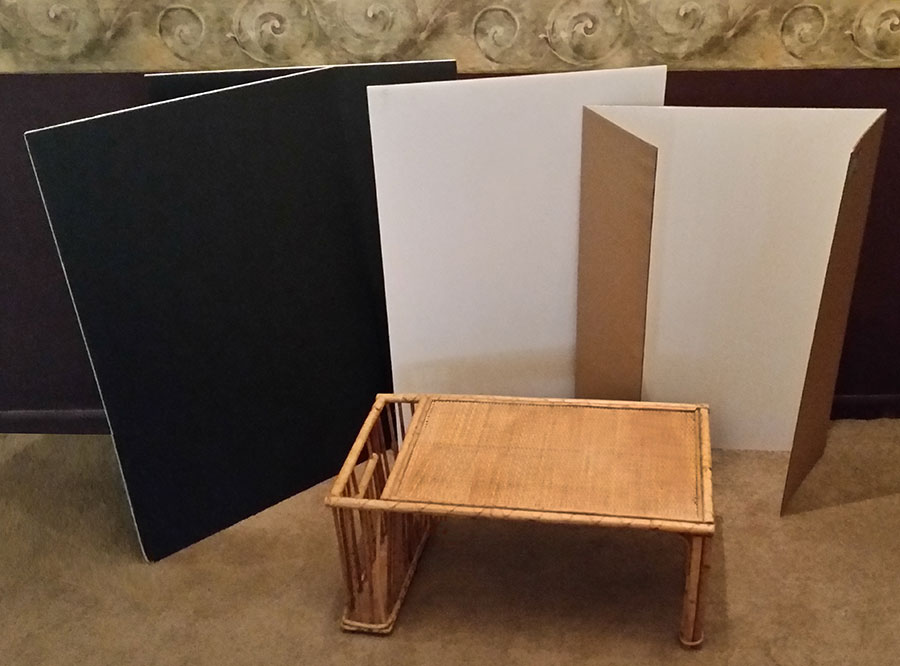
  1. White fold out presentation board.
  2. White Foam Poster board .
  3.  (2) Black Foam Poster boards
  4. Rattan … thing I got at a garage sale.

Total cost – $4.50

The tricks?

There really aren’t many.  Just set it up and shoot.


201602wb

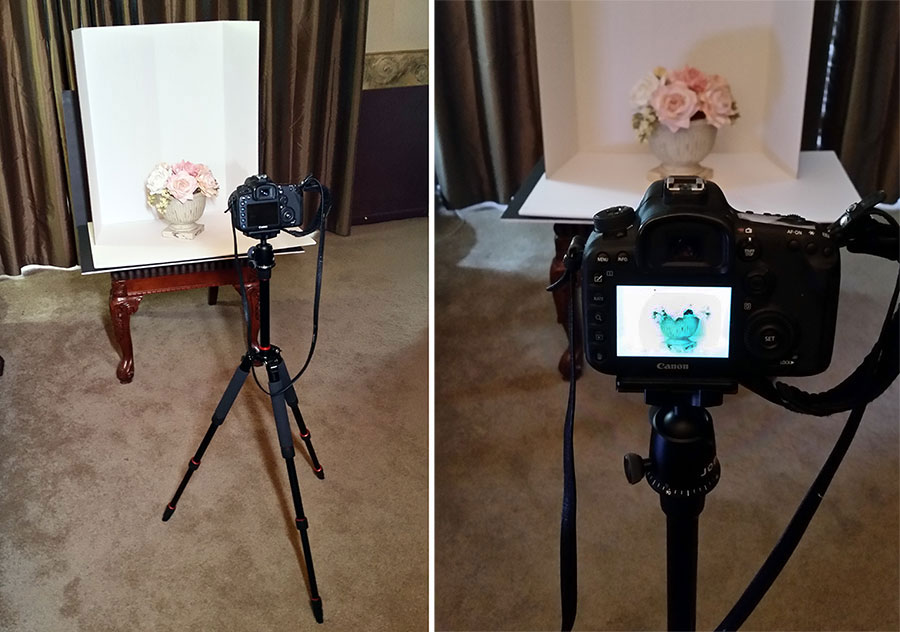
Watch your camera angles, and check for shadows.  Often using lower numbered f-stops is the way to go to narrow your depth of field.

When shooting with the rattan thing, I often go with a very narrow depth of field and just let whatever is in the background form innocuous shapes.

In post production, you clone out the corners and either lighten or darken as needed.  Adding texture layers is also a great was to jazz things up a bit


Oh, … yeah,  what about White Balance?  I’m always talking about White Balance.

You still do one.  In this case I often use the White board as a WB reference image.
wb

Depending on the available light I have, sometimes the reference images can be a bit odd.

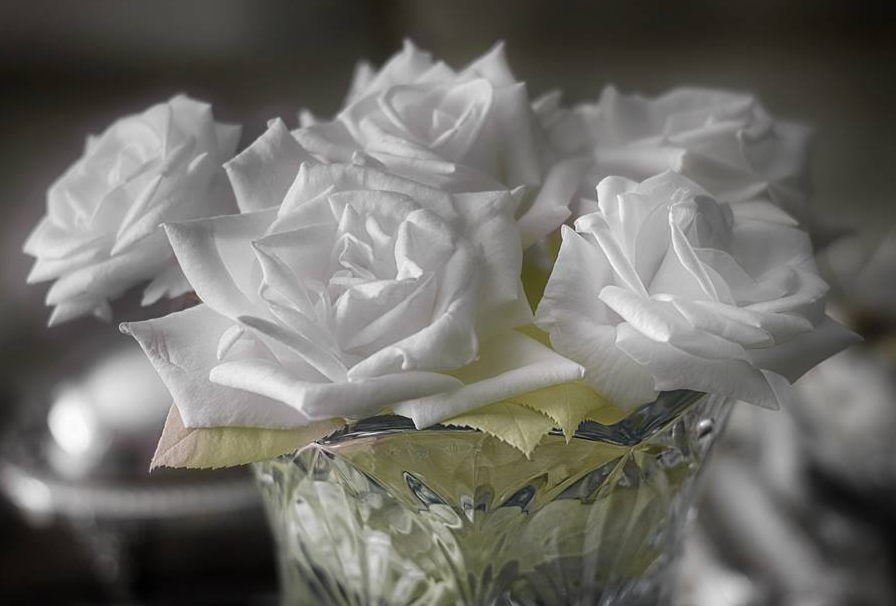
Other times, I have used a close up of a leaf  or petal when I’m shooting flowers.


Because my set up is easily moved, I can locate by windows for high key images like this.  This was shot right by a window on a very sunny day.

10484945_808307409190337_3799072923008304858_o


On the other hand, I can make the most of a darker area by simply going for a very long exposure.

IMG_0250

This was a 2 minute exposure at f 8.0 and only worked because I had my “assistant” go in the other room.

One more, this was was a set of 3 exposures used to make an Infrared HDR.


I am constantly amazed by some of the interesting items that can be used to create studio quality images.

I’ve seen many photographers get great looks using ceramic tiles.  Just be mindful of the reflective quality of the tile.

The main point here is you can get a “pro” studio look without having to spend a fortune.

So, give it a try and if you find something that works well, let me know.


  • Latest Articles
  • Author Bio
Dan Wampler

Latest articles by Dan Wampler (see all articles)

  • Seal Bay photoshoot - March 7, 2023
  • Major Copyright Infringement site Scroller.com - March 6, 2023
  • Kangaroo Island Wallabies and Roos - March 1, 2023
Dan Wampler

Dan Wampler

Dan Wampler is a digital artist from St Louis, MO. Having been interested in art and photography since childhood, he spent most of adult life working for Kodak and in the portrait photography industry. A student of the works of Ansel Adams, Any Warhol, and David Hamilton, Dan attempted to keep a wide range of artistic style.

As an early adopter of digital imaging, he found it gave him a way to completely incorporate art and photography. Began shooting Digital Infrared in 2004, and had first camera converted in 2006. His work has been seen in numerous gallery shows, is featured in an iTunes app. He produces Infrared and natural color digital art for sale and teaches his post-production techniques online.

Dan is LifePixel's Creative Director,  social media manager, lead blog author, main workshops and training sessions instructor. His images appear in this gallery and throughout the website.

If you have a topic suggestion or request feel free to shoot him an email at danwampler@lifepixel.com

Otherwise all LifePixel customer service inquires should be directed to service@lifepixel.com or by phone at 866-610-1710.

View more of Dan's work on his Website | Facebook


See All Articles by Dan Wampler
Share
Pin
Tweet
Email
Share
Share
Pin
Tweet
Email
Share

Related Posts

  • Infrared Photoshop Tutorials & Videos
    Infrared Photoshop Tutorials & Videos
  • Basic Infrared Photoshop Techniques Tutorial
    Basic Infrared Photoshop Techniques Tutorial
  • Life Pixel Modified Camera Quick Start Guide
    Life Pixel Modified Camera Quick Start Guide
  • The Wall Of Shame
    The Wall Of Shame

Filed Under: Tutorials

Comments

  1. Helen Bradshaw says

    January 2, 2022 at 11:10 am

    Hi,
    I have a very similar setup. How are you managing the shadows?

    I place my subject in front of my boards and I have a shadow appear. I adjust my camera angle. I reposition my subject differently against the light. No luck. Shadows still appear. Are you using soft boxes or other light? Or, do you take it with the shadow and remove in post processing?

    Reply
    • Dan Wampler says

      January 2, 2022 at 2:03 pm

      Hello Helen,
      I try to fill the area with as much natural light as possible, and then keep a distance between the background and the subject. I have in certain situations removed shadows in post when necessary. I hope that helps.

      Reply
      • Helen Bradshaw says

        January 2, 2022 at 3:38 pm

        Thanks for the info, Dan! I will give it a try. I think I did have the subject too close.

        Reply

Leave a Reply Cancel reply

Your email address will not be published. Required fields are marked *

Blog Topics

  • Tutorials
  • Inspiration
  • Locations
  • Gear
  • News
  • Other/Misc

What our customers say:

Life Pixel has been a life-changer for me. Continue reading
Eric GConnecticut
Read more reviews
I am more than satisfied with the service I received Continue reading
Christopher JCanada
Read more reviews
I am more than pleased with the conversion job that you did Continue reading
LOUIS MWaco, Texas
Read more reviews
I am VERY impressed with his knowledge of your products and his patience in explaining it to a novice like me. Continue reading
Lynn FEssex, Maryland
Read more reviews
Things will only get better from here thanks to all of you. Continue reading
Phillip FRedding, California
Read more reviews
The Lifepixel newsletter reminds me of not having expressed my gratitude for the excellent job you made. Continue reading
Michael GGermany
Read more reviews
Your staff went above and beyond the call of duty to make sure everything was handled in an excellent manner. Continue reading
Paige RPearland, Texas
Read more reviews
It has given my old camera a new life, I will enjoy using it again. Continue reading
William PAustralia
Read more reviews
Excellent service and the camera works just great Continue reading
Hans FairhurstAustralia
Read more reviews
I just got my converted camera back from you guys. THANK YOU!!!! Continue reading
Anne CutlerForest Knolls, CA
Read more reviews
infrared_filter_choices_sidebar
ir_conversions_explained_sidebar
----------- Watch More Videos -----------
infrared_quick_start_guide

Ready to start shooting Infrared?

Convert My Camera

Subscribe To Our Newsletter

Receive updates, tips, cool tutorials, free stuff and special discounts.

Learn the Basics

  • Video
  • Start Here
  • Filter Choices
  • Focus Calibration
  • Lens Considerations
  • Camera Considerations
  • Place Your Conversion Order

Resources

  • Galleries
  • Lens Hot Spot Database
  • IR Tutorials
  • FAQ
  • Infrared Filter Choices
  • Infrared Photography Guide
  • Infrared DIY Tutorials

Company

  • Why Choose Us
  • Get In Contact
  • Job Openings
  • Write For Us
  • Affiliate Program
  • Terms of Use
  • Privacy Policy
  • Home
  • Start Here
  • Galleries
  • Tutorials
  • FAQ
  • Blog
  • Why Choose LifePixel?
  • Shop
  • Contact

Copyright © 2025 Life Pixel Infrared - All rights reserved - LifePixel Infrared Photography IR Conversion, Modification & Scratched Sensor Repair