In the arc of becoming an infrared artist there are certain milestones along the way.
The first is that moment when you first see an IR image and your heart skips a beat. For me that was in high school when I had exhausted the photo classes available to me by junior year and my teacher, Mr. Mahar suggested an independent study course of my own design. He set me loose with the Time Life photo books and said ‘see what you like and write a proposal for a class’ I can say I was thunderstruck by the IR images I saw there and knew right away it was something I wanted to do. The second phase (in today’s digital world) is learning about the conversion options and getting a camera converted to IR. Third is overcoming the issues we all face at first with setting custom white balances and setting up camera profiles to allow those white balances to work in Photoshop or Lightroom. If you have gotten to this point give yourself a big pat on the back. Those are the most significant technical challenges you will face on your journey.
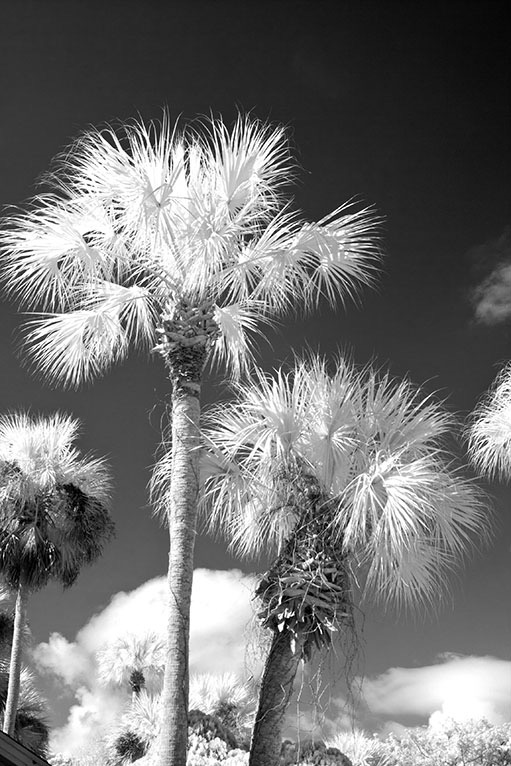
This is what I consider the jumping off point for this stage of the arc. Good control of producing a typical IR image. Not exactly cringe worthy. Exciting at first that you can get this shot. Now it is time to explore and see what you can do with IR.
If you have gotten this far it’s time to take the leap and start creating those IR masterpieces. If you are anything like I was you are overwhelmed at this point with questions like, what should I shoot? How do I want it to look? How do I know an image will look good in IR? These questions can be intimidating and cause you to stall a little that is ok. I’ll shed a little light on what to do next. At this point I should mention I will not be talking about my editing workflow in this article. That will be for another article. Editing is a personal process built up by trial and error over time. We are going to talk about shooting specifically for IR.
Learning to see and shot for IR is the same process you had to go thru when you first picked up a camera and decided to get better at photography. So think back to that time. Think about the awful pictures you made at first. I am talking about the ones you were proud of at the time that you now cringe at a little when you see them. You know the ones. We all have them. It was part of learning to see and be a photographer. If you just read the last few sentences and are ready to give up because that process was tough and you had to claw your way through rounds of shooting and editing and things would click slowly at first and then faster and faster as you put it all together, then stop and take a deep breath because I have great news. The brain is really amazing at learning how to learn and you have already taught it how to learn this stuff. You will pick this up faster this time and have amazing results soon. You already know how to compose a great image hopefully and are a whiz at using the histogram so you don’t need to learn that stuff.
So, by way of reminder what are those steps needed to get you to the point where you can see a scene and see it in IR in your head or at the very least know it will make a great IR photo.
1. Take a lot of IR photos. I mean a lot.
2. Take note of the time of day you took them. Generally I shoot IR in the middle of the day into the afternoon. The exact time I don’t shoot color image.
3. Bracket your exposures at first. The histogram can be tricky for IR so be on the safe side until you know how to get the exposure you want.
4. Be a chimp. This is the only time I will tell you to look at previews of all your images but seeing the results and correcting on the fly when you are in this phase will greatly increase the speed at which you learn the quirks of exposure of IR.
5. When you get an image you really like study it carefully. What is it that works you will discover the basic rules of photography apply and are there to be broken. just as in traditional photography.
6. Study the EXIF info. Your digital camera records everything about the settings you used. Look at that info on the images that really work. Look for patterns.
7. Repeat often this ramp up period will be very satisfying as you start to make better and better images more often.
8. Edit your images in B&W and false color. Get a sense for what you prefer to use to tell your story.
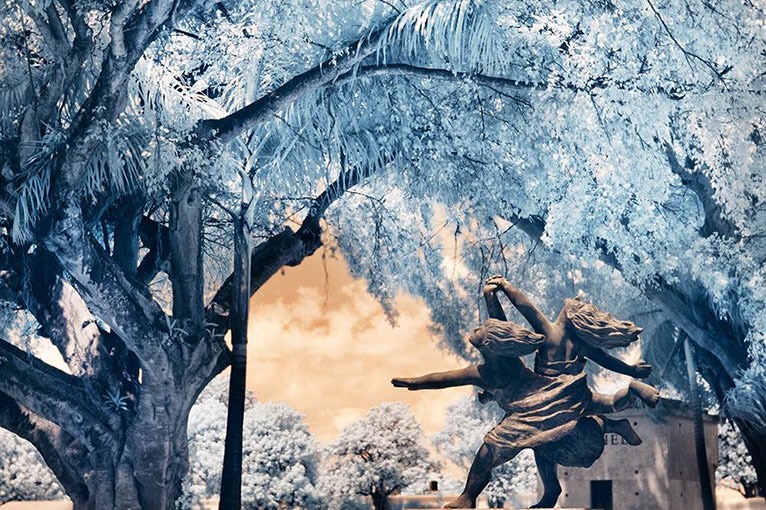
Here we see solid growth and an image I look at and am proud of. It brings together all of my photographic skills to make an interesting image and ultimately you want to make an image that is interesting to the viewer and not merely technically correct.
In closing I offer a tip and way to think of IR while you are out there shooting new images. First the tip. The power of the almost negative image look of IR nature photos is enhanced by adding man made elements that do not have a different look. So in that photo of a tree and grass against the sky that will present as a very dark sky and an almost snowy scene include that stone wall or building in the photo. It helps ground the image and give the viewer a home base in reality. As for the way to think of IR while you are shooting. Think of yourself as a painter using all new colors. You already know how to use the tools. It is not a whole new medium. You are not suddenly trying to be a sculptor. The beauty of IR is that it has a different look and you can find all new ways to express yourself. Soon you will add it to your arsenal of tools and use it interchangeably with your regular photography.
Latest articles by Carl Stoveland (see all articles)
- You Have Solved The Dreaded White Balance Issue… Now What? - December 9, 2016
Carl Stoveland
Carl Stoveland is a professional photographer and photo educator living and working in South Florida. He teaches workshops and private lessons on a variety of photo and editing subjects. His Website is http://
See All Articles by Carl Stoveland


Leave a Reply